


UIKit for all UI matters. UIKit is the framework that forms the core components of all iOS applications. Among all the classes in the UIKit, view and view controllers are the most commonly used classes.View controllers (UIViewController) play a crucial role in your apps — they act as the skeleton of your application. A view controller is basically a class that manages a set of views (to display to the user), while coordinating with model (data) objects.
Because the view controller is connected to your Storyboard (an external file), it has very little control of what’s happening on the view side of things (and vice versa). You may be familiar with this — connect an event in your Interface Builder to a function in your code in Swift and then later on you delete the function. However, the Interface Builder doesn’t know that your function is now gone, and all hell will break loose when that event is invoked during runtime. This problem is precisely what SwiftUI tries to resolve.
The various widgets — such asButton, Label, TextField, and Switch — are represented by the subclasses of UIView.
This article discusses how to use UIKit within a SwiftUI project, but the converse is also true — you would also want to use SwiftUI in an existing UIKit project. Note that after you add SwiftUI to your UIKit project, your apps will only run on iOS 13.0 and later, macOS 10.15 and later, tvOS 13.0 and later, and watchOS 6.0 and later.
The image below shows aUIViewController instances containing a number of UIView instances.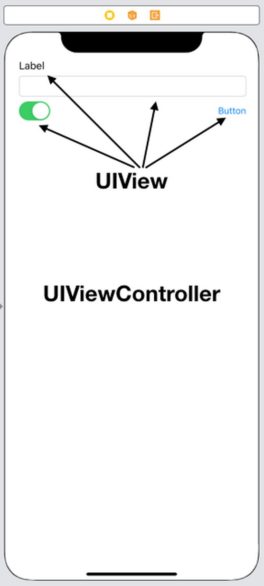 Legacy View controller and views.
Understanding the UIKit View Controller life cycle
In order to handle the various states of a view controller, a view controller has a set of events, known as the life cycle of a view controller. The life cycle of a view controller has a variety of events, including (but not limited to) the following:viewDidLoad: Called after the controller’s view is loaded into memoryloadView: Creates the view that the controller managesviewWillAppear: Notifies the view controller that its view is about to be added to a view hierarchyviewDidAppear: Notifies the view controller that its view was added to a view hierarchyviewWillDisappear: Notifies the view controller that its view is about to be removed from a view hierarchyviewDidDisappear: Notifies the view controller that its view was removed from a view hierarchydidReceiveMemoryWarning: Sent to the view controller when the app receives a memory warning
import UIKitThe various events are fired during the lifetime of the view controller. For example, you often initialize your variables during theclass ViewController: UIViewController {
override func viewDidLoad() { super.viewDidLoad() }
override func loadView() { super.loadView() }
override func viewWillAppear(_ animated: Bool) { super.viewWillAppear(animated) }
override func viewDidAppear(_ animated: Bool) { super.viewDidAppear(animated) }
override func viewWillDisappear(_ animated: Bool) { super.viewWillDisappear(animated) }
override func viewDidDisappear(_ animated: Bool) { super.viewDidDisappear(animated) }
override func didReceiveMemoryWarning() { super.didReceiveMemoryWarning() } }
viewDidLoad event (it fires only once when the view controller is first loaded). If you needed to update the view whenever the view controller appears, you would perform the updates in the viewDidAppear event (fired every time the view comes to the foreground). Or if you need to build the UI dynamically during loading time, you can do it in the loadView event.
Understanding the SwiftUI view life cycle
Compared to theUIViewController life cycles, the life cycle of a view in SwiftUI is much simpler and more straightforward. In SwiftUI, there is no concept of a view controller. Instead, everything is a View.In SwiftUI, View has only two events:
-
onAppearonDisappear
Working with the onAppear and onDisappear events in SwiftUI
When a view appears, theonAppear event will be fired. Likewise, when the view disappears, the onDisappear event will be fired.Let’s illustrate the use of the onAppear event:
  func fetchData() {
        ...
    }    var body: some View {
        List(articles, id: \.url) { item in
            VStack(alignment: .leading) {
                Text(item.title)
                    .font(.headline)
                Text(item.description ?? "")
                    .font(.footnote)
            }
        }.onAppear(perform: fetchData)
    }
When the List view first appears, it will fire the onAppear event, which you then use to call the fetchData() function to load data from the web. For that example, it’s quite straightforward to understand when the onAppear event fires.A more involved example would be one comprising a NavigationView and a TabView. The following image shows an example where the ContentView contains a TabView, which in turn also contains a NavigationView.
 Three views in SwiftUI embedded within NavigationView and TabView.
The following Swift code snippet shows the implementation of the three views that you’ve just seen. To understand when the onAppear and onDisappear events are fired when the user moves from one screen to another, you insert print statements, as shown in the following code:
import SwiftUIWhen the app is first loaded, you see the following outputs:struct View1: View { var body: some View { Text("View1") .onAppear{ print("onAppear in View1") } .onDisappear{ print("onDisappear in View1") } } }
struct View2: View { var body: some View { Text("View2") .onAppear{ print("onAppear in View2") } .onDisappear{ print("onDisappear in View2") } } }
struct ContentView: View { var body: some View { TabView { NavigationView{ NavigationLink(destination: View1()) { Text("Next") } }.onAppear{ print("onAppear in ContentView") } .onDisappear{ print("onDisappear in ContentView") } .tabItem { Image(systemName: "viewfinder.circle.fill") Text("ContentView") }
View2() .tabItem { Image(systemName: "camera.viewfinder") Text("View2") } } .onAppear{ print("onAppear in TabView") } .onDisappear{ print("onDisappear in TabView") } } }
onAppear in TabView
onAppear in ContentView
You can see that
TabView first appeared, followed by ContentView. When you click the Next button, it navigates to View1.The following statement in bold shows the additional statement printed:
onAppear in TabView
onAppear in ContentView
<strong>onAppear in View1</strong>
Even though
ContentView is now hidden, it hasn’t disappeared yet (because there is no output indicating its disappearance).Now, click the Back button to go back to ContentView. This time, you see the following additional output:
onAppear in TabView
onAppear in ContentView
onAppear in View1
<strong>onDisappear in View1</strong>
So
View1 has disappeared. Click the View2 item on the tab bar. View2 is now loaded.Here’s the output:
onAppear in TabView
onAppear in ContentView
onAppear in View1
onDisappear in View1
<strong>onDisappear in ContentView</strong>
<strong>onAppear in View2</strong>
Now
ContentView has disappeared and View2 appears.Finally, click ContentView item on the tab bar and notice that View2 has disappeared and ContentView has appeared again:
onAppear in TabView
onAppear in ContentView
onAppear in View1
onDisappear in View1
onDisappear in ContentView
onAppear in View2
<strong>onDisappear in View2</strong>
<strong>onAppear in ContentView</strong>
As you can see from the example, the
onAppear event allows you to know when a view comes onscreen. This is useful in cases where you want to load data on demand. Suppose you have a tabbed application with five tab items and each of these tab pages separately loads data from the web. It would be useful to load the data only when the user views a particular page. Otherwise, the entire iOS app would feel sluggish when it tries to load all the data at the same time when the app starts up.
Instantiating properties of a view in SwiftUI
Besides understanding when the two events are fired, it’s also important to understand how SwiftUI processes aView when it’s created and the sequences in which properties and binding objects are processed.You may already know that the View is a struct. Very often, views have properties, which allows you to pass in additional information to customize the behaviors of views.
Consider the following simple example of a View named MyView:
struct MyView: View {    var greetings: String    var body: some View {
        Text(greetings)
    }
}
In the MyView struct, you have a property named greetings. It is of type String, but it hasn’t been initialized yet.When you try to use MyView, as in the following code snippet,
struct ContentView: View {
    var body: some View {
        VStack{
            MyView("Hello, World!")
        }
    }
}
You get the error: Missing argument label 'greetings:' in call. This is because you need to initialize the value of the greetings property in MyView, which is the first thing the compiler tries to do when instantiating the struct.To fix this, pass in the argument for the greetings property when calling MyView, like this:
MyView(greetings: "Hello, World!")
Using initializers in a SwiftUI view
Structs can also have initializers (constructors). If MyView has an explicit initializer, like the following:struct MyView: View {
var greetings: String init(_ str:String) {
self.greetings = str
}
var body: some View {
Text(greetings)
}
}
Then greetings must be initialized via the initializer for MyView:
MyView("Hello, World!")
Using binding variables in a SwiftUI view
IfMyView has a @Binding variable, like this:
struct MyView: View {    @Binding var text: String    var greetings: String
    var body: some View {
        Text(greetings)
    }
}</pre
Then you have to initialize it through the parameters:
struct ContentView: View {
    @State var text: String = ""
    var body: some View {
        MyView(greetings: "Hello, World!", text: $text)
    }
}
Note that the binding variable argument must come after the greetings argument.
MyView has an explicit initializer, you have to specify the type of the Binding object in your initializer, like this:
struct MyView: View {    @Binding var text: String    var greetings: String    init(_ str:String, _ text: Binding) {
        self.greetings = str
        self._text = text
    }    var body: some View {
        Text(greetings)
    }
}
Observe that the text @Binding variable has an underscore (_) in the initializer:
self._text = textAnd now when you create an instance of the MyView struct, you can bind the state variable through the initializer, like this:
MyView("Hello, World!", <strong>$text</strong>)
Want to learn more? Check out these SwiftUI resources.


