


 The dock and all its default icons
Icons in the dock and Launchpad are odd ducks; you activate them with a single click. Most other Finder icons are selected (highlighted) when you single-click and opened only when you double-click them.
So, dock icons (and their Launchpad brethren) are kind of like links on a web page; you need only a single click to open them.
Here’s the rundown on what happens when you click dock icons:
- If it’s an application icon, the application opens and becomes active. If the application is already open, it becomes active, which brings its menu and all its windows to the front.
- If it’s a document icon, that document opens in its appropriate application, which becomes the active application. If that application is already open, it becomes the active application with this document in the front.
- If the item is an application or document and is already open when you click its dock icon, the app or document becomes active.
- If it’s a folder icon or disk icon, a stack, fan, or grid with its contents appears so you can choose an item. If you choose Show in Finder from this menu, the folder’s window opens in Finder.
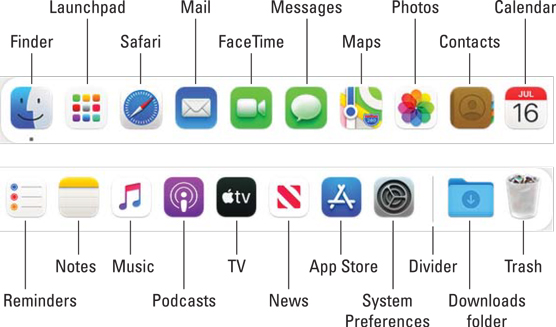
The default icons of the dock
By default, the dock contains a number of commonly used macOS applications, and you can also store your own applications, files, or folders there.But first, look at the items you find in a standard macOS Big Sur dock. If they aren’t familiar to you, they certainly will be as you get to know Big Sur.
I admit that I can’t do justice to all the programs that come with macOS Big Sur that aren’t, strictly speaking, part of the operating system (OS). Alas, some of the programs in the default dock are ones you won’t be seeing much more of. But I’d hate to leave you wondering what all those icons in the dock are, so the following list gives you a brief description of each default dock icon (moving from left to right onscreen).
- Finder: The always running application that manages the desktop, files, folders, disks, and more
- Launchpad: A display of all your applications on a grid that looks suspiciously like an iPad or iPhone
- Safari: A web browser
- Mail: An email program
- FaceTime: A video chat program
- Messages: A program for sending and receiving text and multimedia messages as well as transferring files to and from and remotely controlling other Macs
- Maps: A program with maps and driving directions
- Photos: A program for managing and editing photographs
- Contacts A contact manager application
- Calendar: A calendar program for managing appointments and events
- Reminders: A to-do list and reminder application
- Notes: A program for making notes
- Music: An audio player and store
- Podcasts: A podcast player
- TV: A video player and store
- News: A news reader
- Mac App Store: Where you buy Mac apps from Apple
- System Preferences: An application to configure the way many aspects of your Mac work
- Divider: The line that separates apps on the left and documents or folders on the right
- Downloads folder: A folder that contains files downloaded by Safari or Mail
- Trash: Where you drag files and folders to delete them, or drag removable media to eject it
To get a quick look at the name of a dock icon, just move (hover) your pointer over any item in the dock. Like magic, that item’s name appears above it (like Safari).
It’s likely that your dock won’t look exactly like the one shown. If you added icons to your dock before you upgraded to Big Sur, for example, you’ll see those icons. If you have Apple apps such as iMovie, GarageBand, Pages, Numbers, or Keynote installed, or you get a new Mac with Big Sur preinstalled, you may see their icons in your dock. And if you’ve deleted one of the default icons shown in the preceding figure from your dock under a previous version of macOS, it won’t come back when you upgrade to Big Sur.Trash talkin’
The Trash is a special container where you put the icons you no longer want to hang around on your hard drive(s). Got four copies of a document named Letter to the Editor re: Bird Waste Issue on your hard drive? Drag three of them to the Trash. Tired of tripping over old PDF and DMG files you’ve downloaded but no longer need? Drag them to the Trash, too.To put something in the Trash, just drag its icon onto the Trash icon in the dock and it will move into the Trash. As with other icons, when the Trash icon is highlighted you know that you’ve connected with the Trash while dragging. And as with other dock icons, the Trash icon’s name appears when you move the cursor over the icon.
Two other ways to put items into the Trash are to select the items you want to dispose of and then choose File→ Move to Trash or press Command +Delete (Command +Backspace on some keyboards).
If you accidentally move something to the Trash and want it back right now, you can magically put it back where it came from in two ways:
Way #1
Choose Edit → Undo or press Command +Z. Finder usually remembers more than one action for Undo and can often undo the last few things you did in Finder. That’s the good news. The bad news is that it redoes things in reverse order, so don’t wait too long. If you perform several other file-related activities in Finder, you’ll have to Undo all those actions before you can Undo your accidental Move to Trash.In other words, as soon as you create or rename a folder, move a file from one place to another, drag a different file to the Trash, create an alias, or almost anything that affects a file or folder, choosing Edit → Undo or pressing Command +Z will undo that action first.
You’ll find that some Finder actions — most of the items in the View menu, for example — don’t affect Undo. So, if you drag a file to the Trash and then switch views, Undo will still un-trash the file.
Even if you do something and can’t use Undo, files you drag to the Trash aren’t deleted immediately. You know how the garbage in the can on the street curb sits there until the sanitation engineers come by and pick it up each Thursday? Big Sur’s Trash works the same way, but without the smell. Items sit in the Trash, waiting for a sanitation engineer (you) to come along and empty it.
Way #2
So, if you miss the window of opportunity to use the Undo command, don’t worry; you can still retrieve the file from the Trash:- To open the Trash and see what’s in there, just click its icon on the dock. A Finder window called Trash opens, showing you the files it contains (namely, files and folders put in the Trash since the last time it was emptied).
- To retrieve an item that’s already in the Trash, drag it back out, either onto the desktop or back into the folder where it belongs.
Or use the secret keyboard shortcut: Select the item(s) in the Trash that you want to retrieve and press Command +Delete. This technique has the added benefit of magically transporting the files or folders you select from the Trash back into the folder from which they came. And, unlike Undo, the secret keyboard shortcut will work on a file or folder at any time, or at least until the next time you empty the Trash. Try it — it’s sweet.
And if that doesn’t work, you can right-click or Control-click a file and choose Put Back from the contextual menu.- To empty the Trash, choose Finder →Empty Trash or press Shift+Command +Delete. If the Trash window is open and files are in the Trash, you see an Empty button just below its toolbar on the right. Clicking the button, of course, also empties the Trash.
Think twice before you invoke the Empty Trash command. After you empty the Trash, the files that it contained are pretty much gone forever, or at least gone from your hard drive. There is no Undo for Empty Trash. So my advice is: back up your hard drive at least once (several times is better). After you get proficient at backups, chances improve greatly that even though the files are technically gone forever from your hard drive, you can get them back if you really want to (from your backups).
The Trash icon shows you when it has files waiting for you there; as in real life, Trash that contains files or folders looks like it’s full of crumpled paper. Conversely, when your Trash is empty, the Trash icon looks, well, empty.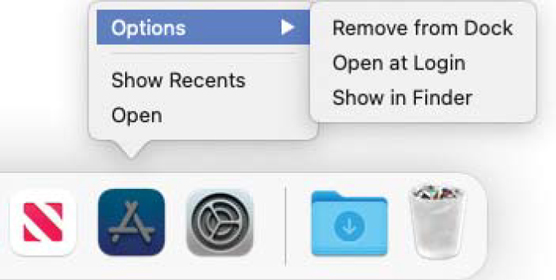 The Options menu for an application icon (Mac App Store) on the dock
Finally, although you can’t open a file that’s in the Trash, you can select it and use Quick Look (shortcut: Command +Y) to see its contents before you decide to use Empty Trash and permanently delete it.
And that’s pretty much all there is to know about the Trash.
Application menus on the dock
Single-clicking an application icon on the dock launches that application — or, if the application is already open, switches you to that application and brings forward all open windows in that application.But application icons on the dock — such as Calendar, Safari, and Music — also hide menus containing some handy commands. (Folder icons in the dock have a different but no less handy menu, which I discuss in a moment.)
You can make menus for applications on the dock appear in two ways:
- Press on the icon and continue to hold down the mouse button.
- Right-click or Control-click.
If you use a trackpad or a Magic Mouse, a two-finger tap should do the trick.
Do any of the preceding and you’ll see a menu for that dock icon, as shown in the figure for the App Store icon.The Options submenu offers three choices:
- Remove from Dock: Removes that application’s icon from the dock (waiting until after you quit the application if it’s running). If an application is running and its icon isn’t already in the dock, you’ll see Add to Dock rather than Remove from Dock.
- Open at Login: Launches this application automatically every time you log in to this user account. This is handy for apps you want to keep running all the time, such as Mail or Safari.
- Show in Finder: Opens the enclosing folder (in this instance, that would be the Applications folder) and selects the application’s icon.
- Show Recents (if available): Displays recently used windows for this app if there are any.
- Open: Launches the application or opens the folder.
One last thing: When you right-click/Control-click the dock icon for an application that’s currently running (look for the little dot below its icon), you may see different menus, like the ones shown (clockwise from top left: Safari, Preview, System Preferences, TextEdit, and Music).
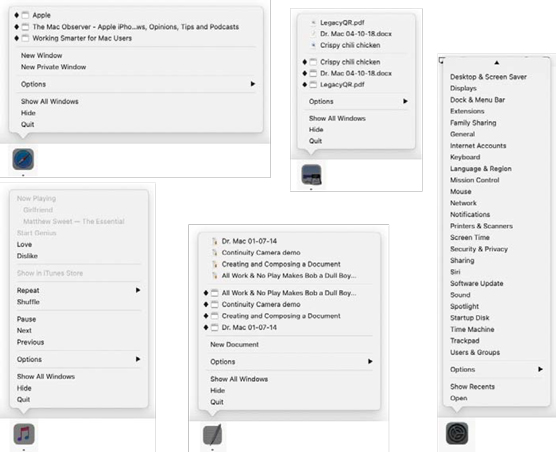 Press and hold down or right-click/Control-click an open application’s dock icon, and menus such as these appear.
As you can see, some open applications provide useful program-specific commands or options.
Music has one of my favorite dock menus, letting me control my music from the dock with options such as Play/Pause, Next or Previous Track, Repeat, and Shuffle.
Other programs, including Preview and Safari, offer you a list of open windows with a check mark to indicate the active window or diamonds (as shown) to indicate windows minimized to the dock.Finally, the items above the list of open windows for TextEdit are recently used documents.
Dock icon body language
As you use the dock or when you’re just doing regular stuff on your Mac, the dock icons like to communicate with you. They can’t talk, so they have a few moves and symbols that indicate things you might want to know. The following figure and the table should make those moves and symbols crystal clear. The Safari dock icon at rest (left) and caught doing the bouncy dance (right)
| Icon Movement or Symbol | What It Means |
| The icon moves up and out of its place in the dock for a moment. | You single-clicked a dock icon, and it’s letting you know that you activated it. |
| The icon does a little bouncy dance when that program is open but isn’t active (that is, the menu bar isn’t showing, and it isn’t the frontmost program). | The program desires your attention; give its icon a click to find out what it wants. |
| A dot appears below its dock icon. | This application is open. |
| An icon that isn’t ordinarily in the dock magically appears. | You see a temporary dock icon for every program that’s currently open until you quit that application. The icon appears because you’ve opened something. When you quit, its icon magically disappears. |
Open files from the dock
One useful function of the dock is that you can use it to open an application quickly and easily. The following tips explain several handy ways to open what you need from the dock:
- You can drag a document icon onto an application’s dock icon. If the application knows how to handle that type of document, its dock icon is highlighted, and the document opens in that application. If the application can’t handle that particular type of document, the dock icon isn’t highlighted, and you can’t drop the document onto it.
I’m getting ahead of myself here, but if the application can’t handle a document, try opening the document this way: Select the document icon and choose File --> Open With, or right-click/Control-click the document icon and use the Open With menu to choose the application you want to open the document with. And if you hold down the Option key, the Open With command changes to Always Open With, which enables you to change the default application that opens this document permanently.
- You can find the original icon of any item you see in the dock by choosing Show in Finder from its dock menu. This trick opens the window containing the item’s actual icon and thoughtfully selects that icon for you.

