


- HDR Backlight Control mode: This mode, which you access through the SCN setting on the Mode dial, captures three images at different exposures and blends them for a final result that contains a greater tonal range (range of shadows to highlights) than can be captured in a single frame. It’s easy to use, but like all the fully automated modes, it prevents you from accessing the other exposure, color, and focus options available in the advanced exposure modes.
- Highlight Tone Priority: This option, explained next, takes a single shot but in a manner that renders highlights better without losing shadow detail.
- HDR mode: Like HDR Backlight Control mode, this mode captures three images at three different exposures and blends the three into a single image. The difference is that you have control over how much exposure varies between frames in this mode.
Enabling Highlight Tone Priority
This feature is turned off by default, which may seem like an odd choice given the improvements it can make to a scene. What gives? The answer is that in order to do its thing, Highlight Tone Priority needs to play with a few other camera settings, as follows:- The minimum ISO is raised to ISO 200–16000 (you cannot expand the ISO). The camera needs the more limited range in order to favor the image highlights. Losing the highest ISO is no big deal — the noise level at that setting can make your photo unattractive anyway. But in bright light, you may miss the option of lowering the ISO to 100 because you may be forced to use a smaller aperture or a faster shutter speed than you like.
- Auto Lighting Optimizer is disabled. This feature, which attempts to improve image contrast, is incompatible with Highlight Tone Priority.
- Shadows may exhibit slightly more noise. Again, noise is the defect that looks like speckles in your image.
 Enable Highlight Tone Priority from Shooting Menu 3.
As a reminder that Highlight Tone Priority is enabled, a D+ symbol appears near the ISO value in the Shooting Settings display. The same symbol appears in the viewfinder and LCD panel. Notice that the symbol that represents Auto Lighting Optimizer is dimmed because that feature is automatically disabled when you turn on Highlight Tone Priority.
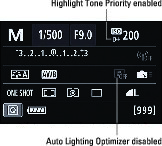 These symbols indicate that Highlight Tone Priority is enabled and Auto Lighting Optimizer is disabled.
Exploring automated HDR photography
HDR mode works similarly to the HDR Backlight Control Scene mode: The camera automatically records three images at different exposures and then blends the three to create a photograph that contains a broader range of shadows and highlights than could be captured with a single exposure.Another option when shooting a high-contrast interior/exterior scene is to use flash to light the interior instead of using HDR mode. Assuming that the exterior is beyond the reach of the flash, it will be exposed by the ambient light. The problem, as in this case, is that the flash light can be reflected in windows, doors, and in other reflective subjects.
You can take advantage of HDR mode in P, Tv, Av, M, C1, or C2 exposure modes. (B mode won't work.) Take these steps:- Select JPEG as the file format (Image Quality). HDR mode is off limits when Raw shooting is enabled. (You can change the Image Quality setting via Shooting Menu 1 or the Quick Control screen.)
- Make sure the following features are turned off:
- AEB (automatic exposure bracketing, Shooting Menu 2)
- White Balance bracketing (Shooting Menu 2)
- Multi Shot Noise Reduction (High ISO Speed NR option, Shooting Menu 3)
- Multiple Exposure (Shooting Menu 3)
- Choose HDR Mode from Shooting Menu 3 to display the HDR Mode menu.
 Set up your HDR shooting session via Shooting Menu 3.
 - Specify the way you want the HDR frames to be recorded via the options shown on the right in the image above.
The options work as follows:
- Adjust Dyn Range: Select this option to display the menu. Here, you specify how you want the camera to adjust exposure between frames. At the Auto setting, the camera analyzes the scene and makes the call for you. Or you can specify that you'd like a 1-, 2-, or 3-stop exposure between frames.
 You can specify an exposure shift between frames of up to three stops.
 - Effect: Select an effect. You can choose between Natural (the default), Art Standard, Art Vivid, Art Bold, or Art Embossed. Each setting varies the saturation, outlines, brightness, and tone of the final image by a different amount.
- Continuous HDR: By default, the camera captures just one HDR image and then returns to normal shooting. If you want to record a series of HDR images, set the option to Every Shot instead of 1 Shot Only. The camera remains in HDR mode until you disable the feature.
- Auto Image Align: This feature, when enabled, analyzes your three captures and then fiddles with them to ensure that the images are aligned as closely as possible. Turn this option on when you’re handholding the camera; when you use a tripod, disable it. When this feature is enabled, the resulting image area may be slightly less than what you saw through the viewfinder because the camera may need to crop the image slightly in order to align the images. The cropped image is then stretched to fill the frame.
- Adjust Dyn Range: Select this option to display the menu. Here, you specify how you want the camera to adjust exposure between frames. At the Auto setting, the camera analyzes the scene and makes the call for you. Or you can specify that you'd like a 1-, 2-, or 3-stop exposure between frames.
- Exit the menu, frame, focus, and shoot. After you release the shutter button, the camera records and blends the three images. The three separate images aren't preserved; you get only the single HDR version.
 This symbol tells you that HDR Mode is enabled.
Note a few more caveats related to this feature:
- Enabling HDR mode disables certain other functions. Specifically, Auto Lighting Optimizer, Highlight Tone Priority, and Live View exposure simulation are unavailable, and the available ISO range tops out at ISO 16000 even if you have selected a higher maximum for the ISO range.
- Flash is unavailable. Even if the built-in flash is raised, it won’t fire in HDR mode.
- Moving subjects may appear blurry. The problem occurs if the subject moves within the frame as the three images are being captured. So this feature, as with the HDR Backlight Control mode, is best reserved for stationary subjects.


