


- Ambience Priority Auto retains a little of the warm color cast that can occur when you shoot in incandescent lighting. The idea is that the warming of colors is usually flattering to skin tones, which makes people happier with portraits they shoot by indoor light. At any rate, this setting produces the same results that Auto mode delivered in previous versions of Canon dSLR cameras, which is why it's the default setting for the P, Tv, Av, and M exposure modes and also used for all other exposure modes except Food.
- White Priority Auto eliminates the warm color cast created by incandescent lighting. In other words, this setting produces the results that most people expect from Auto mode, which is an accurate rendition of colors. Whites appear white instead of slightly yellow, for example. This mode is used by the Food scene mode, which is part of the reason that Food mode makes your meal look "bright and appetizing," per the Canon instruction manual.
If you use flash, though, the White Priority deal is off. Even if the Auto option is set to White Priority, the camera uses the same color-compensating formula as it does in Ambience Priority mode. Oh, and just to confuse matters more, the settings displays still indicate that White Priority is in effect.
The good news is that in most cases, the Auto setting you select won't make a whit of difference. Again, it only tweaks colors if you're shooting in incandescent lighting. Even then, how much your picture is affected depends on your subject, the intensity of the incandescent light, and whether any other lights that have different color temperatures are also hitting the subject.In this image, the orchid was lit only by incandescent light, so the Ambience Priority example (left image) does have warmer colors than the White Priority example (right image). Yellow parts of the petals became more so, and the white and red areas take on a slight golden cast as well. But sometimes, it's difficult to detect any difference between the results of the two settings.
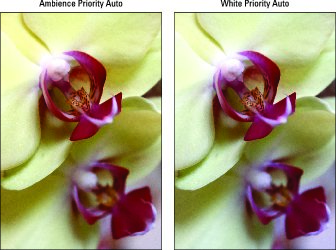 When you shoot in incandescent light, the Ambience Priority Auto setting may result in warmer colors than the White Priority Auto setting.
To specify which priority you want the Auto setting to use, first select Auto from the White Balance setting screen, as shown on the left below. You can get to this screen by pressing the WB button (viewfinder shooting only) or by displaying the Quick Control screen, highlighting Auto, and pressing the Set button. Then press the DISP button to bring up the screen shown on the right.
Notice the label at the bottom of the left screen; it reminds you to use the DISP button to access the AWB adjustment screen. After you get to the adjustment screen, called Detail Settings (huh?), highlight your choice and press Set. You're returned to the main settings screen; press Set again to exit to the Quick Control screen. To return to shooting, press the shutter button halfway and release it.
 With the Auto setting selected, press the DISP button to access the control for setting the Auto mode to White Priority or Ambience Priority.


