


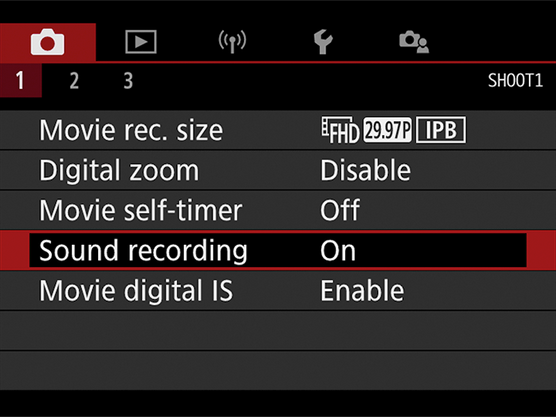
In Scene Intelligent Auto and other Basic Zone modes on your Canon EOS Rebel T8i, you have limited control over the audio portion of your movie: You can choose to record sound or disable audio recording. Make your preferences known through the Sound Recording option on Shooting Menu 1.
 In Scene Intelligent Auto and other Basic Zone exposure modes, your only control over audio is to enable or disable sound recording.
When you set the camera to P, Tv, Av, or M exposure mode, you get a larger set of audio recording options. To explore them, choose Sound Recording from Shooting Menu 1, as shown on the left below, to display the screen shown on the right.
 In P, Tv, Av, and M exposure modes, you have a few more audio options.
If you’re new to sound recording on your Canon camera, explore the next few sentences to discover the audio meter at the bottom of the right screen. An audio meter provides guidance about the sound level being picked up by the microphone. Stereo audio contains two channels, left and right, so you see a volume meter for each channel. Note that although the built-in Canon mic is a stereo mic, you can’t control the channels individually, so both meters always reflect the same data when you record on your Canon camera using that microphone.
Audio levels are measured in decibels (dB). Levels on the volume meter range from—40 (very, very soft) to 0 (as loud as can be measured digitally). The goal is to set the audio level so that sound peaks consistently in the -12 range. The indicators on the meter—the notches that run horizontally across the L and R bars of the meter—turn yellow in this range. The extra space beyond that level, called headroom, gives you both a good signal and a comfortable margin of error. But if the sound is too loud, the volume indicators peak at 0, with the last notch on the meter turning red, warning you that the audio may be distorted.
With Audio Meters 101 out of the way (was that the easiest class ever, or what?), here’s the rest of what you need to know about the three options on the Sound Recording settings screen on your Canon EOS Rebel T8i:- Sound Rec.: You get three choices:
- Auto: At the default setting, Auto, the camera adjusts sound volume automatically. You may want to open the menu screen and take a look at the audio meter before you begin recording to make sure that the sound levels aren’t too high or too low at the Auto setting.
- Disable: Choose Disable to record a video without sound. When this setting is in force, a microphone and the word Off appear at the top of the Live View screen, as shown in the left screen below.
- Manual: Select Manual if you want to set the audio recording levels yourself and also to gain access to the additional settings described next. When you opt for this setting, a minimalist version of an audio meter appears in the lower-left corner of the Live View screen, as shown on the right below.
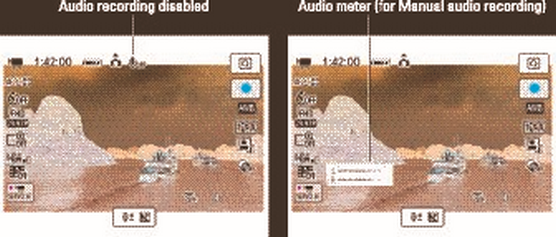 When sound is disabled, you see the microphone symbol highlighted on the left; when Manual recording is in force, an audio meter appears, as shown on the right
- Rec. Level: This option—the one bordered by the red selection box on the left below—enables you to adjust the audio level after you switch to manual volume control. The volume scale to the right of the option name shows the current setting; to make an adjustment, tap the option name or highlight it and press Set. You see the screen shown on the right below. To change the volume level, tap the triangles at the end of the scale or rotate the Quick Control dial. As you do, a white marker appears atop the scale to indicate the new level; the blue marker, the original level. Tap Set or press the Set button to return to the Sound Recording menu screen.
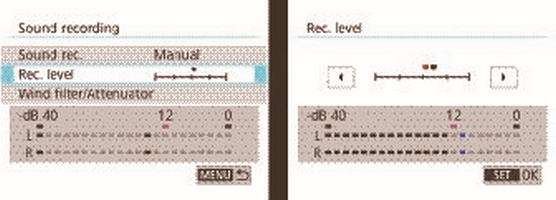 Select Rec. Level (left) to open the screen where you can adjust the audio recording level (right).
- Wind Filter/Attenuator: Regardless of whether you select Auto or Manual as your Canon’s Sound Recording method, you also can enable or disable the following two features. Choose Wind Filter/Attenuator from the main Sound Recording screen (left screen above) to access the features. They work as follows:
- Wind Filter: Ever seen a newscaster out in the field, carrying a microphone that looks like it’s covered with a big piece of foam? That foam thing is a wind filter. It’s designed to lessen the sounds the wind makes when it hits the microphone. You can enable a digital version of the same thing via the Wind Filter option. By default, the Wind Filter is set to Auto, and the camera decides whether to apply it and at what strength.Essentially, the filter works by reducing the volume of noises that are similar to those made by wind. The problem is that some noises not made by wind can also be muffled when the filter is enabled. So when you’re indoors or shooting on a still day, keep this option set to Disable. Also note that when you use an external microphone, the Wind Filter feature has no effect.
- Attenuator: This feature is designed to eliminate distortion that can occur with sudden loud noises. Experiment with enabling this feature if you’re shooting in a location where this audio issue is possible.
The internal microphone may pick up sounds made by the camera’s autofocusing system, especially if you use an older lens. (Newer Canon lenses offer quieter autofocusing operation.) The best solution is to use an external microphone for your Canon camera or lock in autofocusing before you start recording.


