


In Blender's Edit mode, the cube changes color, and dots form at each of the cube's corners. Each dot is a vertex. The line that forms between two vertices is an edge. A face in Blender is a polygon that has been formed by three or more connecting edges.
In the past, faces in Blender were limited to only three-sided and four-sided polygons, often referred to as tris (pronounced like tries) and quads. Since the last edition of this book, Blender — like many other programs — gained support for something called an ngon that can have a virtually limitless number of sides. But don't let Blender's ngon functionality go to your head. There still are some limitations and caveats.
Generally, you should think of ngons as a "process" tool. With some exceptions, like architectural models, a finished model should only consist of just three- and four-sided faces. In fact, most detailed character models are made almost completely with quads and an occasional triangle, and all 3D geometry is reduced to triangles when it gets to your computer hardware.
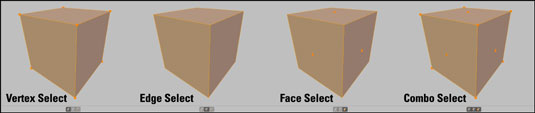
For polygon editing, you can use three different types of Edit modes, sometimes called selection modes: Vertex Select, Edge Select, and Face Select. By default, the first time you tab into Edit mode, you're in Vertex Select mode.
Two visual cues in the Blender interface clue you in to what selection mode you're using. First, for Vertex Select mode, you can see the individual vertices in the mesh. Second, as the figure shows, three new buttons appear in the 3D View's header when you're in Edit mode. The button on the left (it has an icon of a cube with an orange dot over one corner) is enabled, indicating that you're in Vertex Select mode.
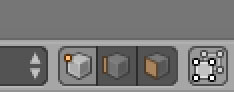
To the right of the Vertex Select button is a button displaying an icon of a cube with a highlighted edge. Click this button to activate Edge Select mode. When you do, the vertices are no longer visible on your mesh. Clicking the last button in this block, which has an icon of a cube with one side marked in orange, activates Face Select mode. When Face Select mode is active, vertices aren't visible, and each polygon in your mesh has a square dot in the center of it.
Now, you may notice that these buttons are blocked together, kind of like the 3D manipulator buttons. So, as with the manipulator, can you simultaneously activate multiple modes? Absolutely! Simply Shift+left-click the Select mode buttons to get this function. Some Blender modelers like to have Vertex Select and Edge Select modes active at the same time to speed up their workflow.
This combined selection mode gives them immediate control at the vertex and edge level, and you can easily select the faces by using Blender's Lasso select (Ctrl+left-click+drag) across two edges. This figure shows the default cube in each of the select modes, as well as a Combo Select mode.
Of course, you can also use a hotkey sequence to access the various select modes. While you're in Edit mode, if you press Ctrl+Tab, you see a menu that lets you switch between modes. This menu doesn't let you set multiple modes; for combo selection, you still have to use the buttons in the 3D View's header.
Also, by default, the first time you tab into Edit mode, all vertices/edges/faces are selected. Selecting things in Edit mode works just like selecting anywhere else:
Right-click any vertex to select it.
Select and deselect multiple vertices by Shift+right-clicking them.
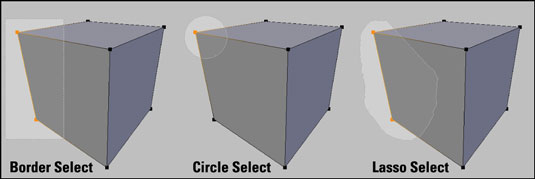
Select large groups of vertices by using the Border Select tool (B), Circle Select (C), or Lasso Select (Ctrl+left-click+drag).
In Border and Circle Select, left-click and drag your mouse cursor to add to your selection. For Border Select, this action draws a box to define a selection area.
Circle Select is sometimes called Brush Select because selection is like painting. Any vertices that you run your mouse cursor over while holding down the left mouse button are selected.
Middle-click and drag to subtract from your selection and right-click or press Esc to exit Border or Circle Select.
To use Lasso Select functionality, Ctrl+left-click and drag your mouse cursor around the vertices you want to select. Anything within that selection region is added to your selection.
And, of course, all these selection tools work in Edge and Face Select modes, as well as in Object mode. This figure shows what the various selection tools look like when in use.
If you want to select everything (in Object mode, all objects; in Edit mode, all vertices in the active object), you can do so by pressing A. The A hotkey is a toggle, so anything previously selected when you press A is deselected. However, if nothing is previously selected, pressing A selects everything. Using this hotkey, you'll find yourself pressing A until you have either everything or nothing selected.
If you're using Blender's default settings, you can't see through your model. You can't select the vertices, edges, and faces on the back side of the model unless you orbit the 3D View to see those vertices or drop into the wireframe viewport shading setting. (Toggle between wireframe and solid by pressing Z.)
On occasion, however, you may find it useful to see (and select) those hidden vertices while in solid viewport shading. To do so, click the Limit Selection to Visible button, sometimes referred to as the Occlude Background Geometry button. Located to the right of the Selection Modes block in the 3D View's header, this button has an icon of a cube with white highlighted vertices on it.
By default, the Limit Selection to Visible button is enabled, but you can click this button to reveal the vertices, edges, and faces on the back of your model. The hiding of those rear vertices is often referred to as backface culling, and it's incredibly useful when you're working with complex models. Keep it enabled and just temporarily switch to wireframe viewport shading (Z) if you need to quickly see or select those backface vertices.
If you have the Pie Menus add-on enabled, pressing Z doesn't work as a toggle between solid and wireframe views. Instead, pressing Z presents a pie menu with all of the potential shading options available. Like the mode-switching pie menu bound to Tab, this isn't quite as fast as a straight toggle, but it's still pretty fast while also giving you quick access to other viewport shading styles.
