


It would be torture to have to examine every PowerPoint slide to make sure it is consistent with the others. In the interest of consistency, PowerPoint offers master styles and master slides. A master slide is a model slide from which the slides in a presentation inherit their formats. A master style is a format that applies to many different slides. Starting from a master slide, you can change a master style and in so doing, reformat many slides the same way. These pages explain how master slides can help you quickly redesign a presentation.
Switching to PowerPoint’s Slide Master view
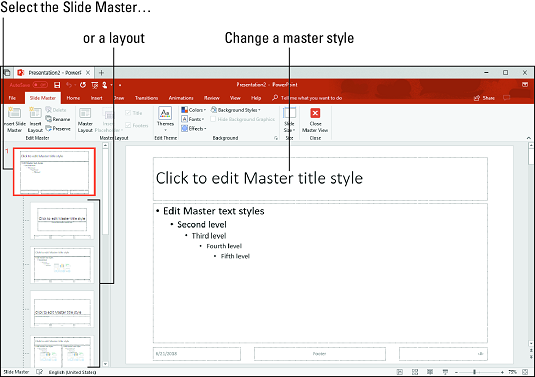
To work with master slides, switch to Slide Master view. From this view, you can start working with master slides:- Go to the View tab.
- Click the Slide Master button.
 In Slide Master view, you can reformat many different slides simultaneously.
In Slide Master view, you can select a master slide in the Slides pane, format styles on a master slide, and in this way reformat many different slides. (Click the Close Master View button or a view button such as Normal or Slide Sorter to leave Slide Master view.)
Understanding PowerPoint’s master slides and master styles
Master slides are special, high-powered slides. Use master slides to deliver the same formatting commands to many different slides. Whether the commands affect all the slides in your presentation or merely a handful of slides depends on whether you format the Slide Master (the topmost slide in Slide Master view) or a layout (one of the other slides):- The Slide Master: The Slide Master is the first slide in the Slides pane in Slide Master view. It’s a little bigger than the master slides, as befits its status as Emperor of All Slides. Formatting changes you make to the Slide Master affect all the slides in your presentation. When you select a theme for your presentation, what you’re really doing is assigning a theme to the Slide Master. Because formatting commands given to the Slide Master apply throughout a presentation, the theme design and colors are applied to all slides. If you want a company logo to appear on all your slides, place the logo on the Slide Master.
- Layouts: As you know, you choose a slide layout — Title and Content, for example — on the New Slide drop-down list to create a new slide. In Slide Master view, PowerPoint provides one layout for each type of slide layout in your presentation. By selecting and reformatting a layout in Slide Master view, you can reformat all slides in your presentation that were created with the same slide layout. For example, to change fonts, alignments, and other formats on all slides that you created with the Title layout, select the Title layout in Slide Master view and change master styles on the Title layout. Each layout controls its own little fiefdom in a PowerPoint presentation — a fiefdom comprised of slides created with the same slide layout.
- Master styles: Each master slide — the Slide Master and each layout — offers you the opportunity to click to edit master styles. The master style governs how text is formatted on slides. By changing a master style on a master slide, you can change the look of slides throughout a presentation. For example, by changing the Master Title Style font, you can change fonts in all the slide titles in your presentation.
In Slide Master view, you can move the pointer over a layout thumbnail in the Slides pane to see a pop-up box that tells you the layout’s name and which slides in your presentation “use” the layout. For example, a pop-up box that reads “Title and Content Layout: used by slide(s) 2-3, 8” tells you that slides 2 through 3 and 8 in your presentation are governed by the Title and Content layout.
Editing a master slide in PowerPoint 2019
Now that you know the relationship among the Slide Master, layouts, and slides, you’re ready to start editing master slides. To edit a master slide, switch to Slide Master view, select a master slide, and change a master style. To insert a picture on a master slide, visit the Insert tab.See this article to find out how to remove pictures from a PowerPoint slide background.
Changing a master slide layout in PowerPoint 2019
Changing the layout of a master slide entails changing the position and size of text frames and content frames as well as removing these frames:- Changing size of frames: Select the frame you want to change, and then move the pointer over a frame handle on the corner, side, top or bottom of the frame and drag when you see the double-headed arrow.
- Moving frames: Move the pointer over the perimeter of a frame, click when you see the four-headed arrow, and drag.
- Removing a frame from the Slide Master: Click the perimeter of the frame to select it and then press Delete.
- Adding a frame to the Slide Master: Select the slide master, and on the Slide Master tab, click the Master Layout button. You see the Master Layout dialog box. Select the check box beside the name of each frame you want to add and click OK.
