


Many laptops and some desktop computers offer a touchscreen, which lets you control any Office 2019 program by using your fingers instead of a keyboard and mouse. In any Office 2019 program, click the Draw tab to see the touchscreen drawing options. The Draw tab displays touchscreen drawing tools.
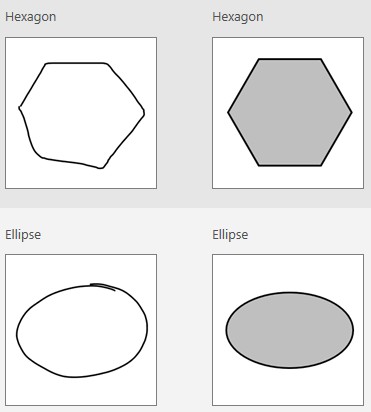 Office 2019 can convert a crude shape into a perfectly formed shape.
The Draw tab displays touchscreen drawing tools.
Drawing in Office 2019
Although each Office 2019 program offers slightly different drawing tools, the basic drawing commands follow:- Drawing lines
- Moving lines
- Erasing lines
Drawing lines in Office 2019
You might want to draw a line in a document to draw an arrow pointing to specific item or to draw a circle or box around important text or pictures. When drawing a line in Office 2019, you can specify a color and line thickness. You can draw a line by using a mouse, a trackpad or your finger on a touchscreen.If you’re drawing on a touchscreen, click the Mouse/Touch icon on the Quick Access bar to toggle between the Mouse and Touch screen mode.
To draw a line in Office 2019, follow these steps:
- Click the Draw tab.The Draw tab appears on the Ribbon.
- Click the Draw icon.
- Click a Pen icon.Drag the mouse or press your finger on the touchscreen to draw a line in your document.
Moving lines in Office 2019
Office 2019 treats lines as separate objects that you can select and drag to a new location. So after you’ve drawn a line in a document, you can move that line to another part of a document.To move a line in Office 2019, follow these steps:
- Click the Draw tab and make sure the Draw or Eraser icons are not selected.If the Draw or Eraser icon appears selected, click that icon to deselect it.
- Move the mouse pointer over the line you want to move.When the mouse pointer appears directly over a drawn line, it turns into a four-way pointer.
- When the four-way pointer mouse icon appears, click the line.Office 2019 displays a box with handles.
 Handles appear to outline the shape of the a line.
 - Move the mouse pointer over the box and drag it to a new location.
- When you’re happy with the new location of the line, release the mouse button.
You can resize the line by dragging a box handle. If you drag the mouse pointer over the rotate handle at the top of the box, you can rotate a line in a document.
Erasing lines in Office 2019
After you’ve drawn a line on a document, you can erase that line later. If you’ve drawn an object made out of multiple lines, you can erase each line individually.To erase a line in Office 2019, follow these steps:
- Click the Draw tab.
- Click the Eraser icon.
The Eraser icon appears selected.
- Move the mouse pointer over the line you want to erase.
- Click the left mouse button.Office 2019 erases the line under the mouse pointer.
Drawing shapes in Office 2019
If you try drawing with your finger on a touchscreen or by using a mouse or trackpad, you may find it difficult to create perfectly formed shapes such as ovals or rectangles. That’s why Office 2019 offers a special Ink to Shape feature that lets you draw a rough outline of the shape and then converts the outline to a perfect shape.To draw a shape in Office 2019, follow these steps:
- Click the Draw tab.
- Click the Ink to Shape icon.The Ink to Shape icon appears selected.
- Click the Draw icon.The Draw icon appears selected.
- Draw a shape using your finger on a touchscreen or your mouse or trackpad.When you've finished drawing, Office 2019 displays a perfectly formed shape such as an oval, a square, or an arrow.
Office 2019 can convert a crude shape into a perfectly formed shape.
Creating Math Equations in Office 2019
One particularly interesting use for Office 2019’s new Draw tab is to make it easier to write mathematical equations and formulas. Typing mathematical equations by drawing on a touchscreen with your finger is far easier than typing them on a keyboard or writing them by using the mouse.To draw mathematical equations and have Office 2019 turn them into text in a document, follow these steps:
- Click the Draw tab.Move the cursor where you want the mathematical equation to appear.
- Click the Ink to Math icon.A Math Input Control dialog box appears.
 The Math Input Control dialog box lets you draw a mathematical equation
 - Draw your mathematical equation in the Write Math Here box.As you draw your mathematical equation, Office 2019 displays what the equation will look like as text.
- Click the Insert button.Office 2019 adds your mathematical equation at the cursor’s current location.
