


Here, you learn ten productivity tips available in Microsoft 365 Business. Use these tips as part of your adoption campaign to drive usage of the service and to reduce support calls to your IT team. You can confidently share these tips to your end users knowing that your organization's data is protected and managed.
Pay attention to the notifications in Microsoft 365 Admin Center. Be on the lookout for new features so you stay on top of additional productivity tips that you can share with your end users.
Pick up where you left off in Microsoft Word
Let's say you start reading a Word document in your office and then realize you have to shut down your computer to get to a doctor's appointment. You arrive at your doctor's office and are told to wait in the reception area until someone is ready to see you. Disappointed that the magazines available are unappealing, you’re relieved to remember that you have your smartphone — and the doctor's office allows the use of mobile devices.You whip out your smartphone, run the Word mobile app, which is registered with your Office 365 account and voila! The last document you were reading back in your office is listed in the Recent documents list. You start reading the document, and close it when you're done. You are still waiting for the doctor, so you look at your Word app again and see that a list of documents has been shared with you and needs your attention. You open one to start editing, and then your name is called. No worries. You'll probably have time to finish editing the document after you get to the inner waiting room.
Share Office 365 documents with confidence
Securely sharing documents with other members in your organization from a mobile device is similar to sharing a document from a desktop. Microsoft has invested heavily in making the mobile experiences in Office 365 as seamless as possible, so that your productivity — on a desktop or a mobile device — doesn't take a hit.Suppose that you are on your way to work and get an email from your project manager asking you to quickly put together a presentation for your project team's kickoff meeting. While sitting on the bus on the way to work, you figure you can use the 30-minute commute to do something productive. So you run the PowerPoint app on your phone and start creating your presentation. You finish the presentation and save it to your OneDrive folder, but you then realize that one slide needs your project manager's input.
You look at the time and notice that you have five more minutes before reaching your destination. You go back to your presentation and tap the Share icon, tap the Invite People button, and enter your project manager's email address. Because the app defaults to Edit access, you go directly to the message area to type a quick message, asking your project manager for input. You tap the Send button and then tap Done. The system sends an email to your project manager with a secure link to the document so she can start editing.
Ten minutes later, off the bus and walking into your office, your project manager sees you. Perplexed, she looks at you and asks: “Didn't I just email you an hour ago? How did you manage to get that presentation in my inbox before you even arrived at work?” You cast a glance at your hero, the IT admin sitting nearby.
Co-author documents with Microsoft 365 Business anytime, anywhere
It happens. You finalize a document and send it to a bunch of people, and then you realize that you need to change one key bit of information in the document. So what do you do? You email everyone back, telling them to ignore your previous email and that you'll be sending an updated version of the document. The problem is, a few people had already replied with their own updated versions, so now you have to consolidate their feedback into the updated document and then send the document back to everyone. All the while, you're hoping you don't end up in an email tree nightmare where people just keep emailing their own new versions of the document back and forth.Fortunately, you don't need to live in that nightmare. If you start using the co-authoring features of the Office applications in your Microsoft 365 Business subscription, everyone on your team can work on the same document — making edits and updates and seeing each other's comments — in real time! The co-authoring features of Office also work seamlessly in the mobile app versions.
Catch someone's attention easily with Microsoft 365
In social media such a Facebook or Twitter, @mentions are a great way to tag people and let them know you want their attention. You simply type @ followed by the name of the person you want to tag. As you're typing the name, a list of suggestions is presented, so you don't have to type the entire name.Well, guess what? @mentions are now part of your Office suite! In Outlook, for example, you can @mention a co-worker in the body of an email or in a meeting invitation, and the system will automatically add the mentioned user in the To line of the email or meeting invitation.
As in Facebook, when you @mention someone, the full name is added automatically to the message. If you want to make the message sound more like the way you would normally relate to your co-worker, you can delete a portion of the mention, so it displays only the first name, for example. Don't worry, the email address in the To line will stay intact.
If you find that a lot of people are trying to get your attention with @mentions, you can filter your mailbox to display only the emails where you were @mentioned. To do this, click the arrow next to All in the message list, and then click Mentioned Mail. This feature works in both the Windows and Mac versions of Outlook.
Figure out whodunnit with Microsoft Word
Office 365 co-author documents in real time with multiple people. This feature is great because you're all dealing with a single source of truth. But what happens if you one day open a document and realize someone has deleted an entire paragraph you painstakingly wrote the day before?Well, you could email everyone and ask the culprit to fess up. Or you can go the stealth route and simply view the version history of the document to see a log of the different versions that have been saved along with the name of the person who saved it and a time stamp of when the version was saved. You can even open the previous version of the document and restore it.
To display the version history in Microsoft Word, click the filename in the top bar and then click Version History. The Version History pane appears on the right of the screen, providing quick access to the versions of the document and the name and icon of the version author.
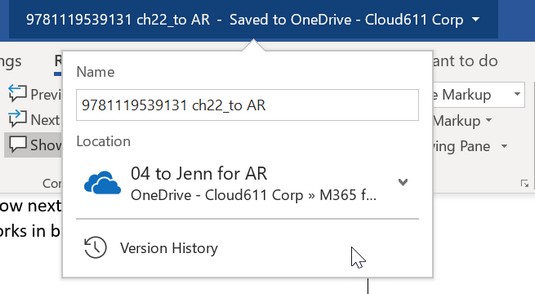 Accessing the version history from Microsoft Word.
In the web version, click the History icon at the top right to display the Version History pane.
This feature not only improves productivity but also promotes harmony when used correctly!
Blur your background in Microsoft Teams
Imagine being on a live interview broadcast worldwide discussing the ramifications of the impeachment of a South Korean president when your toddler crashes your interview by walking into your home office and starts dancing. Now imagine the situation getting even worse when your infant child in a walker waddles into the room, followed by your panicked spouse trying to drag both kids out of the room. Well, this did happen, and it made for a hilarious viral video back in March of 2017 when Professor Robert Kelly was interviewed by BBC.The new Blur My Background capability in Microsoft Teams avoids this scenario. If you schedule a meeting with Teams, click the More Options (…) button, and then click Blur My Background, everything behind you will be subtly blurred.
Imagine how much more productive you're going to be now that you know you can skip the commute, have video-conferencing meetings from your home office, and look professional without worrying about your kids or dog coming in during your meeting and becoming distractions. Chances are Professor Kelly would love this feature. But then again, if his hilarious interview hadn't happened, he wouldn't have inspired the folks at Microsoft to add this feature.
Design like a pro by with PowerPoint’s AI support
Let's face it. Not all of us have been gifted the talent to create presentations that pop and capture people's attention. Unless you're one of those creative ones, creating a TED-worthy presentation is out of reach.There's good news for all of the design-challenged individuals out there! With the help of artificial intelligence (AI), creating PowerPoint presentations that have the touch of a highly paid marketing guru is now achievable.
In the desktop or web version of PowerPoint, start a new presentation. Just plug in the details you want to convey in your slide and don't worry about the look and feel. When you're finished, go to the Design tab on the ribbon, and click the Design Ideas button. The AI technology in Office 365 automatically generates some design ideas for you to choose from.
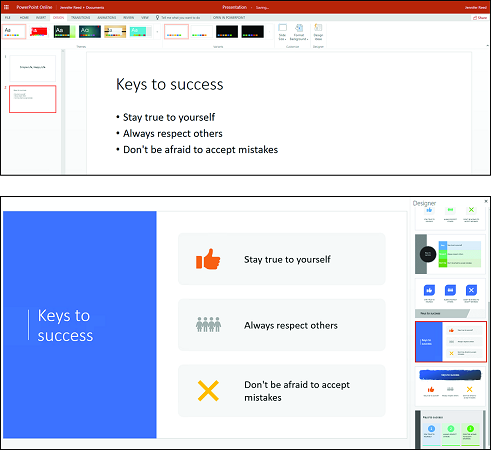 The Design Ideas feature in PowerPoint.
Talk instead of type with Office 365
As a cloud service, Office Apps in Office 365 gets smarter over time. Machine learning and artificial intelligence enable Office applications such as Word, Excel, PowerPoint, and Outlook to adapt to how you work, saving you time and even improving your writing skills.One of these intelligence services is the Dictate feature, which allows you to dictate text instead of typing. In Microsoft Word, the Dictate button is on the Home tab on the ribbon. If you're using Outlook, start a new email, go to the Message tab and then click the Dictate button. When the Dictate icon turns red, you can start talking. As you talk, text appears in your document. Just make sure your microphone is enabled and you're talking clearly and conversationally.
You can insert punctuation by saying the name of the punctuation. For example, at the end of the sentence, say “period” or “question mark” or “exclamation mark.” If you want to start a new paragraph, say, “new paragraph.”
What are you waiting for? Give it this Microsoft 365 feature a try!
Go hands-free with Office 365 Read Aloud
Productivity in Office 365 is designed to meet the needs of people all over the world with different abilities. Dictate, Tell Me, which gives quick access to commands without cycling through the different tabs on the ribbon, and Accessibility, which works seamlessly with screen readers, are just a few of the features in Office 365 that drive productivity and promote inclusion in the workplace.Yet another nifty feature you'll find in Office applications is the Read Aloud feature in Word. Although touted as one of the capabilities in the Learning Tools in Office especially useful for people with dyslexia, The Read Aloud feature is great for proofreading because it highlights the text as each word is read.
A bonus for people whose first language is not English, the Read Aloud feature is also a great tool for learning how words are pronounced.
Give this feature a try and see if you can incorporate it into your workflow. The Read Aloud button is in the Review tab in Microsoft Word.
Happy reading aloud!
Time travel with Windows Timeline
Have you ever found yourself wasting 30 minutes looking for a document that you worked on a few days ago but can't remember where it was saved? Or going through your browsing history to find a search you did for a renovation project?If you've had that unpleasant experience, you’ll be happy to know that you don’t need to waste time in that fashion again. The Timeline feature in Windows 10 helps you reclaim that lost productivity by enabling you to see all your activities during up to 30 days in one screen.
The image below shows a screenshot of the Windows Timeline. The slider bar on the right allows you to go to different points in time and see your activity. You can also use the Search box to do a keyword search of your activities.
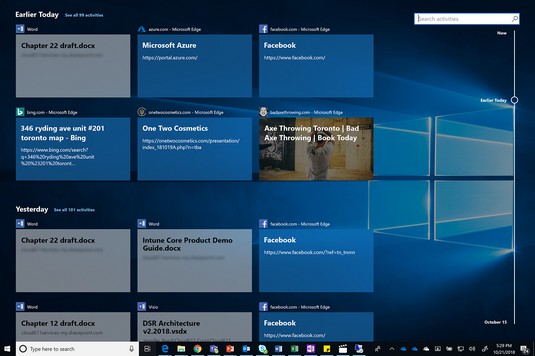 Windows Timeline feature.
To activate the Windows Timeline feature, click the Task View button next to the Cortana search bar, or press the Windows and tab keys.
So go ahead and pick up where you left off with Windows Timeline. You may not be able to go back in time, but at least you can always go back in the Timeline!
