


Next, select the customer from the Customers & Jobs list (which appears along the left edge of the window). QuickBooks whips up a page that lists transactions for the customer. It also shows the customer’s contact information. This figure shows the Customer Center information for a customer.
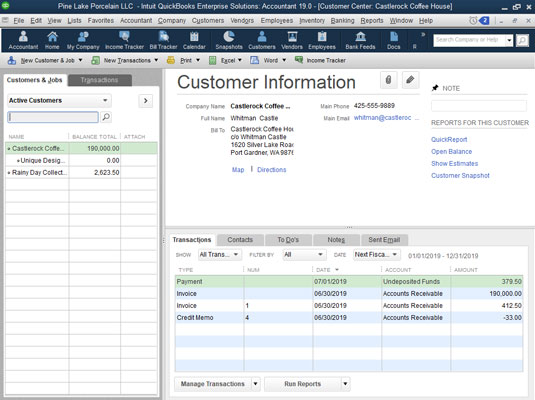 The Customer Center window
You also should be aware that QuickBooks provides several nifty accounts receivable (A/R) reports. You get to these reports by clicking the Reports icon and choosing Customers & Receivables. Or you can choose Reports → Customers & Receivables. QuickBooks then displays a submenu of about a half-dozen reports that describe how much money customers owe you. Some reports, for example, organize open invoices in different groups based on how old the invoices are. (These reports are called agings.) Some reports summarize only invoices or payments. And some reports show each customer’s open, or unpaid, balance.
You can print a statement to send to a customer by choosing Customers→Create Statements. Use the Create Statements dialog box to describe which customers you want to print statements for and the date ranges you want the statements to show; then click Print or Email to print or email the statements. Statements are handy ways to remind forgetful customers or clients about overdue amounts. By the way, you don’t need to send statements to everybody for every month. In my CPA practice, I send out statements a couple of times a year to clients with past-due accounts. This friendly reminder always produces a handful of quick payments and awkward apologies.
How to assess finance charges in QuickBooks 2019
QuickBooks assesses finance charges on unpaid open invoices without considering any unapplied payments. Accordingly, you’ll want to make sure that you apply any payments and credit memos to open invoices before assessing finance charges.
To assess finance charges, follow these steps:1. Choose Edit → Preferences, click the Finance Charge icon in the list on the left, and then click the Company Preferences tab.
To be able to assess finance charges, you first need to set them up.
Only the QuickBooks administrator can change the company finance charge settings, and he or she can do so only in single-user mode.
QuickBooks displays the Preferences dialog box, as shown. (If you’ve assessed finance charges before, QuickBooks displays the Assess Finance Charges window. You can display the Preferences dialog box and check or edit your finance charge settings by clicking the Settings button in the Assess Finance Charges window.)
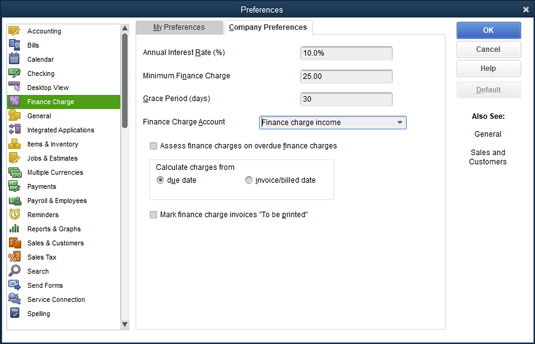 The Preferences dialog box for finance charges
2. Enter the annual interest rate that you want to use to calculate finance charges.
Move the cursor to the Annual Interest Rate (%) text box, and enter the annual interest rate.
3. (Optional) Enter the minimum finance charge, if one exists.Move the cursor to the Minimum Finance Charge text box, and enter the minimum charge. If you always charge at least $25 on a past-due invoice, for example, type 25.
4. Enter the number of days of grace that you give.Days of grace. That sounds kind of like an artsy movie or serious novel, doesn’t it? Basically, this number is how many days of slack you’re willing to cut people. If you type 30 in the Grace Period (Days) text box, QuickBooks doesn’t start assessing finance charges until 30 days after the invoice is past due.
5. Specify which account you want to use to track the finance charges.Activate the Finance Charge Account drop-down menu, and choose an Income or Other Income type account.
6. Indicate whether you want to charge finance charges on finance charges.Does this statement make sense? If you charge somebody a finance charge, and he or she doesn’t pay the finance charge, eventually, that charge becomes past due, too. So, then what do you do the next time you assess finance charges? Do you calculate a finance charge on the finance charge? If you want to do this — and if state and local laws permit you to — select the Assess Finance Charges on Overdue Finance Charges check box.
7. Tell QuickBooks whether it should calculate finance charges from the due date or the invoice date.Select either the Due Date or Invoice/Billed Date option button. As you might guess, you calculate bigger finance charges if you start accruing interest on the invoice date.
8. Tell QuickBooks whether it should print finance charge invoices.Select the check box titled Mark Finance Charge Invoices “To Be Printed” if you want to print invoices later for the finance charges that you calculate.
9. Click OK.After you use the Preferences dialog box to tell QuickBooks how the finance charges should be calculated, click OK.
10. Choose Customers →Assess Finance Charges or click the Finance Charges icon on the home screen.The Assess Finance Charges window appears, as shown. This window shows all the finance charges that QuickBooks has calculated, organized by customer.
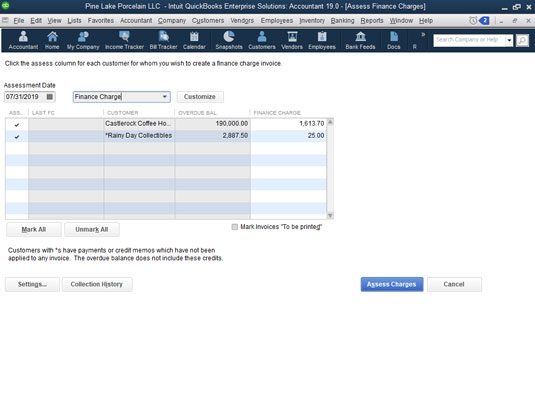 The Assess Finance Charges window
11. Enter the finance charge assessment date.
Move the cursor to the Assessment Date text box, and enter the date when you’re assessing the finance charges, which I’m willing to bet is the current date. (This date is also the invoice date that will be used in the finance-charge invoices, if you create them.)
12. Confirm which customers you want to be assessed finance charges.QuickBooks initially marks all the finance charges, which means that it sets up a new invoice for each finance charge. (QuickBooks marks finance charges with a little check mark.) If you want to unmark (or, later, mark) a finance charge, click it. To unmark all the charges, click the Unmark All button. To mark all the charges, click the Mark All button.
You can produce a collections report for any of the customers or jobs listed in the Assess Finance Charges window by selecting the customer name and then clicking the Collection History button.
13. Click the Assess Charges button.When the Assess Finance Charges window correctly describes the finance charges that you want to assess, click Assess Charges. You’re finished with the finance-charge calculations and assessments.
How to deal with deposits in QuickBooks
While I’m on the subject of improving your cash flow, let me briefly mention one other powerful cash-flow technique — and discuss the bookkeeping required for that technique.One easy way to improve your cash flow is to accept or require up-front deposits or retainers from clients or customers before you do the actual work. In other words, before you begin work or order inventory or do whatever is the first step in your business for completing a sale, you collect cold, hard cash.
Unfortunately, these customer deposits, as they’re called, create a bit of bookkeeping trouble. The question becomes, basically, how do you record a check or cash deposit for stuff that you haven’t yet done or sold? You have two basic options:
- The Easy Way: You can record a sales receipt for the service or product. In this way, you count the cash coming into your business, and you recognize the revenue. Note, too, that if the deposit is nonrefundable — and for cash-flow purposes, the deposit should be nonrefundable — you should count the revenue when you receive the deposit if you’re a cash-basis taxpayer. (You probably are a cash-basis taxpayer, but ask your tax adviser if you aren’t sure.)
- The Precise Way: You can recognize the deposit as a new liability. You do this by creating a journal entry that records the increase in your cash account and that records the increase in your Customer Deposits current liability account. If the deposit is refundable and you’re a cash-basis taxpayer, or if you’re an accrual-basis taxpayer, you probably should use this method. When your sale is completed and invoiced later, use the Customer Deposit item as a minus amount in the sales invoice to move the amount from the liability account and apply it to the invoice balance due.
