Saving a lead in LinkedIn Sales Navigator
There will be times when you won’t have the ability to immediately follow up on leads, so being able to save them to return to later is crucial. Luckily, Sales Navigator provides you ways to save leads every step of the way. The two main ways you can save leads with Sales Navigator are from a company’s LinkedIn page and from a search results page.From a company’s account page
To save a lead directly from a company’s business account page, follow these steps:- Type the company’s name into the search box at the top of your Sales Navigator home page and select the appropriate company from the drop-down menu that appears.You are taken directly to the company’s account page.
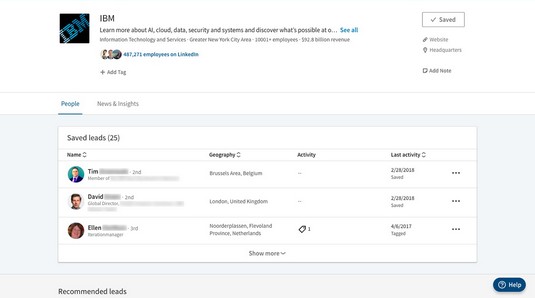 The company account page for IBM.
 - From the People tab (the default view), scroll down to the Recommended Leads section.If you’ve already saved leads from the company, Recommended Leads appears after the Saved Leads section. If this is your first saved lead at this particular company, you won’t have a Saved Leads section.
- Find the name of the person you want to save as a lead and click the Save link at the bottom of that person’s contact card.
 Clicking Save adds the prospect to your leads list.
The Save link changes to “Saved” with a check mark next to it. This person is now saved in your leads list.
From a search results page
To save a lead from a search results page, follow these steps:- On your Sales Navigator home page, hover your mouse pointer over the Advanced link to the right of the search box at the top of the page.Select “Search for leads” from the drop-down menu that appears to open the search criteria box you see below.
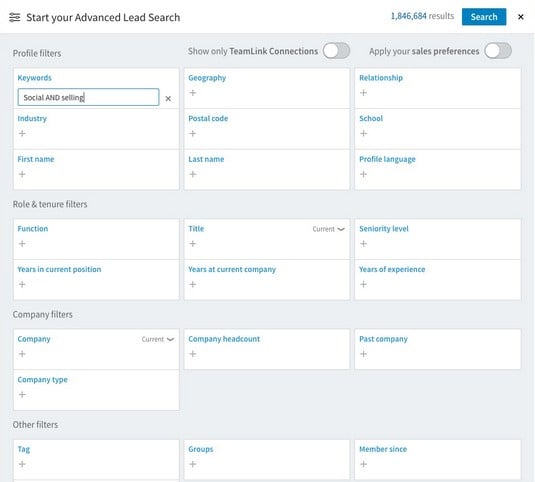 So many search options!
 - Enter your search criteria.The more criteria you enter, the fewer — but more targeted — results you get. You can see how your lead pool is affected by selecting different criteria by keeping an eye on the number to the left of the Search button at the top of the search criteria box.
- Click the Search button that appears in the top right of the search criteria box.A results page like the one below appears.
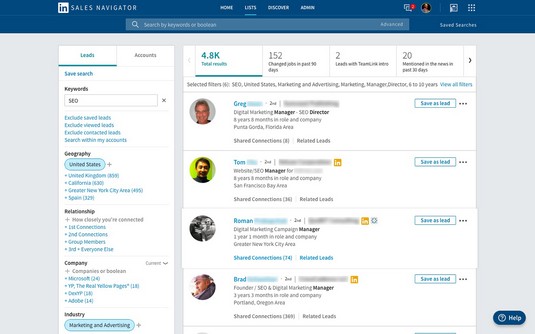 The results of your search.
 - Click the Save as Lead button to the right of any of the search results.The person’s profile is saved and a Message button appears in place of the Save as Lead button.
If you accidentally mark someone as a lead and want to deselect that person, hover your mouse pointer over the icon that looks like three dots to the right of the Message button and select Remove Lead from the drop-down menu.
Adding tags and notes to your LinkedIn Sales Navigator leads
Sales Navigator has two helpful features to keep your leads organized: tags and notes. Tags group leads together in ways that make the most sense for your organization and sales goals. Tags help you streamline your workflow so you can find what you need fast. Notes, on the other hand, is a way to store information about leads, such as the last time you touched base with them or the types of content they respond best to, just like you would on a paper notepad.Adding tags to your leads and accounts is extremely important. After all, the Sales Navigator search function is so robust that you will quickly build up your network (as well as leads and accounts lists). To keep everything organized and easily accessible, you should add tags to be able to locate specific people and companies as quickly as possible.
So, what kind of tags should you use? The answer depends on your industry and company. For example, does your company’s industry have some niche areas that you want to keep separate? Why not add tags to identify those particular areas? You can then keep track of leads and accounts that meet that criteria.
In addition, chances are your company uses certain terminology to identify prospects. Maybe this terminology is unique to your company, or maybe it’s common terminology. Whatever the case, add these terms as tags to applicable prospects in order to narrow them down in your search results when the time comes.
Another method that is helpful is to tag prospects with the roles they play in their companies’ decision-making process. For example, someone might be the final decision maker, an influencer, and so on. That way, you know what kind of content — and contact — is most appropriate when interacting with this lead.
You can also tag leads and accounts based on where they are in the buyer’s journey. For example, are they still in the research phase? Tag them as such so you know how to follow up and what kind of content may be of interest to them.
Building a rapport with prospects is extremely important. After all, wouldn’t you prefer to make a purchase from someone who took the time to get to know you enough to determine that you have things in common? It’s the same with leads, which is why it’s helpful to add tags that remind you of any commonalities you may have. For example, are you both fans of the New York Yankees? Add that as a tag. How about the fact that you both vacation at Disney World once a year? Tag that lead’s account with that. It’ll give you something to refer back to when the time comes to reach out in the future.
Now, here’s where you put the rubber to the road and start adding those tags. You can add tags and notes to your leads in two ways: from a lead’s profile page and from a search results page. Here’s how to do it from a lead’s profile page:- Go to the person’s profile page in Sales Navigator and click the +Add Tag link that appears in the right sidebar.
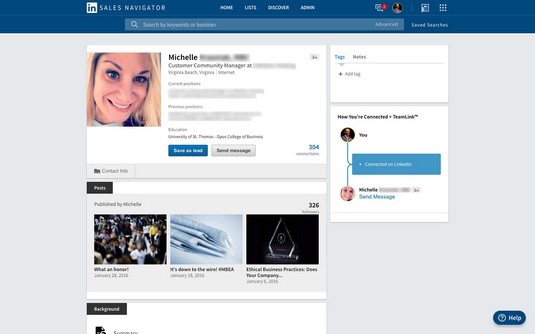 Click the +Add Tag link to add a custom tag.
If you’ve created tags before, they appear in a drop-down menu with check boxes next to them. If you have not created any tags before, Sales Navigator provides a list of six tags to get you started: Customer, Decision Maker, Follow Up, High Priority, Influencer, and Opportunity. There is also a Create New link at the bottom of the menu to add your own tag.
Sales Navigator provides a list of tags to get you started, but I recommend you start adding your own right away.
- Select all the applicable tags (or create new ones) and click the Apply button at the bottom of the box.The tagging box disappears and you’re back on the lead’s profile page.
- If you decide you want to edit or delete tags from your existing list, click the +Add Tag link and select the Edit Tag List link at the bottom of the drop-down menu. In the box that appears, you can either edit what the tag says by clicking the pencil icon next to the tag or delete it entirely by clicking the garbage can icon.To add a note to a lead’s page, simply click the Notes tab next to the Tags tab in the right sidebar of a person’s profile page and start typing!
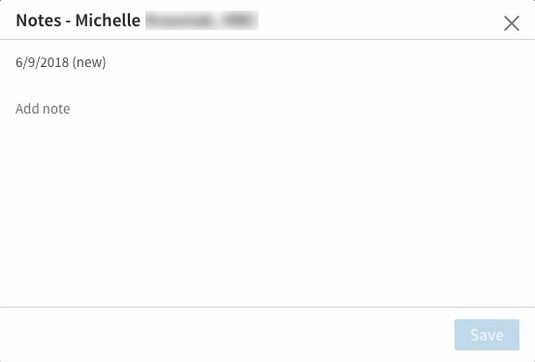 Adding a note to a lead’s page.
To add tags to a lead from the search results page, follow these steps:
- Perform a search in Sales Navigator.You can search via the main search box at the top of the page or run an advanced search.
- Once you locate the lead in the search results page, hover your mouse pointer over the icon that looks like three dots and select Tag from the drop-down menu that appears.You’re presented with the same menu you see when adding tags from a person’s profile page.
You cannot add a note to a lead via the search results method. You have to be on the lead’s profile page in order to utilize the notes function.
Viewing similar and suggested leads in LinkedIn Sales Navigator
As a sales professional, you already know your target audience. You know the title or titles you’re looking for in a lead. You know the geographical area. But even seasoned professionals need a fresh set of eyes on things every now and again, right? Luckily for us, Sales Navigator offers users a fresh perspective by applying more of its searching magic in the form of sales preferences, search history, and profile interaction data to offer users suggested leads.There are a couple of ways to access this data from Sales Navigator. The first is in your Filter Your Updates box on the Sales Navigator home page:
- Go to your Sales Navigator home page.
- In the Filter Your Updates box on the left side of your Sales Navigator home page, click the Suggested Leads link.This link is the third option down in the “By Type” category. Clicking this takes you to the updates feed of the leads Sales Navigator is recommending you take a closer look at.
- Scroll through the updates feed and click the Save as Lead button that appears to the right of any update.The box disappears and the Save as Lead button changes to “Lead Saved.”
If you decide you don’t want to save the lead after all, just click the Lead Saved button again to deselect the lead.
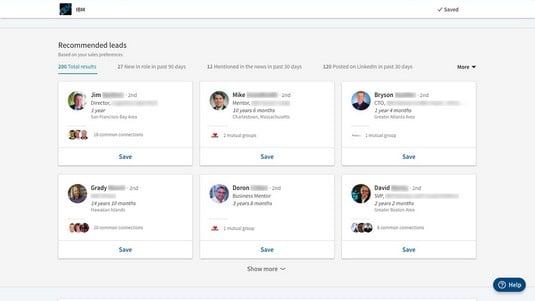
The second way to view similar leads is from the main navigation menu bar at the top of the Sales Navigator home page:- From your Sales Navigator home page, hover your mouse pointer over the Discover link in the main navigation menu bar at the top of your screen and select Recommended Leads from the drop-down menu that appears.You are taken to the screen shown below. These results are based on the sales preferences you set as well as your previous account activity.
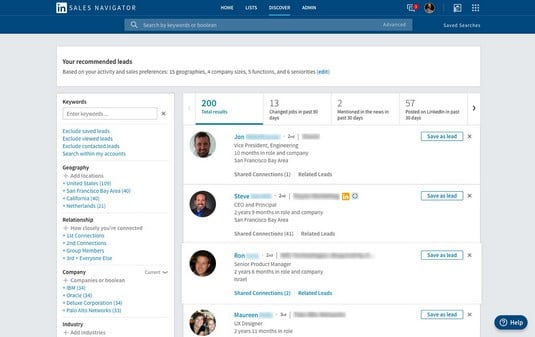 The Recommended Leads page.
 - Use the filtering criteria on the left side to narrow down your options.Chances are, not every lead presented is going to be applicable. Save time and frustration by using the numerous criteria presented to include only those leads that are the best fit for your sales goals.