To save a company as an account in LinkedIn Sales Navigator, do the following:
- Type the name of the company in the search bar at the top of the page and select the company from the drop-down menu that appears. You are taken directly to the company’s business account page.
If you’ve already saved a company as an account, you won’t be taken to the company’s page. Instead, you are taken to a page that shows the employees of that company.
- Click the Save button that appears at the top right of the company’s profile page.
The company is now saved to your Accounts list. From now on, whenever you search for this particular company, you will be offered a lot more information to select from in the drop-down menu.
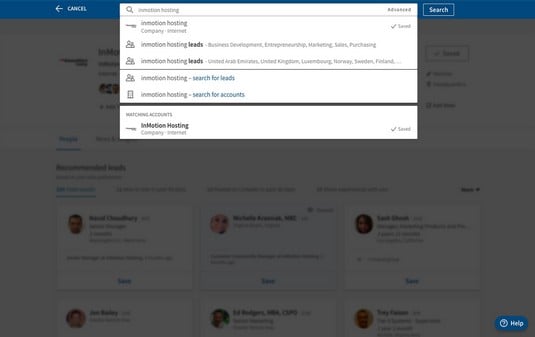 Access a lot more information about a saved company account when performing searches.
To unsave a company, click that same Save button (which now says “Saved” preceded by a check mark). When the company is unsaved, a green notification box appears on the bottom-left side of your screen.
When you want to access your saved leads and accounts in the future, simply hover your mouse pointer over the Lists link in the main navigation menu bar at the top of your screen and select one of the two from the drop-down menu.
Adding tags and notes to your accounts in LinkedIn Sales Navigator
Adding tags to your company accounts serves the same purpose as adding tags to individual leads. Tags help you keep your accounts organized by whatever criteria you choose, making it easier to find what you’re looking for. For example, if in your future sales prospecting you want to quickly identify all companies that specialize in a certain product or service, you’d tag those companies with that descriptor and be able to narrow down search results using that word or words.To add tags to accounts in LinkedIn Sales Navigator, follow these steps:
- Hover your mouse pointer over the List link at the top of the page and select Saved Accounts from the drop-down menu that appears.
You’re taken to the Your Saved Accounts page.
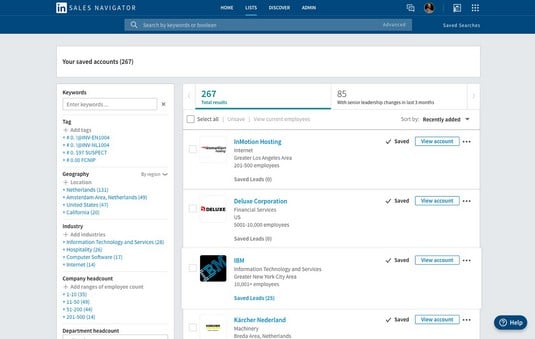 This page lists all the accounts you’ve saved.
 - Search for a specific company by typing its name in the Keywords box on the left side of the screen.
The company you’re looking for will show up on the results page. If there are multiple companies with similar names, you may have to scroll down a bit to locate the exact one.
- Click the company name to be taken to that company’s account page.
On the company’s account page, you see information such as the company description and website as well as any saved leads you may have that are associated with that company.
- Click the +Add Tag link that appears underneath the company name and description at the top of the page.
As with individual tags, if you’ve created tags before, they appear in a drop-down menu with check boxes next to them. If you have not created any tags before, you only see the six tags Sales Navigator provides. There is also a Create New link at the bottom of the menu.
- Select all applicable tags (or create new ones) and then click the Apply button at the bottom of the box.
If you select existing tags and also add new tags to the list, after you click the Apply button, click the +Add Tag link again and this time, click the Create New link at the bottom of the drop-down menu.
- If you decide you want to edit or delete tags from your existing list, click the +Add Tag link and select the Edit Tag List link at the bottom of the drop-down menu.
In the box that appears you can either edit what the tag says by clicking the pencil icon next to the tag or delete it entirely by clicking the garbage can icon.
To add a note, simply click the Add Note link on the top right of the company’s account page and start typing the note in the pop-up box that appears.
Viewing similar and suggested accounts in LinkedIn Sales Navigator
When you first join Sales Navigator, LinkedIn presents you with a number of relevant accounts that you may already be selling to in order to build up your initial list. Sales Navigator determines which accounts to show you based on your recent actions on LinkedIn, such as your profile views, company page views, InMail activity, and more.To add one of the accounts recommended by LinkedIn, do the following:
- Click the Save Account button that appears below the name of the account you’d like to save.
You can add as many of the suggested accounts as you’d like.
- Click the Continue button.
The accounts you selected are now accessible via the Accounts page.Alternatively, you can hover your mouse pointer over the Discover link in the top menu bar and select Suggested Accounts from the drop-down menu.
- Hover your mouse pointer over the Lists link at the top of the page and select Saved Accounts from the drop-down menu that appears.
You’re taken to your Saved Accounts page.
- Locate a company that fits the criteria of other companies you’re looking for.
For example, if you want Sales Navigator to suggest housewares importing companies, locate a company of that type in your Saved Accounts list.
- Once you locate a company, hover your mouse pointer over the icon that looks like three dots that appears to the right of the company name.
A drop-down menu appears.
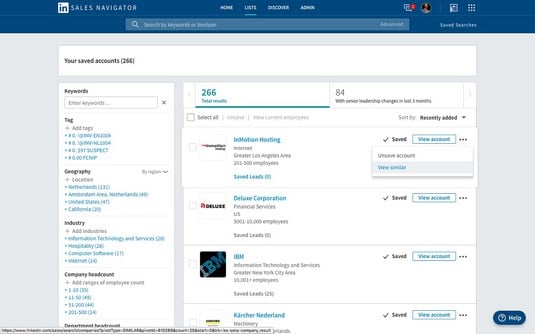 Sales Navigator suggests similar accounts for you to save.
 - Select the View Similar option.
The screen refreshes with a new list of companies that are similar to the one you already have saved.
- Click the Save as Account button next to the name of any company that fits your criteria.
That’s it! You’ve now added even more companies to your list.
Once you’re on the View Similar page, if you hover your mouse pointer over the three-dot icon again (next to any of the entries) and select the View Similar option, the page will refresh with even more companies that fit your search criteria.