


Sometimes you need to draw temporary lines while you model in SketchUp. These temporary lines, or guides, are useful for lining up things, making things the right size, and generally adding precision and accuracy to what you’re building.
In previous versions of SketchUp, guides were called construction geometry because that’s basically what they are: a special kind of entity that you create when and where you need them. They aren’t part of your model because they’re not edges or faces. This means that you can choose to hide them or delete them — like other annotations, they don’t affect the rest of your geometry.
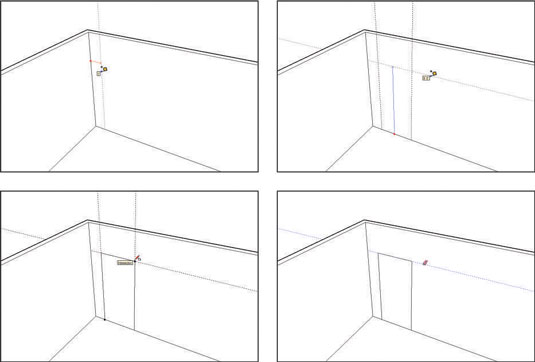
The guides are positioned 12 inches from the wall and 36 inches apart to draw the sides of a doorway. Another guide is used 6 feet, 8 inches from the floor to indicate the top, and then a rectangle, bounded by the guides, which is exactly the right size. When you’re done, erase the guides with the Eraser tool.
Creating guides with the Tape Measure tool
You can create three kinds of guides, and you use the Tape Measure tool to make them all.
Parallel guide lines: Clicking anywhere (except the endpoints or midpoint) along an edge with the Tape Measure tool tells SketchUp that you want to create a guide parallel to that edge. Just move your mouse and you see a parallel, dashed line; click again to place the line wherever you want.

Linear guide lines: To create a guide along an edge in your model, click anywhere along the edge except on either of the endpoints, and then click again anywhere else along the edge.
Guide points: You may want to place a point somewhere in space; you can do exactly that with guide points. With the Tape Measure tool, click an edge’s endpoint, and then click again somewhere else. A little x appears at the end of a dashed line — that’s your new guide point.
Here’s an important point about the Tape Measure tool: It has two modes, and it creates guides in only one of them. Pressing the Ctrl key (Option on a Mac) toggles between the modes. When you see a + next to your cursor, your Tape Measure can make guides; when there’s no +, it can’t.
Using guides to make your life easier
As you’re working along in this software, you’ll find yourself using guides all the time; they’re an indispensable part of the way modeling in SketchUp works. Here’s what you need to know about using them:
Position guides precisely using the Measurements box.
Erase guides one at a time. Just click or drag over them with the Eraser tool to delete guides individually. You can also right-click them and choose Erase from the context menu.
Erase all your guides at once. Choosing Edit→Delete Guides does just that.
Hide guides individually or all at once. Right-click a single guide and choose Hide to hide it, or deselect View→Guides to hide them all. It’s a good idea to hide your guides instead of erasing them, especially while you’re still modeling.
Select, move, copy, and rotate guides just like any other entity in your model. Guides aren’t edges, but you can treat them that way a lot of the time.
