

You’ll find that these SketchUp tips and tricks are pretty quick to pick up. Moreover, many of these techniques are designed to speed the core mechanics of your 3D modeling.
In fact, quick wins like these are available in every project you’ll do in SketchUp — hidden gems you’ll discover when you think “There’s got to be a quicker way to do this.” When you’re struggling, step back and realize that there is indeed a smarter way.
Set your click style in SketchUp to click-move-click
It’s tough to say out loud, but it’s possible that you’ve gotten pretty far in your SketchUp career while click-dragging your mouse for many SketchUp operations. If for some reason you just haven’t picked up the technique that lets you move your mouse freely between the beginning and end of most operations, you can force yourself to learnOn the Window menu, choose Preferences (Mac: the SketchUp menu; web: app settings). In the Drawing section of the resulting dialog box, change from Auto Detect to Click-Move-Click.
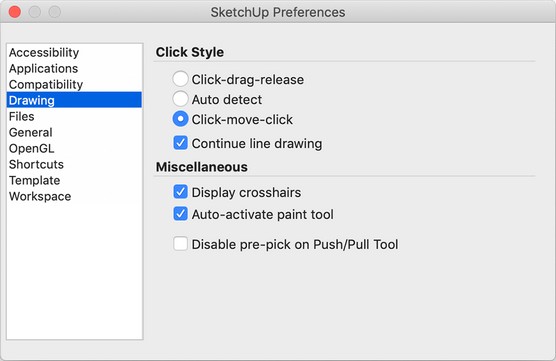 It’s click-move-click for your SketchUp tasks from now on.
Click-move-click is what SketchUp calls click-release, click. But you don’t even have to think about what it’s called, because after you change that preference, it’ll be the only way SketchUp works.
Customize your SketchUp shortcuts
When you know the default SketchUp shortcuts, you should customize and use another dozen helpful shortcuts. You can choose your own shortcuts, of course; our suggestions are based on personal preferences and thumb wars.In desktop versions of SketchUp, you create or edit shortcut customizations by choosing Window→Preferences (Mac: SketchUp→Preferences). To assign shortcuts, look up the name of the command you want to customize and then click the input field to type a custom shortcut key.
In SketchUp for web, use Search to look up the commands. When you mouse over a command name, you see a little empty rectangle to the right of its description. Click that rectangle to assign or reassign a shortcut.Here are ten SketchUp shortcuts to customize right now:
- X-ray (X): The X-ray face style toggles the transparency of faces in a model. This shortcut is super-handy if you’re designing pieces that fit together and working with solid tools. X-ray is also great when you’re making complex selections; it helps you understand whether you’ve selected more than you want. If you use the shortcut, you can toggle X-ray on demand.
- Hide Rest of Model (Shift+M): As your model becomes complex, you’ll want to get a better view of the groups and components that you need to edit. This display command turns off everything outside the context of a group and component so that you can orbit around and see what you need to see. SketchUp also operates considerably faster when you hide the rest of the model while editing a piece of it.
- Color by Axis (Shift+X): It’s possible that you might slip an inference with the Line tool and create a mysterious missing face. This mistake happens often enough that it’s handy to have the Color by Axis style toggle at your fingertips to identify edges that have strayed off course. Like the X-ray shortcut, it a helps you spot important details.
- View Hidden Geometry (Shift+H): Whether you hide edges and faces yourself, SketchUp hides them all the time. Whenever you extrude arcs or circles, SketchUp creates hidden edges. As your modeling skills improve, you’ll often need to see this hidden geometry to grab better inferences, so this shortcut comes in handy.
- Perspective or Parallel Projection (Shift+P): For some reason, these two camera settings do the same thing: toggle between a perspective and orthographic view of your model. If you’re setting up a model to create plans or elevations, you’ll find yourself using this shortcut (which you need to assign to only one of the commands) to switch your world view back and forth.
- Create Scene (+):Scenes are really useful for saving a view or a design scenario. You can create them on the fly with this simple shortcut.
- Previous & Next Scene (< and >): If you’re considering presenting from SketchUp, it’s a good idea to set up this simple pair of shortcuts to reverse or advance a scene-by-scene narrative. The people you’re presenting to will think you’re a wizard.
- Shadows (Shift+S): Let’s face it: Shadows make your SketchUp model look cooler. But they can slow SketchUp as your project grows in size. Slip shadows on and off occasionally. Most users find that intermittent shadow feedback to be visceral and pleasing, like a free bottle of sparkling water.
- Make Group (G) and Make Component (Shift+G): Let’s go rogue here: you should overwrite the default shortcut for the important Make Component command and instead assign G to Make Group. You don’t always know what an object is when you start creating it, and making a component costs you a few extra clicks. So keep G on your trigger finger to create a group immediately, drawing objects in their own modeling context right away. Then, after you’ve made a group, press Shift+G if the group needs to be a component.
- Paste in Place (Shift+V): You’re going to be using Paste in Place all the time — more often than normal pasty Paste but not so much that you can break your Ctrl+V muscle memory. Bring Shift+V into your 3D lexicon to move geometry in and out of groups or components (or across modeling files) efficiently.
Use SketchUp’s inference locking force
Inferencing is like the way of the Jedi. You must trust the inferencing force and know that it is always with you in SketchUp — and can be invoked with arrow keys.Here are two inferencing techniques that will significantly speed your work:
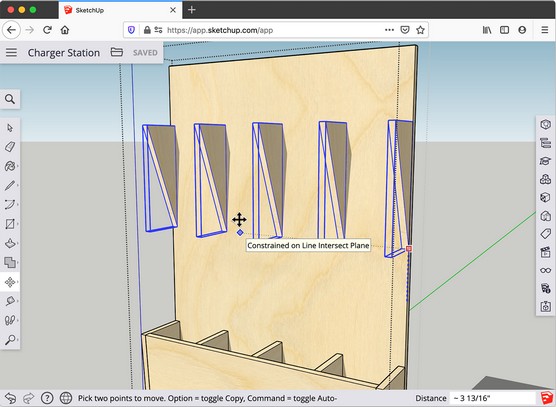
- Use the arrow keys to lock orientation for the Move tool. When you want to raise or lower something in SketchUp, activate the Move tool, click your selection on its bottom corner, and press the up arrow key. Now your cursor is free to roam the screen, and you can to pick an exact finishing height for your move. Inference locking with the arrow keys is accurate as any other technique but requires less mental effort.
 Inference locks help you move precisely and fluidly.
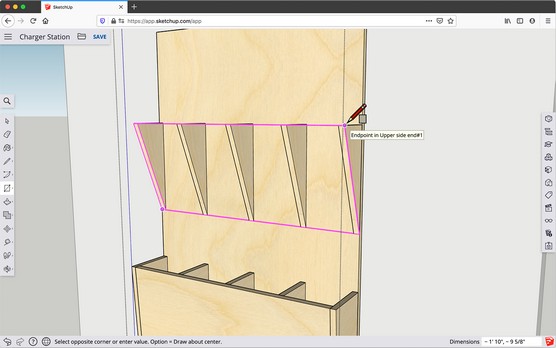
- Use the Get Down inference to operate off axis. This is the best inference name ever, right? Seriously, our new favorite inference technique is to hover over an over a face or an edge and then press the down-arrow key to lock a tool orientation (the magenta inference). The Get Down inference lets you treat the orientation of any edge or face as if it were a 4th axis, along with red, green, and blue. That’s why it’s so hip, man.
To get off the down-arrow inference, first, click the down key again. The magenta inference will run perpendicular to your reference. Click the down key a third time and you’ll unlock the inference.
 Use the down key to lock tools to off-axis orientations.
Transport yourself across space and time
Okay, the title is a slight exaggeration, but some camera tools help you warp through a SketchUp model with much less effort than orbiting and zooming across a model. Integrate them, and your perceived effort of modeling goes down. That’s a big deal!Try these camera techniques in SketchUp to see whether any of them sticks for you:
- Use the Orbit tool to center your screen on an object. If you’re modeling an interior, this tool is a handy way to skip your view across a room. With Orbit activated, double-click any geometry on the screen. SketchUp jumps to center your screen on the focus of the double-click.
- Use Zoom Window to jump to a nearby selection. With Zoom Window (choose Camera →Zoom Window), you can use a selection window to jump your view closer to a specific area. It’s recommended that you not use Zoom Window to jump to areas that are very far away.
- Use Zoom Selection to jump right to a selection. If you wanted to remember one more keyboard shortcut, this one might be it. With the Select tool activated, you can right-click an object and choose Zoom Selection from the shortcut menu to warp right to it.
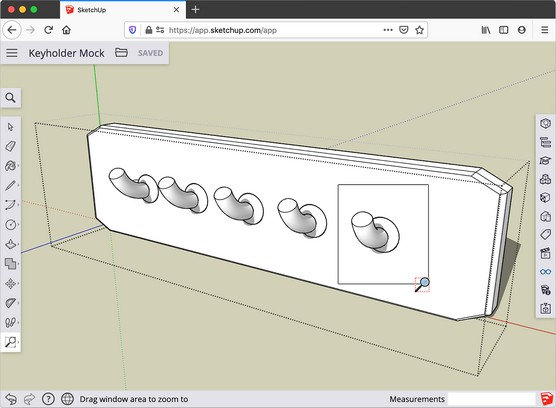 Use SketchUp's Zoom Window to jump your zooms to a desired spot.
Round off edges with SketchUp’s Arc Tool
The following technique for rounding corners around a series of edges is just too cool to leave out of this book. This fillet — or rounding — method works on flat faces only.Follow these steps and reference the images below to round edges:
- With a flat face, activate the two-point Arc tool.
- Near one of the junctures between two edges, click to start drawing an arc.
- Hover your cursor over the adjacent edge to find the magenta tangent inference.
- Double-click to finish your arc.The face and edges on the outside of your arc disappear. But wait, there’s more.
- Move your cursor close to another corner or intersection, and double-click the face (not the edges).
This method of rounding edges is also configurable. When you’re done rounding, use the Select tool to select an arc, then open the Entity Info panel to redefine the arc’s radius or segments. Pretty smooth — or at least as smooth as you want it.
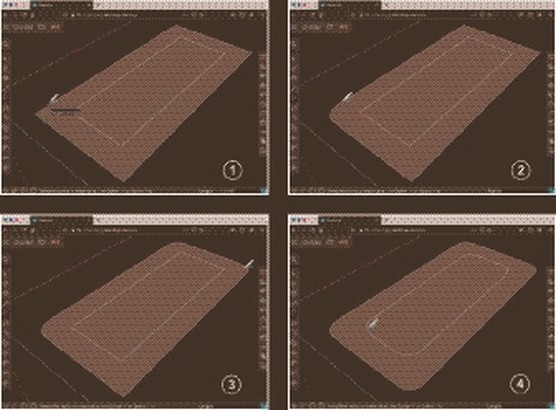 Double-click to fillet.
Use SketchUp’s Scale Tool to set length for simple objects
Here’s a quick alternative for simple extrusion when you know exactly how long a simple, uniform object (such as a 2×4) needs to be:- Select the object you want to scale.
- Make the object a group, if it’s not one already.
- Using the Scale tool, click one of the middle grips that define the length of the object.
- Scale the object in one direction.If you chose the right grips, the object extrudes as though you ‘re push/pulling it. If you grabbed the wrong grip, press the Esc key and try again.
- Click to finish your scaling.Click anywhere at all.
- Type how long you want that object to be and press Enter to set the length.Just like telling SketchUp, the length of an extrusion after using the Push/Pull tool, you can define the dimensions of a Scale operation by typing an input right after finishing the operation.
 Type a measurement in SketchUp while scaling a uniform object to define its length.
10 extensions for Dummies
Truth be told, there is soooo much to be said about SketchUp extensions — the add-on apps that you can install to access more modeling tools. Think of extensions as being like gems you find in a dungeon, unlocking new powers in SketchUp.But SketchUp extensions can give you superpowers — and they’re incredibly fun — so they’re worth exploring.
Extensions are available only in desktop versions of SketchUp. You have to have a Pro subscription to use them.
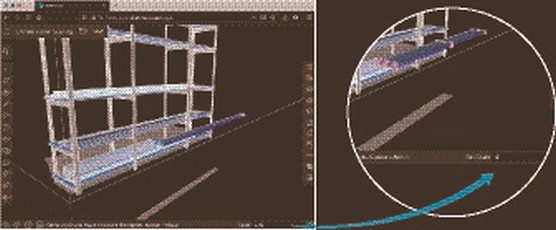
The quickest way to find and install extensions is to use Extension Warehouse(choose Window→Extension Warehouse). Extension Warehouse works just like an app store on your smartphone: You search for extensions, browse them by category, and install them in SketchUp. You can install many extensions for free; others cost a little bit of money.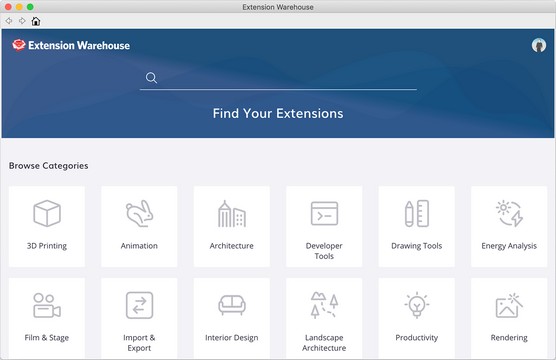 Extension Warehouse: an app store in SketchUp.
After you’ve installed an extension, use Extension Manager to check its status or deactivate it. Choose Window→Extension Manager to find a few extensions that come installed in SketchUp Pro.
Deactivating extensions that you don’t use is a good idea, especially as you start collecting them. Fewer enabled extensions usually means faster and more stable modeling.
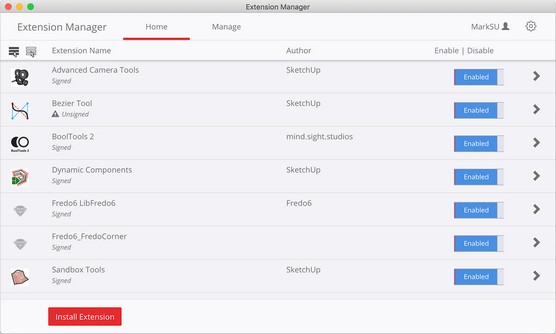 Use Extension Manager to turn off the SketchUp tools you’re not using.
When will you need extensions? That’s the question! To help you start thinking more three-dimensionally about your modeling, in the table below you discover ten add-ons that are worth checking out — and teaching yourself — as you get into the wild world of SketchUp extensions.
| Extension | What to Use It For | Get It From |
| Weld By Smustard |
Singe edges together. Ideal for welding tangent arcs for smooth extrusions. Weld is free, and it’s almost essential for a good Follow Me. | Extension Warehouse |
| Bézier Curve By SketchUp |
You can use this extension to get 3D curves. This extension is also very useful for tracing over hand sketches or imported images. | Extension Warehouse |
| Soap Skin Bubble By Josef L. |
Create complex mesh faces between noncoplanar edges (like a loop of whacky Bézier curves). | Extension Warehouse |
| Joint PushPull By Fredo6 |
Give almost anything thickness with this 3D extruder, including that wacky shape you made from Bézier curves. | SketchUcation Plugin Store |
| RoundCorner By Fredo6 |
Precise chamfering and filleting — basically, edge magic. | SketchUcation Plugin Store |
| Skimp By Mindsight Studios |
You’ll find lots of models on the Internet that are too big to load into your project. Skimp simplifies these behemoths to a noncrippling size for composition in SketchUp. | Extension Warehouse |
| Open Cut List By L’Air du Bois |
Designate objects as a certain kind of wood and then use this extension, which spits out a list of pieces and a cutting diagram that accounts for kerf, clearance, and the dimensional lumber you’re working with. Make some sawdust! | Extension Warehouse |
| Mirror By TIG |
If you use other CAD programs, you’ve probably spent some time looking for this extension, which quickly copies and inverts a selection across a defined plane. | SketchUcation Plugin Store |
| True Bend By ThomThom |
Lots of extensions that bend and distort models, but the best one to start with is True Bend, which bends an object around a 360-degree radius. | Extension Warehouse |
| Eneroth Random Selection By Eneroth3 |
Variety can do wonders for your model. Use this extension to randomly select objects in a uniform array. Then move, scale, or replace them to inject chaos into SketchUp. | SketchUcation Plugin Store |
Get SketchUp on your smartphone
Okay, it’s true: You can’t use SketchUp to draw 3D models on your smartphone.But you can get the free SketchUp app on a smartphone or tablet to view and reference your models. Think about walking around a hardware store with an exploded view of your model or a scene in which you’ve saved a parts list or cutting layout. Here’s how to get your models on a phone or tablet:
- Install SketchUp Viewer from an app store.This part is pretty simple. Go to the app store for your device, and search for SketchUp Viewer.
- Open the app, and access models stored in Trimble Connect, 3D Warehouse, Dropbox, or on your device.If you use SketchUp for web, the models you’ve saved are already stored in Trimble Connect. If you use SketchUp Pro, you can store your models in Trimble Connect (choose File→Trimble Connect→Publish Model) or upload models to 3D Warehouse. Models that you’ve stored in any of these places are available by clicking the cloud icon in the top-right corner of the screen. Additionally, you can load models from Dropbox or from device storage.
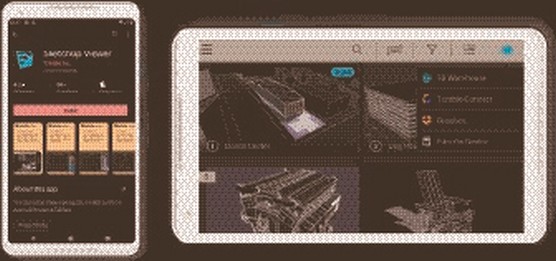 Get SketchUp Viewer (and your 3D models).
Now that you have your models on your phone or tablet, what are you going to do with them? Well, you’re going to use them. Isn’t that the beauty of making models in the first place? Here are a few ways to use your models with the SketchUp Viewer.
- Use Styles and Scenes to deliver 3D presentations. Almost everything about styling and composing models for 3D presentation in Part 3 applies in the SketchUp Viewer, because all the scenes you create in SketchUp are available in the Viewer. Your saved model views — with hidden groups and components (or tags), dimensions and labels, section planes, shadows, or styles — are at your fingertips on your device. In addition to jumping between scenes you’ve saved, you can use the Position Camera tool to jump your camera to first-person view. (Find it by clicking the Orbit icon in the bottom-left corner of the screen.)
- Reference project plans while building something. Wouldn’t you know, the model views that you make to build a project — orthographic plan and elevations, section views that show construction details, dimensions, and label callouts — are pretty useful to reference while building a project. Why wouldn’t you want all this information on your workbench, caked in sawdust?
- Take measurements on the fly. Need to double-check the dimensions of your design? After you’ve made a note with your real-life tape measure, pull out the 3D Tape Measure tool (the second icon from the top) in SketchUp Viewer. Now place a finger on your screen. You’ll see a little magnified view of your model with an inference cursor. Move your finger to snap to the inference you want; then remove your finger from the screen. Repeat to set the end of your measurement. SketchUp spits out a model dimension. Do you think it will fit?
- Preview models in real space with augmented reality. Okay, here’s the fun part: You can use the SketchUp Viewer to preview your models in the context of real-world space, using the augmented reality tools available on many smartphones and tablets. The SketchUp Viewer activates the camera on your device and then projects a scaled 3D model onscreen. The result is a scaled preview of your model, set in the frame of the real space you may be designing it for. This feature comes in very handy for evaluating room layouts, previewing custom built-in projects, and catching Pokémon at will.
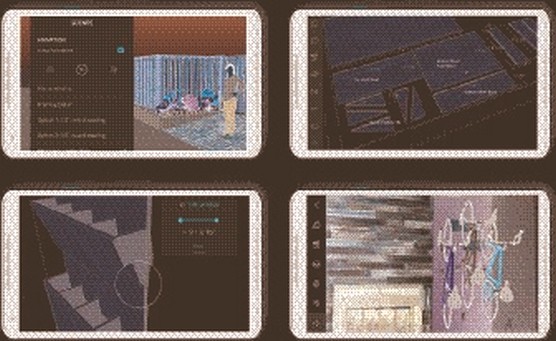 Present, reference, measure, and preview your SketchUp 3D models from your phone.
Turn off your SketchUp profiles
It’s the nature of computers: At some point, you’ll make a SketchUp model that slows down. When that happens, you can lessen the processing load of SketchUp in many ways. The simplest (and quickest) method to try to speed up SketchUp is to turn off edge profiles. This display setting removes the extra line thickness applied to edges that define the outline of your geometry.You can turn off profiles by changing or editing a style, but it’s much faster to set a customized keyboard shortcut. Now you can toggle in and out of edge profiles. Just like toggling shadows on and off, toggling profiles is a nice way to throttle the demand on your computer while keeping the sketchy look and feel a keystroke away.
Connect with the SketchUp community
The Internet is an infinite resource of highly specialized SketchUp knowledge. People across the world, in many languages, have uploaded detailed YouTube videos in which they explain how to do something very specific in SketchUp.Generate a cut list, draw with subdivisions to create organic shapes, model videogame levels, import GIS data — you can do it all in SketchUp, because a community of SketchUp people (we call them SketchUppers) are inspired to share and teach those who are willing to learn. You’ll find them in the SketchUp Forums, SketchUcation, and YouTube. Almost anywhere you can ask a question, a SketchUpper will answer it.
One last tip: Ask a friendly question, and you’ll get a helpful answer. With that, you are now in the good hands of SketchUppers everywhere.
Want to learn more? Check out SketchUp Cheat Sheet.


