
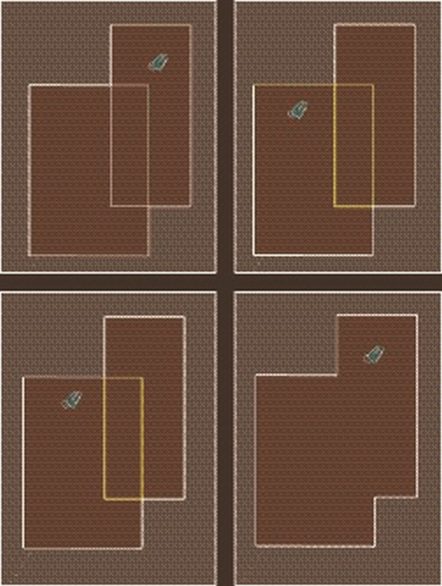
SketchUp won’t create a face where you want it to
You’ve dutifully traced all around where you want SketchUp to create a face, but nothing’s happening. If you follow along in the image below, which was inspired by a visit to the M.C. Escher museum in Amsterdam, you see the top-left image seems to show a cube beside a rectangle, but the rectangle didn’t produce a face. In the top-right image, a diagonal line was drawn between diagonally opposite corners of the rectangle, producing two triangular faces, but something still doesn’t look right.Changing the camera position to standard front (lower-left image) and right side (lower-right image) reveals the source of the problem. It turns out that the upper-right corner of the rectangle doesn’t lie on the red-blue plane but is actually to the right of the blue-green plane, and to the right of the blue-red plane. The upper-left image isn’t really an optical illusion; it just looks like one.
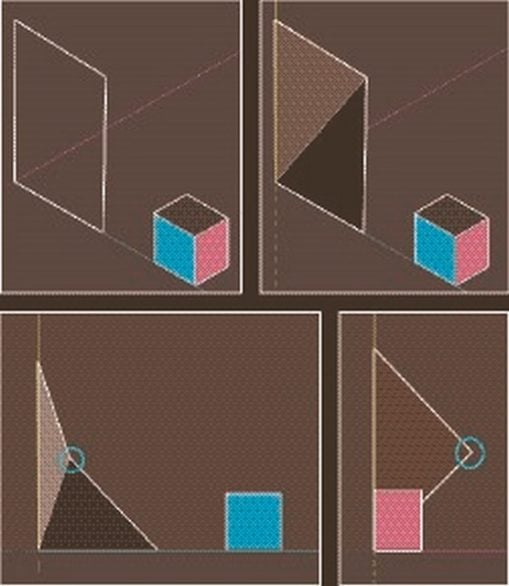 Just because it looks right doesn’t mean that it is.
Ninety percent of the time, when SketchUp doesn’t create a face where you think it should, an edge isn’t on the plane you think it’s on. To check whether your edges are coplanar, draw an edge that cuts diagonally across the area where you want a face to appear. If a face appears now, your edges aren’t all on the same plane. To fix the problem, you have to figure out which edge is the culprit, and the Color By Axis option may help you see this information at a glance. Here’s how Color By Axis works:
- In the Styles panel, change your edge color from All Same to By Axis.SketchUp draws the edges in your model using the color of the axis to which they’re parallel; edges parallel to the red axis are red, and so on.
- Look carefully at the edges that you wanted to define your desired face.Are all the edges the color they’re supposed to be? If they’re not all supposed to be parallel to the drawing axes, this technique doesn’t do much good. But if they are, and one (or more) of them is black (instead of red or green or blue), that edge (or those edges) is your problem child. Fix it and switch back to All Same when you’re done.
A common source of this problem is SketchUp’s inferences. As you slide the mouse over a face you may unwittingly be latching on to an unintended inference, such as the edge of a surface that is part of a cylinder. Watch those inference prompts, and use Undo when you complete a face but no face appears.
Your SketchUp faces are two different colors
In SketchUp, faces have two sides: a front and a back. By default, these two sides are different colors.When you use certain tools, such as Push/Pull or Follow Me, on a face, sometimes the faces on the resulting geometry are “inside out.” For some people, the issue is just bothersome. If you want to 3D-print your model, you need to fix the issue so that your model will print correctly.
To fix this issue, right-click the faces you want to flip and choose Reverse Faces from the context menu. If you have lots of faces to flip, you can select them all and then choose Reverse Faces to flip them all at once.
In 3D printing, this process is called checking your model’s normals.
The plan for the structure you see below was for all the outside walls to be wood siding and the interior walls to be painted yellow. But the top two images show that somehow the left wall got reversed. The bottom two images show that the problem has been solved by selecting the yellow face and reversing it.
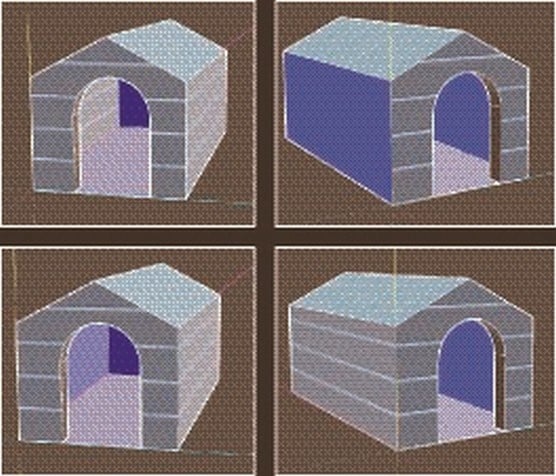 Reversing the faces in SketchUp.
Edges on a face won’t sink in
Edges on a face tend not to sink in when you’re trying to draw a rectangle (or another geometric figure) on a face with one of SketchUp’s shape-drawing tools. Ordinarily, the Rectangle tool creates a new face on top of any face you use it on; after that, you can use Push/Pull to create a hole, if you want.When the edges you just drew don’t seem to cut through the face you drew them on, try these approaches:
- Retrace one of the edges. Sometimes that works — you’d be surprised how often.
- Select Hidden Geometry from the View menu. You’re checking to make sure that the face you just drew isn’t crossing any hidden or smoothed edges; if it is, the face you thought was flat may not be.
- Make sure that the face you drew on isn’t part of a group or component. If it is, undo a few steps and then redraw your shape while you edit the group or component.
- Select the face + edges, right-click, and choose Intersect Faces→With Selection. This approach is often needed when you are working with one or more curved surfaces.
SketchUp crashed, and you lost your model
Unfortunately, SketchUp crashes happen sometimes. The good news is that SketchUp automatically saves a copy of your file every five minutes.In the web version, these autosaves are captured in Trimble Connect as revisions. You can always view the revision history for a file by navigating to it in the Trimble Connect tab (by clicking Open in the menu at the top of the screen to access Trimble Connect). For any file, you can choose to view or restore an older version.
In desktop versions, the file that SketchUp autosaves is actually a separate file, AutoSave_yourfilename.skp. If your file ever gets corrupted in a crash, an intact file is ready for you.
The problem is that most people don’t even know that the autosaved file is there. Where do you find it? If you’ve ever saved your file, the autosaved file is in the same folder as the original; therefore, it’s very important that you save your file almost immediately after starting it.
Simple, right? Not so fast. On a Mac, you may need to change your Library folder from hidden to visible. In the Finder app, hold down the Option key while you choose Go→Library. If you don’t hold down the Option key, Library may not appear on the menu.
When you close your model, SketchUp typically assumes nothing untoward has happened and usually cleans up after itself by deleting the autosaved file.The really good news is that every time you save a file, SketchUp proactively saves two identical files, one with the normal file extension .SKP and the other with the file extension .SKB. You continue working on the .SKP file. If something goes really wrong with your model, you can always go back to how it was an instant before the last time you saved it. But you can’t find it in the Open File dialog box. Here’s the secret: In the Open File dialog box, go to the end of the File Name window, click the down arrow beside Sketchup Models (.SKP), and click All Files. Now the .SKB files show, and you can open them. (web: The same basic principles apply, but read more details on SketchUp's website.)
To minimize the amount of work you lose when software (or hardware) goes south, always do two things:- Save often — compulsively, even.
- Use the Save a Copy As command on the File menu.
- Save the original version of your file as yourfilename_Master.skp.That’s the file you’ll always be working on.
- Create a folder that lives in the same place as your Master file; call the folder something like Your file’s name Archive.
- Every half-hour or so, choose File→Save a Copy As, and save a sequentially numbered version of your file to the Archive folder.When you’re building a big model, it’s not uncommon for your Archive folder to contain 40 or 50 saved versions of the model dating back to when the project first started.
- Back up regularly.At least at the end of every work session, such as when you head to a coffee or lunch break, back up your files to a low-cost, high-capacity, high-speed portable USB drive, then remove it and keep it separate from your computer. At the end of your shift, take it to a different location. You don’t need to keep it in a bank vault, just in a separate building. Take it home at night, for example.
You can always buy new hardware and software, but you can’t buy your personal files.
SketchUp is sooooo slooooooooow
The bigger your SketchUp model, the worse your computer’s performance. What makes a model big? In a nutshell, faces.Do everything in your power to keep your model as small as you can. Here are some tips for doing that:
- Reduce the number of sides on your extruded circles and arcs.
- Use 2D people and trees instead of 3D ones. 3D plants and people have hundreds of faces each. Consider using 2D ones instead, especially if your model won’t be seen much from overhead.
- Use search filters in 3D Warehouse. When you’re searching for models in 3D Warehouse, you can restrict your search result to show only models of a certain file size or polygon (face) complexity. Especially if your model is more than 10 MB, it makes sense to keep your 3D Warehouse downloads small!
- Make liberal use of the Outliner and tags. These SketchUp features were specifically designed to let you organize your model into manageable chunks. Hide everything you’re not working on at the moment; doing so gives your computer a fighting chance.
- Substitute simple forms for large numbers of complex components. For example, insert sticks as placeholders for big sets of 3D trees, cars, and other big components.
- Turn off shadows and switch to a simple style, such as Shaded in the Default Styles collection. It takes a lot of computer horsepower to display shadows, edge effects, and textures in real time on your monitor. When you’re working, turn off all that stuff.
- Use scenes to navigate between views. Scenes aren’t just for presenting your model; they’re also great for working with it. If you create scenes for the different views you commonly use and with different combinations of hidden geometry, then you don’t have to orbit, pan, and zoom around your gigantic model. To speed up things even more, deselect Enable Scene Transitions in the Animation panel of the Model Info dialog box. (web: Animation settings are in the Scenes panel.)
You can’t get a good view of the inside of your SketchUp model
It’s not always easy to work on the inside of something in SketchUp. You can do these things to make it easier, though:- Cut into your model with section SketchUp’s Sections feature lets you cut away parts of your model — temporarily, of course — so that you can get a better view of what’s inside.
- Widen your field of view. Field of view is the part of your model you can see onscreen at one time. A wider FOV is like having better peripheral vision.
You can change the field of view only when in Perspective view mode, but the setting will be remembered if you then switch to Parallel view mode.
The image below shows the plan view of a room. If you zoom or walk in through the door — oops, tunnel vision. Increase peripheral vision by changing your field of view. Ah, that’s better! Now you can see that the picture hanging on the wall is the floor plan of this room.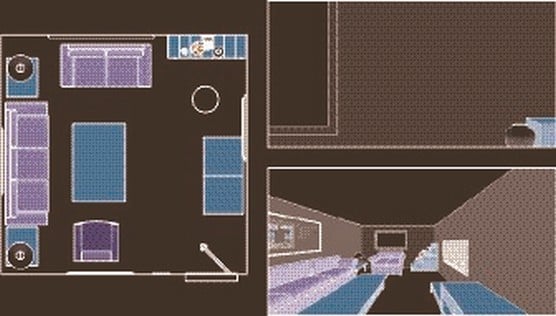 Changing SketchUp's field of view makes a world of difference.
A face flashes when you orbit in SketchUp
If you have two faces in the same spot — maybe one is in a separate group or component — you see a Z-fighting effect. SketchUp is deciding which face to display by switching back and forth between them; it’s not a good solution, but certainly a logical one — at least for a piece of software. The image below attempts to portray this effect in a single image. The only way to get rid of Z-fighting is to delete or hide one of the faces.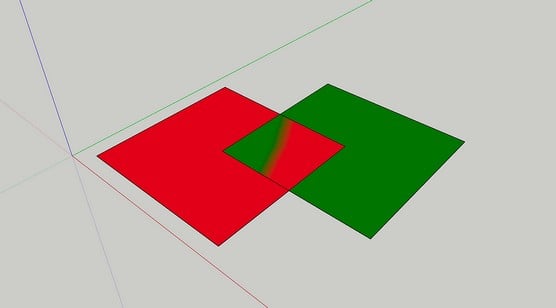 Two faces fighting for the same 3D real estate.
You can’t move your SketchUp component the way you want
When you insert some components into your model, the components by default glue to faces. A glued component instance isn’t actually glued in one place. Instead, it’s glued to the plane of the face you originally placed (or created) it on. For example, if you place a sofa component on the floor of your living room, you can move it around only on that plane — not up and down.This gluing behavior comes in handy when you deal with things like furniture; it allows you to rearrange things with the Move tool without accidentally picking them up.
If you can’t move your component the way you want to, right-click it to see whether Unglue is an option; if it is, choose it. Now you can move your component around however you want.
Bad stuff happens almost every time you use SketchUp’s Eraser
When you use the Eraser tool, it’s pretty easy to delete stuff accidentally. Worse, you usually don’t notice what’s missing until it’s too late. Here are some tips for erasing more accurately:- Orbit around. Try to make sure that nothing is behind whatever you’re erasing; use SketchUp’s navigation tools to get a view of your model that puts you out of danger.
- Switch on Back Edges. When you’re doing a lot of erasing, choose View→Edge Style→Back Edges. That way, you can see every edge in your model, and you’re less likely to erase the wrong ones.
- Use the Undo modifier of the eraser. Follow along starting in the upper-left image you see below. The intent is to erase the four edges in the center to create a single face. While erasing, you can select multiple objects by holding down the left mouse button while dragging the eraser over them. Oh, great googly moogly (or words to that effect) — you selected some things you didn’t want to erase. No problem: Don’t release the mouse button, but press and hold down the keyboard Alt key (Mac: ⌘). Now anything you drag the eraser over will be unselected. You can switch back and forth as desired, but nothing actually gets erased until you release the mouse button.
- Double-check. After you do a lot of erasing, give your model a quick once-over with the Orbit tool, just to make sure that you didn’t get rid of anything important. Put a sticky note on your computer monitor that says something like Check after Erase! just to remind you.
 The uneraser in action.
All your edges and faces have different tags
Using Tags in SketchUp can be a dangerous business. Here’s the short version of some good advice: Always build everything on Untagged, and assign whole groups or components to other tags only if you really need to.If you used tags in SketchUp and now things are messed up, here’s what you can do to recover:
- Make sure that everything is visible.Select Hidden Geometry on the View menu; then (in the Tags panel) make all your tags visible. Just make sure that you can see everything in your model.
- Choose Edit→Select All.
- In the Entity Info panel, move everything to Layer0.
- In the Tags panel, delete your other tags.
- When you’re prompted, tell SketchUp to move anything remaining on them to Untagged.
- Create new tags and follow best practices to avoid problems.
If you’ve downloaded 3D Warehouse models, you’ll probably find that they have some tags that you don’t understand and might want to get rid of. They may have had significance to the original creator, but they can become clutter in your file, so they should be removed.
Want to learn more? Check out our SketchUp Cheat Sheet.