


The Wi‐Fi on your Nikon D5500 feature enables you to connect your camera wirelessly to certain “smart” devices to transfer photos: specifically, Android and Apple iOS‐based phones, tablets, and media players.
Connecting the camera to your device
To connect your camera to your smart device, take these steps:
Open the camera’s Setup menu and select Wi-Fi.
You see the Wi‐Fi setup screen.
 Enable Wi‐Fi via the Setup menu.
Select Network Connection and then choose Enable.
You’re returned to the Wi‐Fi setup screen. The Wi‐Fi symbol blinks to let you know that your camera is now sending out its Wi‐Fi signal. The same icon blinks in the Information display and in the default Live View display while Wi‐Fi is enabled.
Select Network Settings to display the screen shown on the right.
 Here’s the launch screen for configuring the camera to connect with your smart device.
Select a connection option.
Which option you use depends on your device:
Push‐button WPS (Android only): Some Android devices offer a WPS (Wi‐Fi Protected Setup) feature that enables you to initiate a connection just by pushing a button. If your device has this feature, choose Push‐button. The camera displays a screen prompting you to press the WPS button on the device and begins searching for a connection.
PIN‐entry WPS (Android only): If your device uses a PIN (personal identification number) for wireless security, select this option from the screen. On the next screen, enter the PIN and then choose OK to attempt the connection.
View SSID (Android or iOS): Your camera is assigned an SSID number (Service Set Identifier), and, after a few moments, the SSID appears as an available network on your smart device. Select the camera’s SSID on your device, and then choose the Connect option on the device.
 Choose the camera’s SSID (left) from the list of available networks on your smart device; the message shown on the right appears when the connection is made.
If the stars are in alignment and the devices connect, you see the confirmation screen and the Wi‐Fi symbol stops blinking.
Launch the Nikon Wireless Mobile Utility app on your device.
The initial app screen offers two main options: Take Photos and View Photos. Somewhere on the screen, you should also see an icon that lets you access other app settings; usually, the icon looks like a little wheel.
 The initial app screen gives you the option to view or shoot photos.
To sever the connection and turn off Wi‐Fi, set the Wi‐Fi option on the camera’s Setup menu to Off.
Viewing photos on the smart device
After connecting your camera with the device and firing up the WMU app, tap View Photos on the smart device. Tap the option labeled Pictures on Camera. After a few seconds, thumbnails of your images appear, and you can view your pictures using the same techniques you use to view photos that you take with your smart device.
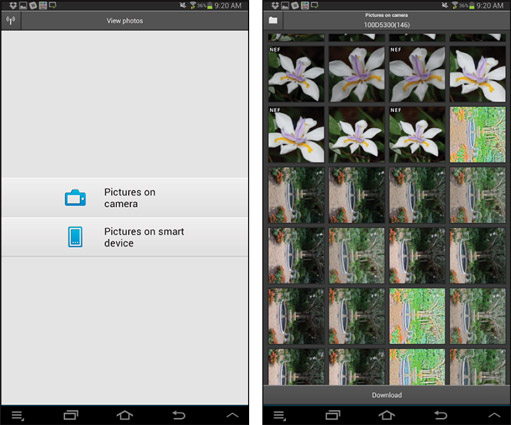
Transferring photos to the device
While you’re viewing your photos on the device, you can use options built into the WMU app to tag photos for transfer to the device. You can also set the size of the file you want to download. But an easier option is to use a camera feature that enables you to tag all photos you want to transfer. To try it out, open the camera’s Playback menu and choose Select to Send to Smart Device. You see thumbnails of your images.
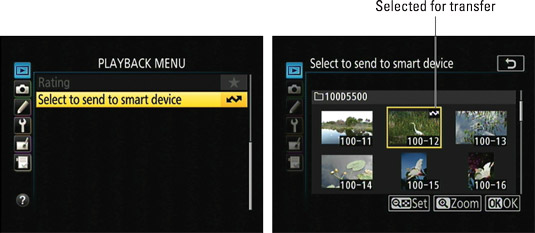
To tag a photo for transfer, tap the Set icon at the bottom of the screen or press the Zoom Out button. To remove the transfer tag, tap Set or press the Zoom Out button again. After choosing all your photos, tap OK or press the OK button. Now when you select the option on the smart device that transfers photos, your tagged files are automatically downloaded.
During playback mode, you can tag an individual photo for transfer by pressing the i button, which displays the mini‐menu. Choose the Select to Send to Smart Device/Deselect option to add the tag. The “marked for transfer” symbol appears on the image during playback.
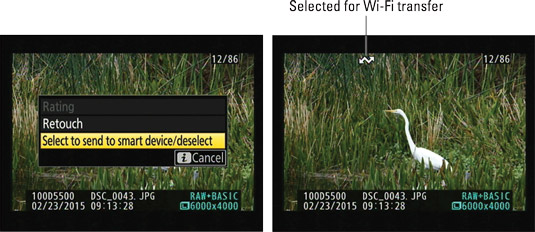
If you shot the picture in the Raw (NEF) format, it is automatically converted to the JPEG format during the transfer process so that it’s ready for online sharing.
Taking pictures via the smart device
To use your smart device as a remote shutter release, connect the devices, launch the WMU app, and then tap the Take Photos button. The camera automatically shifts to Live View mode, and the live preview appears on the smart device screen, along with some shooting data, such as the shutter speed and f‐stop. A focus box appears on the preview; tap your subject to place the focus box over it and set focus. The focus box turns green when focus is achieved.
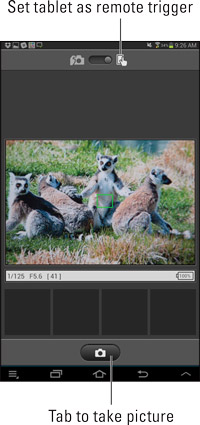
Make sure that the option at the top of the screen is set to the icon that shows a finger on the tablet; this tells the app that you want to use the tablet to trigger the shutter. Then tap the camera icon at the bottom of the screen to trigger the shutter release.
Through the app options, you can specify whether you want the picture to be automatically downloaded after it’s captured. You also can delay the shutter release by enabling the app’s self‐timer option.
Again, you must set all picture options before connecting the camera to the device; you can’t change settings after the two devices are paired.
