


The ISO setting adjusts the sensitivity to light on your Nikon D5500. A higher ISO enables you to use a faster shutter speed or a smaller aperture (higher f‐stop number) because less light is needed to expose the image. But a higher ISO also increases the possibility of noise.
You can’t adjust ISO in Auto and Auto Flash Off exposure modes; the camera sets the ISO automatically. In any other exposure mode except Night Vision Effects mode, you can choose ISO values ranging from 100 to 25600. You also have the option of sticking with Auto ISO and letting the camera select the ISO it feels is appropriate for your chosen aperture and shutter speed.
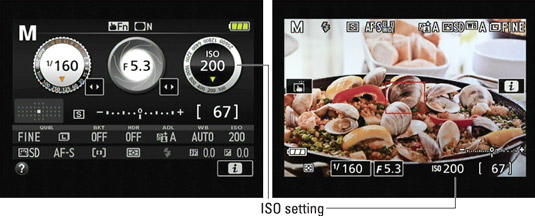
To see the ISO setting, look in the Information and Live View displays. The viewfinder reports the ISO value only when the option is set to Auto. The value appears on the right end of the viewfinder, just to the left of the Shots Remaining value. Otherwise, the ISO area of the viewfinder is empty.
If you want to view the ISO setting in the viewfinder, you can tell the camera to display that number in the area normally reserved for the Shots Remaining value. Make the change via the ISO Display option, found in the Exposure section of the Custom Setting menu. Choose On to replace the Shots Remaining value with the ISO value. You can then refer to the Information and Live View displays to check the Shots Remaining value.
To adjust ISO, you have these options:
Fn (Function) button: By default, pressing the Fn button (left front side of the camera) highlights the ISO setting in the displays. Hold the button while rotating the Command dial to change the setting.
Information display or Live View control strip: You also can adjust the setting via the control strip. Press the i button or tap the onscreen i icon to access the strip.
 In the control strip, look for the ISO setting here.
Shooting menu: Finally, you can change the setting via the ISO Sensitivity Settings option on the Shooting menu. After choosing that option, choose ISO Sensitivity on the screen shown on the right to display the menu of available ISO settings. (The other options you see below are available only in the P, S, A, and M modes.)
 You can access advanced ISO options from the Shooting menu.
So what’s up with the special menu options provided for the P, S, A, and M modes? Well, in those modes, Auto ISO doesn’t appear as an option when you select an ISO setting. But by way of the Shooting menu options, you can enable Auto ISO as a backup.
Here’s how it works: You dial in a specific ISO setting — say, ISO 100. If the camera decides that it can’t properly expose the image at that ISO given the current aperture and shutter speed, it automatically adjusts ISO as necessary.
To enable this option, select ISO Sensitivity Settings on the Shooting menu. On the next screen, turn the Auto ISO Sensitivity Control option to On. Next, use these two menu options to tell the camera when it should step in and offer ISO assistance:
Maximum Sensitivity: This option sets the highest ISO that the camera can use when it overrides the selected setting — a great feature because it enables you to decide how much noise potential you’re willing to accept in order to get a good exposure. Even if the picture can’t be properly exposed, the camera won’t go any higher than the limit you set.
Minimum Shutter Speed: Set the minimum shutter speed at which the ISO override engages when you use the P and A exposure modes.
If you set this option to Auto, the camera selects the minimum shutter speed setting based on the focal length of your lens — the idea is that with a longer lens, you need a faster shutter speed to avoid the blur that camera shake can cause when you handhold the camera. You also have the option to select a specific shutter speed.
However, ultimately, exposure trumps camera shake issues: If the camera can’t expose the picture at what it thinks is a safe shutter speed for your lens focal length, it uses a slower speed.
When the camera is about to override your ISO setting, it alerts you by blinking the ISO Auto label in the viewfinder and in the Live View display. The message “ISO‐A” blinks in the Information display as well. When you view your pictures in the monitor, the ISO value appears in red if you use certain playback display modes.
To disable Auto ISO override, set the Auto ISO Sensitivity Control option to Off.
