


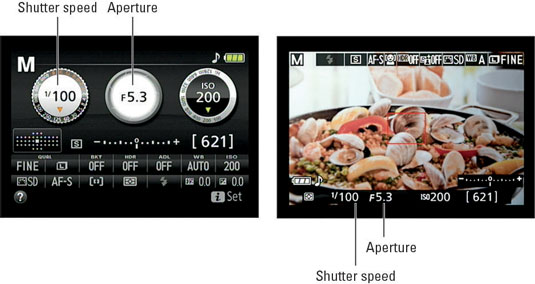
You can view the current aperture (f-stop) and shutter speed in the Information display and Live View display on your Nikon D5300. (If you don't see this data in Live View mode, press the Info button to cycle through the various display options.)
The settings also appear in the viewfinder.

In the viewfinder, shutter speeds are presented as whole numbers, even if the shutter speed is set to a fraction of a second. For example, the number 100 indicates a shutter speed of 1/100 second. When the shutter speed slows to 1 second or more, quote marks appear after the number — 1” indicates a shutter speed of one second, 4” means four seconds, and so on.
To select aperture and shutter speed, start by pressing the shutter button halfway to kick the exposure system into gear. You can then release the button. The next step depends on the exposure mode, as follows:
P (programmed autoexposure): The camera displays its recommended f-stop and shutter speed when you press the shutter button halfway. But you can rotate the Command dial to select a different combination of settings. The number of possible combinations depends on the aperture settings the camera can select, which depends on your lens.
An asterisk (*) appears next to the P symbol in the upper-left corner of the Information and Live View displays if you adjust the aperture/shutter speed settings. You see a tiny P* symbol at the left end of the viewfinder display as well. To get back to the initial combo of shutter speed and aperture, rotate the Command dial until the P* viewfinder symbol turns off.
S (shutter-priority autoexposure): Rotate the Command dial to set the shutter speed. As you do, the camera automatically adjusts the aperture as needed to maintain proper exposure.
Available shutter speeds range from 30 seconds to 1/4000 second except when flash is enabled. When you use flash, the top shutter speed is 1/200 second; minimum shutter speeds vary depending on the exposure mode. This limitation is due to the way the camera must time the flash with the opening of the shutter.
As the aperture shifts, so does depth of field — so even though you’re working in shutter-priority mode, keep an eye on the f-stop if depth of field is important to your photo. Note that in extreme lighting conditions, the camera may not be able to adjust the aperture enough to produce a good exposure at the current shutter speed. So you may need to compromise on shutter speed or ISO.
A (aperture-priority autoexposure): Rotate the Command dial to adjust the f-stop setting. The camera automatically selects the appropriate shutter speed needed to expose the image at your chosen aperture.
The range of available f-stop settings depends on your lens. For zoom lenses, the range typically also changes as you zoom in and out. For example, a lens may offer a maximum aperture of f/3.5 when set to its widest angle (shortest focal length) but limit you to f/5.6 when you zoom in to a longer focal length. Check your lens manual for details on the aperture settings.
The aperture symbol that surrounds the f-stop value in the Information display is designed to remind you what the f-stop setting does: The center of the graphic grows or shrinks as you change the to f-stop value, indicating that the setting is opening or closing the aperture.
Note that this graphic disappears if you switch from the default Information display style (called Graphic) to a simpler display (Classic). You adjust this setting via the Info Display Format option on the Setup menu.
When you raise the f-stop value, be careful that the shutter speed doesn’t drop so low that you risk camera shake if you handhold the camera. And if your scene contains moving objects, make sure that the shutter speed the camera selects is fast enough to stop action (or slow enough to blur it, if that’s your creative goal). These same warnings apply when you use P mode.
M (manual exposure): Set aperture and shutter speed like so:
To adjust shutter speed: Rotate the Command dial.
In Manual mode, you can access two shutter speed settings not available in the other modes: Rotate the dial one notch past the slowest speed (30 seconds) to access the Bulb setting, which keeps the shutter open as long as the shutter button is pressed. If you use the ML-L3 wireless remote control unit, rotate the dial one more time to display the Time setting.
When you select the Time setting, press the remote's shutter button once to begin the exposure and a second time to end it; maximum exposure time is 30 minutes. If you set the shutter speed to either of these options and then change the Mode dial to S, an alert appears; you must shift back to M mode to take advantage of them.
To adjust aperture: Press the Exposure Compensation button (on top of the camera) while rotating the Command dial. Notice the little aperture-like symbol that lies next to the button? That’s your reminder of the button’s role in setting the f-stop in M mode.
In P, S, or A mode, the settings that the camera selects are based on what it thinks is the proper exposure. If you don’t agree, you can switch the camera to manual exposure mode and dial in the aperture and shutter speed that deliver the exposure you want. Or, if you want to stay in P, S, or A mode, you can tweak exposure.
