


You can protect pictures on your Canon EOS 70D from accidental erasure by giving them protected status. After you take this step, the camera doesn't allow you to delete the picture from your memory card, regardless of whether you press the Erase button or use the Erase Images option on Playback Menu 1.
Although the Erase functions don't touch protected pictures, formatting your memory card does erase them.
Also note that when you download protected files to your computer, they show up as read-only files, meaning that the photo can't be altered. So if you want to be able to edit your photos, be sure to remove the protected status before downloading.
Anyway, protecting a picture on the Canon 70D is easy. You can use either of the techniques outlined in the next two sections.
Protecting (or unprotecting) a single photo
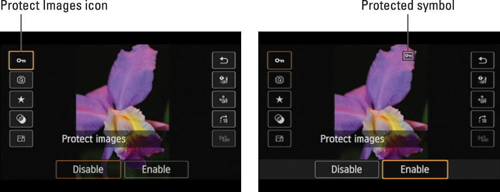
To apply protection to just one or two photos, the Quick Control screen offers the fastest option. Display the photo you want to protect in full-frame view. Or in Index view, select the photo by moving the highlight box over it. Then press the Quick Control button and tap or highlight the Protect Images symbol, labeled in the figure below. Choose Enable at the bottom of the screen, and a little key symbol appears at the top of the frame, as shown in the figure. Tap the return arrow (upper right of the screen) or press the Quick Control button again to exit the Quick Control display.
If you later want to remove the protected status, follow the same steps but choose Disable on the Quick Control screen.
Protecting multiple photos
When you want to apply protected status to — or remove it from — more than a couple photos, going through Playback Menu 1 is faster than using the Quick Control screen. Take these steps:
Display Playback Menu 1 and choose Protect Images, as shown on the left in the following figure.

You then see the options shown on the right in the figure:
Select Images: Choose the photos you want to protect.
All Images in Folder: Protects all the photos in a folder. Unless your memory card contains multiple folders, this option protects all your pictures. If you do have multiple folders, you can select a folder in the next step.
Unprotect All Images in Folder: This does the opposite, in case you protected those images and no longer need them locked down.
All Images on Card: A handy option to protect all photos on the card.
Unprotect All Images on Card: Removes protected status from all pictures on the card.
Choose an option from the list.
What happens now depends on which option you chose:
Select Images: An image appears on the monitor, along with a little key icon in the upper left of the screen, as shown on the left in the following figure. Scroll to the first picture you want to protect and then tap the Set icon or press the Set button. Now a key icon appears with the data at the top of the screen, as shown in the right image of the figure. After you finish protecting photos, press the Menu button or tap the Menu icon to exit the protection screens.
You can also pinch the display to show more (4 or 9) photos, then touch the photo to protect it. Don't forget to tap Set or press the Set button to lock your choices in.
All Images in Folder or Unprotect All Images in Folder: You see a screen where you can select a specific folder. Select that folder, tap Set or press the Set button, and then tap OK or press the Set button again.
All Images on Card or Unprotect All Images on Card: Choose OK on the confirmation screen.
 The key icon indicates that the picture is protected.
To remove protection from individual pictures, follow these same steps, choosing Select Images in Step 2. When you display the locked picture, just press or tap Set to turn off the protection. The little key icon disappears from the top of the screen to let you know that the picture is no longer protected.
