


 Press the DISP button when the menus are active to view this screen.
This screen offers a quick summary of certain camera settings. The data displayed varies depending on the setting of the Mode dial; Figure 1-10 shows data that appears in the P, Tv, Av, and M exposure modes. If a setting can't be adjusted in the current exposure mode, it disappears from the screen.
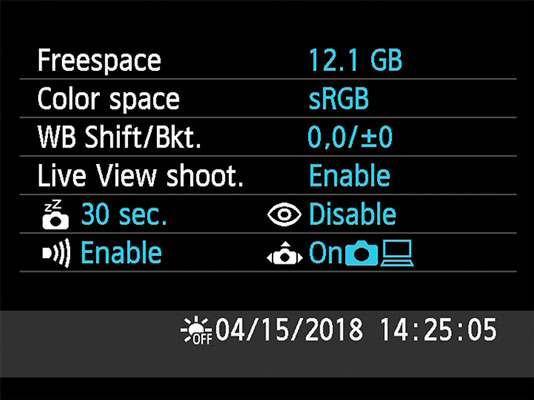
Moving from top to bottom, here's your decoder ring to the screen:
- Freespace: Indicates the amount of empty storage space on your camera memory card.
- Color Space: Tells you whether the camera is using the sRGB or Adobe RGB color space. (Stick with sRGB until you have time to explore that information.)
- White Balance Shift/Bracketing: Indicates the amount of White Balance shift or bracketing.
- Live View Shooting: Tells you whether Live View is enabled.
- Auto Power Off and Red-Eye Reduction flash mode: These two functions share a line on the screen. The first readout tells you the delay time selected for the Auto Power Off option, found on Setup Menu 1; the second symbol indicates whether the flash is set to Red-Eye Reduction mode, found on Shooting Menu 1.
- Beep and Auto Rotate Display: The first setting determines whether the camera beeps after certain operations; you can turn the sound on and off via Shooting Menu 1.
The second symbol reflects the setting of the Auto Rotate option on Setup Menu 1, which determines whether pictures are rotated to their proper orientation during playback and when you view them on your computer (assuming the software you use can read the rotation data embedded in the image file). The symbol shown in the figure indicates that both rotation features are enabled.
- Date/Time: The last line of the display shows the date and time, which you enter via the Date/Time/Zone option on Setup Menu 2. The sun symbol at the beginning of the line indicates whether you told the camera to adjust the time automatically to account for Daylight Saving Time.
Of course, with the exception of the free-card-space value, you also can simply go to the menu that contains the option in question to check its status. The Camera Settings display just gives you a quick way to monitor some of the critical functions without hunting through menus.
To exit the Camera Settings screen, press the Menu button or press the shutter button halfway and release it.