


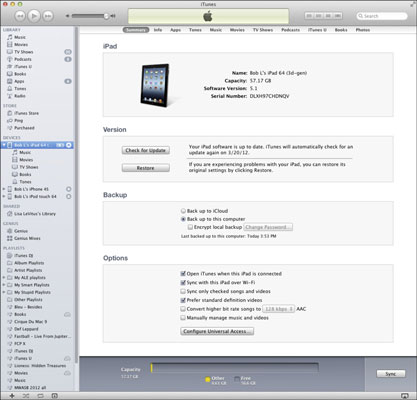
Synchronizing your iPad with iTunes on a Mac or PC provides numerous options that you won’t find anywhere on your iPad. These are all optional settings that you can access from the iTunes Summary pane.
If you want iTunes to launch automatically whenever you connect your iPad to your computer, select the Open iTunes When This iPad Is Connected check box.
If you intend to connect your iPad to your computer to charge it, you might not want iTunes to launch every time you connect it. If you do choose to enable it, iTunes launches and synchronizes automatically every time you connect your iPad.
If you want to sync only items that have check marks to the left of their names in your iTunes library, select the Sync Only Checked Songs and Videos check box.
If you leave this unchecked, all songs and videos will be synced.
If you want to sync automatically over your Wi-Fi connection, select the Sync over Wi-Fi Connection check box.
In the figure it says Sync with this iPad over Wi-Fi.
If you want high-definition videos you import to be automatically converted into smaller standard-definition video files when you transfer them to your iPad, select the Prefer Standard Definition Videos check box.
Standard-definition video files are significantly smaller than high-definition video files. You’ll hardly notice the difference when you watch the video on your iPad (unless it’s a third-generation iPad with a Retina display, in which case you’ll almost certainly notice), but you can have more video files on your iPad because they take up less space.
The conversion from HD to standard definition takes a long time, so be prepared for very long sync times when you sync new HD video and have this option enabled.
If you want songs with bit rates higher than 128 Kbps converted into smaller 128-Kbps AAC files when you transfer them to your iPad, select the Convert Higher Bit Rate Songs to 128 Kbps AAC check box.
A higher bit rate means that the song will have better sound quality but use a lot of storage space. Songs that you buy at the iTunes Store or on Amazon, for example, have bit rates of around 256 Kbps. A 4-minute song with a 256-Kbps bit rate is around 8MB; convert it to 128-Kbps AAC and it’s roughly half that size, while sounding almost as good.
To turn off automatic syncing in the Music and Video panes, select the Manually Manage Music and Videos check box.
If you leave this option unchecked, your music and videos will automatically sync.
To password-protect your iPad backups (your iPad creates a backup of its contents automatically every time you sync), select the Encrypt iPad Backup check box.
If you decide to select the Prevent iPods, iPhones, and iPads from Syncing Automatically check box in the iTunes Preferences (that’s iTunes→Preferences on a Mac and Edit→Preferences on a PC) on the Devices tab, you can still synchronize manually by clicking the Sync or Apply button in the lower-right corner of the window.
Why the Sync or Apply button? If you’ve changed any sync settings since the last time you synchronized, the Sync button instead says Apply. When you click that button — regardless of its name — your iPad will start to sync.
