To make your screen easier to read, you can use the Magnifier app, adjust the brightness, or change the wallpaper. You can also set up the VoiceOver feature to read onscreen elements out loud.
Voice Control, Numbers, and Grids are welcome accessibility features to help you navigate more easily. And you can turn on or off a slew of features, including Zoom, Invert Colors, Speak Selection, and Large Type.
If hearing is your challenge, you can do the obvious thing and adjust the system volume. The iPad also allows you to use mono audio (useful when you’re wearing headphones) and to set an LED to flash when an alert sounds.
Features that help you deal with physical and motor challenges include an AssistiveTouch feature for those who have difficulty using the iPad touchscreen, and Switch Control for working with adaptive accessories. Also included are the Home Button and Call Audio Routing settings, which allow you to adjust how quickly you have to tap the iPad screen to work with features, and whether you can use a headset or speaker to answer calls.
The Guided Access feature helps if you have difficulty focusing on one task. It also provides a handy mode for showing presentations of content in settings where you don’t want users to flit off to other apps, as in school or a public kiosk.
This article covers some of the accessibility features of iPadOS 16. For more comprehensive coverage, check out the book iPad For Seniors For Dummies, 2023-2024 Edition.
How to use the Magnifier app on an iPad
The Magnifier app uses your iPad’s camera to help you magnify objects. Magnifier is considered an accessibility feature, but almost everyone needs a magnifier at one time or another. To use Magnifier:- Tap the Magnifier app icon to open it. By default, the app resides on the second Home screen.
- Point your iPad’s camera at the object you want to magnify.
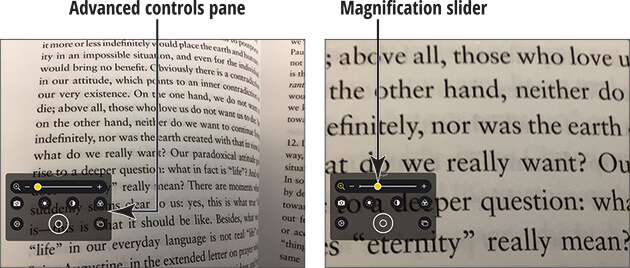
- Drag the magnification slider (shown in the figure below) to increase or decrease magnification.
 ©John Wiley & Sons, Inc.
Using the Magnifier app's slider
By default, Magnifier offers an advanced controls pane (see above) with more controls to help customize your experience. You can select which camera to use, adjust brightness and contrast levels, and apply color filters. You can also take freeze frames (to freeze something onscreen momentarily) by tapping the large round button.
Freeze frames are not saved to Photos. They disappear into the ether when you close the Magnifier app.
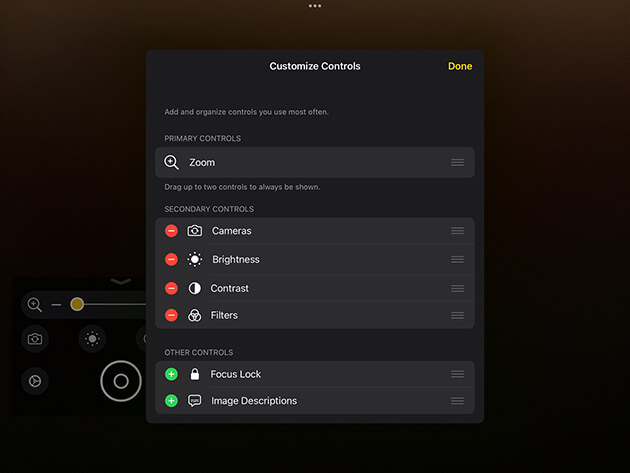
Tap the customize controls icon (gear) in the lower left of the advanced controls pane, and then tap Settings in the resulting menu to open the Customize Controls dialog, shown in the figure below. From here, you can determine which controls appear in the advanced controls pane.To remove a control, tap the red circle containing the minus sign (–) found to the left of the control name; then tap the Remove button that appears on the right. To add a control you’ve removed, simply tap the green circle containing the plus sign (+).
 ©Apple, Inc.
The iPad's Customize Controls window
You can combine magnification with your iPad's portability so that you can reach up to (or behind) an object and magnify something that is not only too small to see otherwise but also out of view entirely.
How to set up VoiceOver on an iPad
VoiceOver reads the names of screen elements and settings to you, but it also changes the way you provide input to the iPad. In Notes, for example, you can have VoiceOver read the name of the Notes buttons to you, and when you enter notes, it reads words or characters that you’ve entered. It can also tell you whether such features as Auto-Correction are on.VoiceOver is even smarter in iPadOS 16 than in previous incarnations. It includes support for apps and websites that may not have built-in accessibility support. It can read descriptions of images in apps and on the web, and it can identify and speak text it finds in images.
 ©Apple, Inc.
Selecting VoiceOver in the Accessibility menu
To turn on VoiceOver, follow these steps:
- Tap the Settings icon on the Home screen.
- In Settings, tap Accessibility.
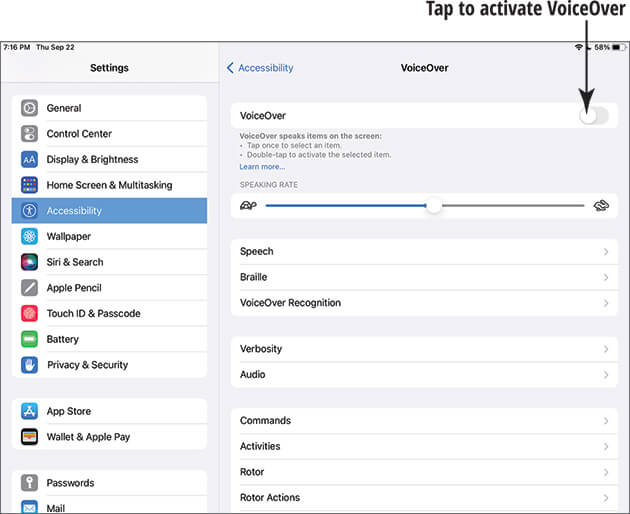
- In the Accessibility pane, tap VoiceOver.
- In the VoiceOver pane, shown in the figure above, tap the VoiceOver switch to turn on this feature (the button becomes green).
With VoiceOver on, you must first single-tap to select an item such as a button, which causes VoiceOver to read the name of the button to you. Then you double-tap the button to activate its function.
- Tap the VoiceOver Practice button to select it and then double-tap the button to open VoiceOver Practice. Practice using gestures (such as pinching or flicking left), and VoiceOver tells you what action each gesture initiates.
- Tap the Done button and then double-tap the same button to return to the VoiceOver dialog.
- Tap the Verbosity button once and then double-tap to open its options:
- Tap the Speak Hints switch and then double-tap the switch to turn the feature on (or off). VoiceOver speaks the name of each tapped item.
- Tap once and then double-tap the VoiceOver button in the upper-left corner of the Verbosity window to go back to the VoiceOver screen.
You can change the language that VoiceOver speaks. In General settings, tap Language & Region, tap iPad Language, and then select another language. However, this action also changes the language used for labels on Home icons and various settings and fields in iPad. Be careful with this setting, lest you choose a language you don’t understand by accident and have a difficult time figuring out how to change it back.
-
If you would like VoiceOver to speak descriptions of images in apps or on the web, swipe up with three fingers to scroll down and then tap and double-tap VoiceOver Recognition, tap and double-tap Image Descriptions, and finally tap and double-tap the Image Descriptions switch to toggle the setting on (green).
Don’t ignore the Sensitive Content Output setting in the Image Descriptions page. If the content of an image is something you’d like to keep everyone in the room from hearing, select any option other than Speak.
- Return to the main VoiceOver screen.
- If you want VoiceOver to read words or characters to you (for example, in the Notes app), scroll down (use a three-finger swipe to do so), tap and double-tap Typing, and then tap and double-tap Typing Feedback.
-
In the Typing Feedback dialog, tap and then double-tap to select the option you prefer in both the Software Keyboards section and the Hardware Keyboards section.
The Words option causes VoiceOver to read words to you but not individual characters you type, such as the dollar sign ($). The Characters and Words option causes VoiceOver to read both the individual characters as you type them and each word as you complete it.
- Press the Home button or swipe up from the bottom of the screen (iPad models without a Home button) to return to the Home screen.
In the screen that appears, choose what you want three presses of the Home button (or top button, for iPads without a Home button) to activate. Now three presses with a single finger on the Home button or top button (depending on your iPad model) provide you with the option you selected wherever you go in iPad.
How to use VoiceOver on an iPad
After VoiceOver is turned on (see preceding section), you need to figure out how to use it. I won’t kid you — using it is awkward at first, but you’ll get the hang of it.Here are the main onscreen gestures you should know how to use:
- Tap an item to select it. VoiceOver then speaks its name.
- Double-tap the selected item. This action activates the item.
- Flick three fingers. It takes three fingers to scroll around a page with VoiceOver turned on.
However, if your iPad doesn’t have a Home button, you need to look at your iPad (for Face ID to recognize you) and then slowly move your finger up from the bottom of the screen until you hear two tones, which indicate that your screen is unlocked.
If tapping with two or three fingers is difficult, try tapping with one finger from one hand and one or two from the other. When double- or triple-tapping, you have to perform these gestures as quickly and as precisely as you can for them to work.
The table below provides additional gestures to help you use VoiceOver. If you want to use this feature often, I recommend the VoiceOver section of the iPad online User Guide, which goes into great detail about using VoiceOver. You can find the User Guide on Apple Support's iPad Manuals page.Once you're on the iPad Manuals page, just click the model of iPad or the version of iPad OS you have to read its manual. You can also get an Apple Books version of the manual through the Apple Books app in its Book Store.
VoiceOver Gestures
| Gesture | Effect |
| Flick right or left | Select the next or preceding item |
| Tap with two fingers | Stop or continue speaking the current item |
| Flick two fingers up | Read everything from the top of the screen |
| Flick two fingers down | Read everything from the current position |
| Flick three fingers up or down | Scroll one page at a time |
| Flick three fingers right or left | Go to the next or preceding page |
| Tap three fingers | Speak the scroll status (for example, line 20 of 100) |
| Flick four fingers up or down | Go to the first or last element on a page |
| Flick four fingers right or left | Go to the next or preceding section (as on a web page) |
How to change additional vision settings
Several Vision features are simple settings that you can turn on or off after you tap Settings, tap Accessibility:- Zoom: The Zoom feature enlarges the contents displayed on the iPad screen when you double-tap the screen with three fingers. The Zoom feature works almost everywhere in iPad: in Photos, on web pages, on your Home screens, in your Mail, in Music, and in Videos. Give it a try!
- Spoken Content: Options here include the ability to have your iPad speak items you’ve selected or to hear the content of an entire screen and highlight content as it’s spoken.
- Display & Text Size: Includes such features as
- Color Filters (aids in case of color blindness)
- Reduce White Point (helps reduce the intensity of bright colors)
- Invert Colors (which reverses colors on your screen so that white backgrounds are black and black text is white): Classic Invert inverts all colors, and Smart Invert does not invert colors for items like images, multimedia, and some apps that may use darker color styles.
The Invert Colors feature works well in some places and not so well in others. For example, in the Photos application, pictures appear almost as photo negatives (which is a really cool trick to try). Your Home screen image likewise looks a bit strange. And don’t even think of playing a video with this feature turned on! However, if you need help reading text, White on Black can be useful in several apps.
- Larger Text (under Accessibility tap Display & Text Size): If having larger text in such apps as Contacts, Mail, and Notes would be helpful to you, you can turn on the Larger Text feature and choose the text size that works best for you.
- Bold Text (under Accessibility tap Display & Text Size): Turning on this setting restarts your iPad (after asking you for permission to do so) and then causes text in various apps and in Settings to be bold.
- Button Shapes (under Accessibility tap Display & Text Size): This setting applies shapes to buttons so that they’re more easily distinguishable. For an example, check out the Accessibility button near the top of the screen after you enable Button Shapes by toggling its switch on. Turn it back off and notice the difference (shown in the figure below; the button name is underlined).
 ©Apple, Inc.
iPad Accessibility options
- Reduce Transparency (under Accessibility tap Display & Text Size): This setting helps increase legibility of text by reducing blurring and transparency effects that make up a good deal of the iPad user interface.
- Increase Contrast (under Accessibility tap Display & Text Size): Use this setting to set up backgrounds in some areas of the iPad and apps with greater contrast, which should improve visibility.
- On/Off Labels (under Accessibility tap Display & Text Size): If you have trouble making out colors and therefore find it hard to tell when a setting is on (green) or off (white), use this setting to add a circle to the right of a setting when it’s off and a white vertical line to a setting when it’s on.
- Reduce Motion (under Accessibility tap Motion): Tap this accessibility feature and then tap the on/off switch to turn off the parallax effect, which causes the background of your Home screens to appear to float as you move the iPad around.