

Meetings & Chat is more than up the task. You can share your screen with others and even allow them to control your computer’s mouse and keyboard. What’s more, you can allow others to mark up your screen — and vice versa.
Share your screen with others
As the meeting’s host, you can easily share your screen with participants by following these steps:- During your meeting, drag your mouse to the bottom of the screen. Zoom displays the in-meeting menu.
- Click on the Screen Share icon. Zoom displays all your computer’s currently open programs, as you can see here.
 Selecting a screen to share with meeting participants.
If you’re using multiple monitors and programs, then expect a wide array of choices.
- Click on the specific screen, desktop, or application that you want to share with meeting participants. You can also select Zoom’s whiteboard or your tablet or smartphone if you've connected them to your computer via cables.
- (Optional) If you want to share your computer’s sound and/or optimize your screen-share session for playing videos, then select the corresponding checkboxes in the lower left-hand corner of the screen.
- Click on the Advanced tab at the top of the screen to do the following:
- Share a portion of your screen
- Share music or computer sound only
- Content from a second, external camera
- Click on the blue Share button in the lower right-hand corner.
 Zoom menu indicating active screen-sharing.
Zoom also places a green enclosure around the specific screen that you are sharing as a subtle reminder.
Just because another meeting participant can control your screen doesn’t mean that you are at his mercy. That is, you can still move your mouse, type your keyboard, and perform other normal computer functions.
Understand exactly what you’re sharing
Zoom’s robust screen-sharing options can confound newbies and even experienced users. To eliminate this confusion, refer to the first figure in this article. Why did Zoom display all of those screens?To answer this question, I need to supply some background information about how I work. My current computing setup includes a MacBook Pro and an ASUS external monitor. At the time that I shared my screen, I was running nine different programs on my computer. Taken together, you now understand why Zoom offered me so many different sharing options. (When it comes to screen-sharing, Meetings & Chat doesn’t discriminate.) For the sake of simplicity, I’m highlighting only four of them:
- Desktop 1: If I select this option (A), then I share any and all programs running on my MacBook Pro’s screen. Say that I hit Command+Tab on my Mac to toggle to a different program. (PC users use Alt+Tab to do the same thing.) Because I previously chose Desktop 1, all participants would continue to see everything on my Mac’s screen. Note that Zoom places a big white “1” on the left-hand side of my screen to remind me that I’d be sharing this desktop.
- Desktop 2: If I select this option (B), then I share any and all programs that I have pinned to my external monitor. When I hit toggle to a different program, then participants continue to see everything that I’m showing that monitor. Note that Zoom places a big white 2 on the left-hand side of my external monitor to remind me that I’d be sharing this desktop.
- Zoom’s whiteboard: Selecting this option (C) means that I am sharing my Zoom whiteboard only with meeting participants
- Microsoft Word: Selecting this option means that I’m sharing Microsoft Word (D) only during my meeting. As a result, when I switch to a web browser or Spotify, then Zoom automatically pauses screen-sharing for all meeting participants because I have effectively moved Word to the background. That is, it is no longer the active program on my computer.
There’s nothing absolute about Zoom’s screen-sharing options. Your specific choices will hinge upon your hardware and the applications that you’re running. A simple example will illustrate my point.
Samir works at Initech and uses a Microsoft Surface and does not connect an external monitor to it. He’s currently noodling with both a Microsoft Word document and an Excel spreadsheet. This figure shows a crude mockup of Samir’s screen. Mockup of a programs running on an employee’s desktop computer.
It’s time for Samir’s weekly meeting with his boss Bill. Samir shares only Microsoft Word with him. In specific this case, the term screen-sharing is a bit of a misnomer. In other words, Samir isn’t sharing his computer’s entire screen. Rather, he is sharing only one specific program: Word.
If Samir wanted to share Excel with Bill, then he would have to end his new screen-sharing session and initiate a new one. Of course, if Samir shared his entire desktop, then he could have concurrently shared both programs with Bill from the start.
Sharing a desktop with meeting participants can be very different than sharing a specific program.
When sharing your desktop, by default you cannot share the Zoom application itself. You can change this setting by following these steps:- Launch the Zoom desktop client.
- Click on the Settings icon in the upper-right hand corner. Zoom displays your settings.
- Click on Share Screen on the left-hand side.
- Select the Show Zoom windows during screen share checkbox.
Perform different tasks while sharing your screen
Of course, you may want to do more than just share your screen. Zoom allows you to perform the following related functions during an existing screen-sharing session:- Pause your screen-sharing session
- Stop sharing your screen altogether
- Share a different one of your screens with users
- If you want to temporarily stop sharing your screen, click on the Pause Share button. Zoom displays a message that reads, “Your screen sharing is paused.”
- If you want to share a different screen with meeting participants, click on the New Share button.
- When you want to stop sharing your screen, click on the red Stop Share button underneath the in-meeting menu in the center.
Those who don’t exercise caution when sharing their screens run the risk of embarrassing themselves and even losing their jobs
Let meeting participants control your screen
Peter works in IT, and he’s helping Bob diagnose an issue on the latter’s computers. For many reasons, Peter may want to control Bob’s screen remotely:- It’s just a more efficient way of working.
- Peter doesn’t want to keep barking orders at Bob. (This reason is my personal favorite for granting others the ability to control my screen.)
- Bob doesn’t care to know the exact steps required to solve it. He just wants Peter to take care of it for him.
- During your live meeting, drag your mouse or cursor to the bottom of Zoom. Zoom displays the in-meeting menu.
- Click on the Share Screen icon.
- After you share your screen, click on the Remote Control icon.
- (Optional) Select the Auto accept all requests option.
To let a specific individual control your computer, follow the same steps but instead select Give Mouse/Keyboard Control to: and click on the name of the participant to whom you want to give control of your computer.
- Advise others in the meeting that they can control your screen if they request access.
- Say that you don’t want to automatically accept all requests. When you see a participant’s request to assume control, click on the blue Approve button to grant her control of your screen.
Request control of a host’s screen
The following steps apply to meeting participants who would like to request control of the host’s screen:- Move your computer’s cursor to the top of the Zoom desktop client window. When you do, Zoom presents View Options menu.
- Click on the View Options menu and choose Request Remote Control from the menu that appears. Zoom indicates that you are requesting control of the host’s screen.
- Click on the blue Request button.
At this point, the host needs to approve your request.
Regain control of your computer
If you’re the host and want to resume control of your computer, follow these steps:- Return to the Zoom meeting. In other words, control the mouse and tab over from whatever other program or screen you were sharing.
- Mouse over the in-meeting menu
- Click on the red Stop Share button.
How to annotate your screen
Zoom lets meeting participants do far more than just share their screens with each other. With a few clicks, you can annotate others’ screens. In so doing, you can provide specific feedback, make insightful suggestions, or pinpoint a problem in a way that words alone often fails to do.Using a dedicated whiteboard
Odds are that you’ve seen a physical whiteboard at some point at work. Using markers, people in the room can sketch any number of diagrams on dry erase boards. They can document business processes, redesign org charts, mock up logos, write code, or just about anything else.Why should Zoom be any different?
After you do, Zoom displays its whiteboard in the following figure.
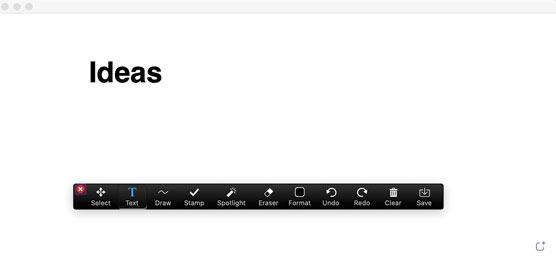 Zoom whiteboard with annotation menu.
The following table displays the whiteboard’s menu items and describes what they do.
| Name | Description |
| Select | Creates a box that engulfs your other annotations, allowing you to easily move them as a group. |
| Text | Enter text over any part of your screen. |
| Draw | Draw whatever you like with your mouse or touchpad. Zoom also lets you insert a number of basic shapes. |
| Stamp | Place different types of stamps. Examples include an arrow, checkmark, X, star, heart, and question mark. |
| Spotlight | Makes your computer’s cursor more visible. You can turn it into a red circle or a rightward arrow. |
| Eraser | As its name states, clicking on this button allows you to erase prior annotations or parts of them. |
| Format | Clicking here lets you change the color, weight, and font of your annotation. |
| Undo | Reverse your previous annotation. |
| Redo | Repeat your previous annotation. |
| Clear | Invoke three options: clear all drawings, clear your drawings, and clear viewers’ drawings. |
| Save | Saves the entire screen markup as a local file on your computer. |
Say that you lose track of Zoom’s the annotation tool menu. Just click on the Annotate button in the in-meeting menu. Zoom once again brings its annotation tools again to the front.
Zoom’s annotation tools are available only during screen-sharing sessions.
After you launch the communal whiteboard, others may want to add their own notes to it If you’re a participant and want to add notes to a communal whiteboard, follow these steps:- From the desktop client, move your computer’s cursor to the top of the Zoom desktop client window.
- From the View Options menu that appears, choose Annotate.
Note that everyone in the meeting can annotate at the same time.
Annotating a screen
Zoom doesn’t force meeting hosts and participants to use a dedicated whiteboard to make annotations. Everyone in the meeting can mark up a regular screen and the program running on it. The possibilities here are limitless, but here’s one common example.Geno is developing a new version of a website for his client Jerry. Geno invites Jerry to a Zoom video meeting and follows these directions:
- Share your screen with others.
- Click on the Annotate button in the in-meeting menu.
- From here, pinpoint design elements and changes in a far more specific way than mere words would allow. Returning to the previous example, Jerry can now show Geno exactly where he wants to move a picture or the logo in the header.
Invoking other meeting options
Hosts can invoke a few other options to control their meetings.Follow these steps to invoke these options:
- Launch the Zoom desktop client.
- Start a meeting and enable your video.
- Click on the Participants icon on the black in-meeting menu at the bottom of the screen. Zoom displays a new screen on the right-hand side.
- In the lower right-hand corner, click on the More button.
- Zoom presents the self-explanatory choices in the following table.
| Action | Directions and Results |
| Mute Participants upon Entry | This feature does exactly what you expect. If you select this option, then Zoom prompts with you an additional window in which you can allow them to unmute themselves. |
| Allow Participants to Unmute Themselves | If you only want participants to listen during the meeting or part of it, then disenable this option at any point. Note that this feature is useful when an unknown participant is generating distracting background noise. |
| Play Enter/Exit Chime | This option lets you enable or disable the sound that Zoom plays when these events take place. |
| Allow Participants to Rename Themselves | This small but important feature means exactly what you think it does. Changing Lawrence to Larry is one thing. Think carefully about whether you want people to represent themselves as someone else entirely during the meeting, though. |
| Lock Meeting | This option prevents new participants from joining the meeting, even if they know the PMI, meeting ID number, and/or password. |
| Clear All Feedback | If you have enabled nonverbal reactions, then Zoom allows the host to wipe them out in one fell swoop. Note that Zoom greys out this option if participants haven’t provided any feedback. |
| Enable Waiting Room | Selecting this option means that participants cannot enter the meeting, even if they know the PMI, meeting ID number, and/or password. |


