


- Public
- Private
- Multi-workspace channels (for Enterprise Grid customers only)
- Shared
Regardless of the type of channel, only workspace members can access the information inside of it. Put differently, even public Slack channels aren’t available to the general public.
Slack’s public channels
Let’s introduce the idea of a public channel by keeping it as simple as possible:They generally exist within a specific Slack workspace. Exceptions to this rule occur when you share a channel with another can create public channels.
How can you use public channels? The applications are limitless. The following image shows some of channels for a fictitious company.
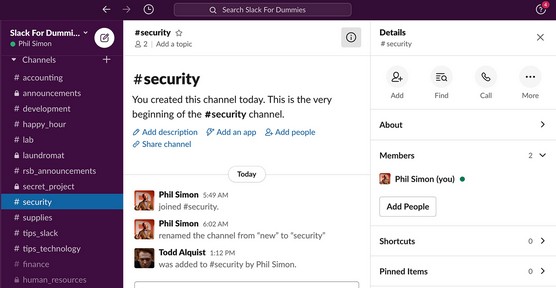 Workplace with Slack channels.
The key point is this: Each of channel serves a different purpose.
Here’s a real-world example of how one educator uses channels. One college professor teaches three sections of Introduction to Information Systems. In Slack, that professor uses more than two dozen public channels for each class each semester. Examples include channels for each the following:
- Each homework assignment: These are called #hw1, #hw2, and so on.
- General questions: Students usually use #ask_the_professor if their questions that don’t relate to specific homework assignments.
- Writing tips: Tips are posted in — wait for it — the #writing_tips.
Slack’s private channels
Like public channels, private channels also exist under a specific workspace. Public and private channels fundamentally serve the same purpose: to share context-specific information with a group of people. Any member in a Slack workspace can join — and contribute to — a public channel. The only exception to the latter is if the Workspace Owner or Admin has limited channel posting rights.For example, an organization may create public channels for #company_news or #system_issues. The rationale here is simple: all employees should be able to view this critical company information. For confidential discussions in #payroll_issues, #research, and #hr_staffing_plans, however, discussions probably aren’t fit for public consumption.
Unlike public channels, private channels appear only in users’ channel directories if they are already a member of that private channel. Put differently, if you’re not a member, then in theory you wouldn’t know that a private channel even existed.
Unlike public channels, private channels require invitations to join. That is, you cannot browse private channels and join them.
You can leave a public channel at any time and rejoin at your leisure. However, if you leave a private channel, an existing member will need to invite you back.
This begs the question: How do you know if a particular channel to which you belong is public or private? If you see a lock icon to the left of the channel name, then it is private.Returning to the image above, notice how the #announcements channel is private, but the #supplies and #tips_slack channels are public.
Note how #secret_project appears above the fray. This happens because it was marked as a favorite by clicking on the star icon. It then turns blue. Click on the icon again, and the channel will appear with the others because it ceases to be a favorite.
When you add users to private channels, they will be able to see the entire history of all previous communications.
Slack’s multi-workspace channels
What if your organization uses Slack but different departments set up separate workspaces? Employees want to be able to send messages, and share files, collaborate within the same channel. Slack makes such scenarios possible though multi-workspace channels (MWCs).You can skip the following information if you’re not using or considering Enterprise Grid.
Of course, Octavarium could always try to fuse together multiple workspaces.
Say that you work in your company’s finance department. You want to share a channel with your peers in accounting, even though the two groups use different workspaces. Follow these steps:- Click on the channel name in the sidebar of the finance workspace.
- Click on the information (i) icon in the top right-hand corner.
Slack displays a four-pane tab with the word Details above it.
- Click on the More icon on the far right.
Slack displays a panel underneath the icon
- Click on Additional Options.
- Select Add to Other [Organization Name> Workspaces.
Here you will locate the accounting workspace.Slack presents a search box with default text that reads Type a Team Name.
- Type a few letters of the workspace name with which you want to share this channel. When the workspace pops up, select it.
- Click on the green Review Changes button.
Slack warns you if the same workspace name already exists in the “target” workspace. If that’s the case, then rename the channel. Many people add an underscore when this happens. For example, @announcements becomes @announcements_.
Slack confirms that all members of both workspaces will be able to join this channel. What’s more, they will be able to see the channel’s history and files.
- Click on the green Save Changes button.
Members of the finance workspace now may join the MWC, view its content, and contribute on their own.
Multi-workspace channels work really well for organizations that meet two conditions. Specifically, these large firms have purchased Slack’s Enterprise Grid and rely upon multiple workspaces.
With Enterprise Grid, others can add you to a MWC without your consent at any point. If the MWC is public, then you can leave it if you like and rejoin it later. If the MWC is private, then you can leave it but you’ll need another invite to rejoin it.
Slack’s shared channels
We live in a collaborative world. At some point, you may well want to use Slack to work with people from other organizations and third-parties that also use Slack. Examples here include vendors, clients, and partners. What if you want to share a specific channel with them? Wouldn’t doing so would allow you to seamlessly collaborate with them?Customers of Slack’s premium plans can choose to share channels with external organizations.
Slack now allows up to ten different organizations to share the same channel. Of course, all organizations need to belong to a premium Slack plan. To share a channel with an external organization, follow these steps:
- In the sidebar, click on the name of the channel that you want to share with another organization.
- Click on the information (i) icon in the top right-hand corner.
Slack displays a four-pane tab with the word Details above it.
- Click on the More icon on the far right.
- From the drop-down menu, click Additional Options.
- Click on Share with Another Organization.
- Copy the link that Slack generates so that you can share it with the person in the external organization.
- Click on the green Done button.
You can email that link to the contact at the other organization. Alternatively, you can share the channel with another workspace that you own.
- Paste that link into your web browser’s address bar and hit Enter.
- Select the workspace with which you want to share that channel.
Slack asks you to review and accept the channel’s invitation.If the “receiving” workspace is on Slack Free plan, then Slack will prompt you to start a trial to a premium plan. You’ll have 14 days to kick the tires on this paid feature.
- Click on the green Accept Invitation box.
Slack has now successfully shared your channel with an another organization’s workspace. Slack now places two overlapping diamonds to the right of the channel to indicate that it’s shared. Also, Slackbot notifies all invitees that they now belong to the channel. Note that if the invitee doesn’t belong to a premium plan, then Slackbot notify will post a message with upgrade instructions.
If your organization is using Enterprise Grid, then one of the Org Owners or Admins may need to approve your request to share a channel with an external organization.
Ready to get started? Here are ten Slack tips to help give you an edge.


