

Creating a new Pro Tools session
To create a new session, choose File → Create New from the main menu or press ⌘ +N (Mac) or Ctrl+N (PC). The Dashboard opens. Here you can choose the following.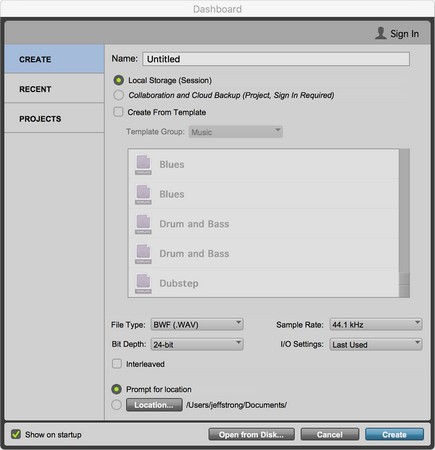 The New Session dialog box is where you set up a new song file.
Create
Choose this option to create a new session in one of three ways:- Local Storage (Session): This option opens a session with no tracks or routing assignments. Choose this option if you want to customize your session.
- Collaboration and Cloud Backup (Project, Sign In Required): Choose this option when you want to create a new session that you want to collaborate with others on the cloud. You’ll need to login in to your Pro Tools Master Account and navigate to the artist community.
- Create from Template: Choosing this option opens a menu of saved templates. To get started I recommend choosing this and taking a look at your options — you may find one that fits your needs pretty well. When you choose a template, all the tracks and setting assigned to that template automatically show up in your session. This can be a real timesaver if you want to create a complicated session with lots of tracks and send routing. You still need to choose the session parameters listed below to create your session.
If you plan to create a lot of sessions with specific tracks and signal routing settings, save your empty session (without the audio tracks) as a template to save you time later.
- File Type: This drop-down menu lets you choose between BWF (Broadcast WAV File) or AIFF files. Choose the one that works best for you. (I always use WAV files because they’re compatible with other software I use. Your needs may be different.) If you aren’t transferring your files from one program to another, I suggest using the default BWF option.
- Sample Rate: Here you choose the sample rate of your session. Your options depend on the Avid hardware you have. For example, if you have an Mbox Mini, your choices are between 44.1 kHz and 48 kHz. If you have an Mbox, you can choose between 44.1 kHz, 48 kHz, 88.2 kHz, and 96 kHz. If you have an Mbox Pro, or Eleven Rack, you can choose from six options: 44.1 kHz, 48 kHz, 88.2 kHz, 96 kHz, 197.4 kHz, and 192 kHz.
- Bit Depth: Depending on your version of Pro Tools, you can choose between a 16-bit rate, a 24-bit rate, or a 32-bit float rate (the 32-bit rate is only available with Pro Tools 10, HD or HDX). For most sessions select the 24 Bit radio button.
- I/O Settings: From this drop-down menu, you can choose between the most recently used setting, a stereo-mix setting, or from a list of other saved settings.
The higher the sample rate you select in the New Session dialog box, the more work your computer processor has to do. You often have to balance your desire for the highest-resolution music possible against the capabilities of your system.
The sample rate you choose depends on your goals, intended final format (CD, for example), and the speed of your computer’s processor. For example, if your session is going to have a ton of tracks and end up on a CD or be used for online distribution, your best bet is to choose 44.1 kHz because that’s where you’ll end up when you record to CD or this is the quality most online distributers want. Keep in mind, too, that using a whole slew of tracks means that your computer needs as much processing power as possible to handle mixing and processing tasks. In this case, recording at 96 kHz would likely put too much strain on your computer and deprive you of the power to do what you want during mixing.On the other hand, if you suspect you won’t use very many tracks and want the highest resolution possible — or if you have a very powerful computer and won’t go crazy creating multiple tracks — 88.2 kHz or 96 kHz may better meet your goals.
Get to know your system before you record a lot of music with it. Experiment with different sample rates and track counts to see what your computer can handle. With this information, you can get a good sense of how hard you can push your system before you reach the limits of its performance.
Recent
Choose this option to choose from recent sessions. This is the same window that opens when you choose File → Open Session from the main menu.Projects
Choose this option to choose from collaboration project sessions. This is the same window that opens when you choose File → Open Project from the main menu. If you aren’t signed into your Pro Tools account, click the Sign In button in the upper right. After you’re signed in, you’ll see your projects listed, if you have any.Opening Pro Tools sessions
To open a session, choose File → Open Session from the main menu or press ⌘ +O (Mac) or Ctrl+O (PC). The Open Session dialog box appears. Choose the file you want to open and then click Open.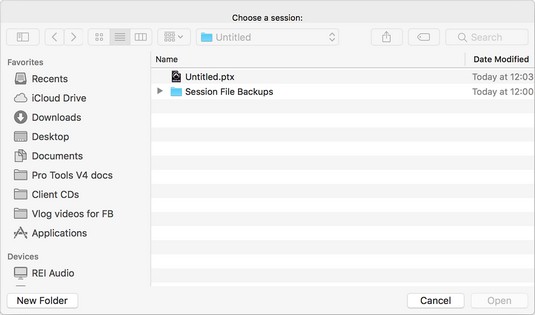 The Open Session dialog box.
If you have a session with more than 24 tracks and you want to keep those additional tracks, don’t open it in a Pro Tools version earlier than 5.3 (or if you do, don’t save it there) because any additional tracks will be lost when you click Save.
Saving your Pro Tools sessions
You have four options for saving sessions in Pro Tools: Save Session, Save Session As, Save Session Copy In, and Save As Template. As well, you can always return to a previously saved version of your session with the Revert to Saved command.Save Session
This is the same Save command that you find in any computer program. As usual, you choose File → Save to save your session. You can also initiate a save by pressing ⌘ +S (Mac) or Ctrl+S (PC).You should get used to saving from the keyboard often to prevent losing any data while you work. You can also turn on the Auto Save function and have Pro tools save your session automatically. Here’s how:
- Choose Setup → Preferences to access the Preferences dialog box.
- On the Operations tab, select the Enable Session File Auto Backup check box.
Save Session As
Choose File → Save Session As to save your session with a new name and/or location. You see the Save Session As dialog box.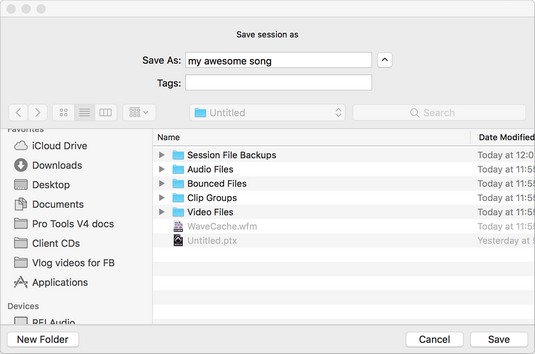 Choose the session name and location here.
Use Save Session As to save a variation of a session that you’ve been working on. Pro Tools users do this a lot when they're mixing because this way, they can have a bunch of different mixes to choose from. The good thing about this command is that it saves only the session data and not the audio or MIDI files, so the session won’t take up much room on your hard drive.
Save Session Copy In
If you want to transfer your files from one program to another (Pro Tools to Logic, for example), using the Save Session Copy In command can be useful. Choosing File → Save Session Copy In opens this dialog box.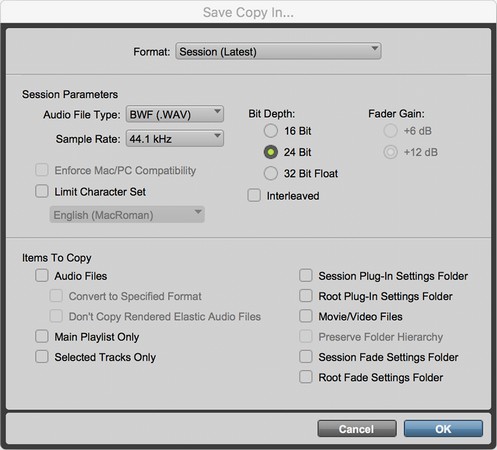 The Save Session Copy In dialog box allows you to change the type of file your session is formatted in.
Here, you can change the filename, location, and file type, among other options:
- Session Format: From this drop-down menu, choose the Pro Tools version you want to save in. Your options include to save the session as a project or as the latest version, as well as PT7–9 or PT5.1–6.9.
Keep in mind that you may lose some data if you save this session in an earlier version.
- Session Parameters: Use this section of the dialog box to choose the audio file type, sample rate, and bit depth. You can choose from the same options that you had when you first opened the session.
If you choose Session (Pro Tools 5.1 -> 6.9), you can also choose to force Mac/PC compatibility. If you want to share this session between a Mac and a PC, you need to select the Enforce Mac/PC Compatibility check box.
- Items to Copy: The Items to Copy section includes options for audio files, plug-in settings, and movie or video files that may be part of the session. If you plan on taking this session to another computer, use Items to Copy function when you choose what you want to copy.
Relying on Revert to Save
The Revert to Save command (choose File → Revert to Save) is a handy feature if you did a bunch of work since you last saved your session and want to undo it without having to use the Undo command (located under Edit menu) to backtrack through the steps and undo each one.Personally, if you're in the position of wanting to undo a bunch of stuff and haven’t used the Save command since starting those changes, you choose to save the session with the Save As command. This way, you have those changes just in case you do decide to keep them. If you go that route, the changes will be sitting in a separate session file, safe and (ahem) sound.
Creating a Pro Tools session template
To make your life easier, you can create a session template with all the options you want already in place — track settings, window views, mixer settings, and so on — so all you have to do when you open a new session is open the template and save it with your new session name.A variety of session templates comes with your Pro Tools software. To use them, choose the Pro Tools Session Templates folder from the Software CD-ROM and drag it onto your hard drive. Open the template session and rename it as your new session. You can use this folder for all your templates so that finding them again is easy. Choose File → Open session from the main menu, select the template folder from the Open Session dialog box, and scroll to the template you want to use.
To prepare a template, start by opening a new session and then creating your session as you want. After you set all the options to your liking, save the session file with a name that you’ll remember (like killer session template 1) so you can find it easily.To transform the session file you saved into a session template, use the following steps:
- Choose File → Save As Template.The Save Session Template dialog box opens.
 Use the Save Session Template to create a template for your session.
 - Select Install template in system or Select location for template.
- If you choose to install your template in the system, you choose the category and assign a name; your template will go into the default template folder.
- If you choose the select the location for your template, a navigation box appears when you click OK; then you can put the template anywhere you choose.
- In the Include Media selector, you can chose to have certain media included in your session template. For example, you may want to use a series of rhythm-section audio files to use in multiple sessions. Check this box and each time you create a new session based on this template, the files will be there for you.Your template is saved in the location that you chose when you opened the session.


