

These two types of audio processing — offline and real-time — are some of the more powerful mixing tools available to you in Pro Tools. With them, you can EQ your tracks and add compression, reverb, delay — and a myriad of other enhancements — to your music. Your only limitations are the plug-ins you have at your disposal and the processing power of your computer and your pocketbook. The following information introduces you to the two types of plug-ins — Real Time and AudioSuite — and then show you how to route your system so you can use them effectively.
Pro Tools: Real Time Plug-ins
Real time plug-ins process your audio while your session plays, allowing you to make adjustments on the fly and be able to hear these changes immediately. This is handy for adding compression, delay, and reverb, for example. The drawback to this is that anytime you process as your session plays, you’re using up more of your computer’s processing power — sometimes a lot more, as in the case of reverb. The following sections lay out the basics of using Real Time plug-ins. Pro Tools requires plug-ins in the AAX, 64-bit format.Routing your Real Time plug-ins
Real Time plug-ins are like the effects processors that you plug into your mixer. The sound from your tracks are sent to these effects and routed back through the mixer so you can hear the affected sound.The two ways to place these effects in your mixer within Pro Tools are by using inserts or by using sends and returns.
- Inserts: Inserting a plug-in basically involves putting the effect inline with the audio as it travels through the channel strip in your mixer. This means all the sound from the audio file passes through the effect on its way out of the mixer (and to your ears).
When you insert a plug-in, you can choose from three formats:
- Mono in/mono out: One channel goes in and one comes out of the effect.
- Mono in/stereo out: One channel goes in, and two come out.
- Stereo in/stereo out: Two channels go in, and two channels come out.
- Sends: Using a send for your effects lets you route a portion of your track’s signal that you can then control with the Send level. These sends are routed to an auxiliary track, into which the effect is inserted. Thus you can route more than one track to a single effect.
Understanding the Real Time Plug-In window
When you select a plug-in (or click its name in the Inserts section of a track’s channel strip), a window opens, displaying all the controls for the plug-in.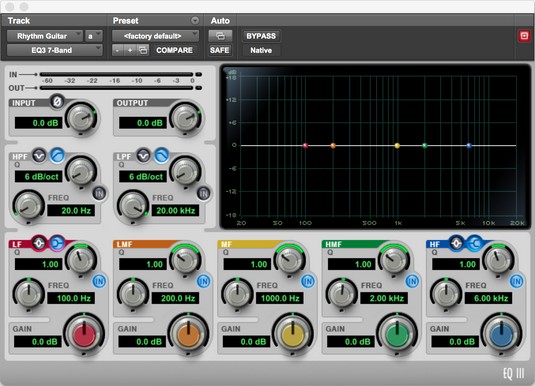 Most plug-in windows have some similar controls.
Most plug-ins usually have controls at the top of the window, similar to the ones described in the following list:
- Track Selector: This control lets you choose to view the plug-ins for any of the tracks in your session (except MIDI). Selecting a track without a plug-in shows no insert.
- Insert Position Selector: Use this to access any insert on the current track.
- Plug-In Selector: From this menu, choose from any Real Time plug-in that’s located in your Plug-Ins folder (the one located within the Pro Tools folder on your hard drive).
- Effect Bypass Button: This button (surprise, surprise) bypasses the effect, allowing you to quickly and easily compare the affected and unaffected sounds. A bypassed effect shows as blue in the Mix and the Edit windows. If you bypass some (but not all) of a multi-mono effect, the effect shows as purple in the Mix and the Edit windows. This makes it easy for you to see whether one of your effects is bypassed without having to open all your Plug-In windows.
- Settings menu: Clicking and holding on the arrows at the left side of the plug-in window accesses the Settings drop-down menu which lets you save, copy, paste, import, delete, and lock your plug-ins’ settings, as well as set plug-in preferences (such as where to store these settings).
 Use the Plug-Ins Settings menu to save settings, among other things.
 - Librarian menu: From this drop-down menu, choose from plug-in settings you have stored. This menu is activated by clicking and holding the setting name next to the arrows for the Settings drop-down menu.
- Previous (-) button: Clicking this button moves to the previous saved plug-in preset in your preset list.
- Next (+) button: Clicking this button moves to the next saved plug-in preset in your preset list.
- Preset list button: Click this button to open the plug-in preset list, from which you can select the preset you want.
- Compare button: Click this button to toggle between your current and your previous setting.
- Auto button: Clicking this button opens the Plug-In Automation dialog box, from which you can set automation for your selected plug-in parameters.
- Automation Safe button: Engaging this button keeps any written automation data from being overwritten.
- Master Link button: Enabling this button allows you to control all channels of a multi-mono plug-in at once. You can see the channels of your session in the gray box above this button. The small black square represents the channels.
- Channel selector: This button lets you choose the channel to adjust for the plug-in.
- Target button: Depressing this button keeps the current Plug-In window open when you open another plug-in. With this button off, clicking the plug-in name in a track’s insert replaces the open window with a new window.
- Phase Invert button: This button (not available on all plug-ins) allows you to reverse the phase of the audio passing through the plug-in. This means flipping the waveform top to bottom.
Working with Real Time plug-ins for Pro Tools
Chances are that you’ll spend quite a bit of time using plug-ins. Unless you have a control surface, you’ll probably end up spending more time than necessary just mouse-jockeying the controls. In the following list, you find some shortcuts to make working with plug-ins quicker and easier:- To make fine adjustments with your mouse: Press ⌘ (Mac) or Ctrl (PC) while you drag the plug-in control.
- To return a control to its default setting: Press Option (Mac) or Alt (PC) while you click that control.
- To move through the controls in a plug-in: Press the Tab key on your keyboard. To go backward, press Shift+Tab.
- For plug-in parameters that offer kilohertz (kHz) values: Press the K key after the number of kilohertz you want to enter. For example, to enter 10 kHz, type 10k.
- To increase the value of a parameter without using your mouse: Press the up-arrow key (↑) on your keyboard; to decrease a value, press the down-arrow key (↓).
- To enter a value via your keyboard: Type in the value in the parameter box and then press Return/Enter.
Using AudioSuite offline plug-ins with Pro Tools
Pro Tools comes with a variety of offline plug-ins — that is, effects that you can use to process your tracks so that you end up either altering the original audio file or creating a new one. These types of plug-ins are listed under AudioSuite in the main menu. The image below shows the AudioSuite menu. Each item expands to include all plug-ins available for that plug-in type.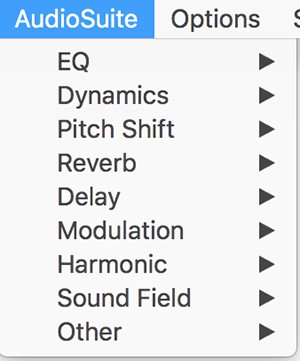 Use AudioSuite plug-ins to process your tracks offline.
When you select a plug-in from the AudioSuite menu, a window opens, containing all the controls for the plug-in. You’re going to find the same kinds of controls for nearly all the plug-ins. They include the following:
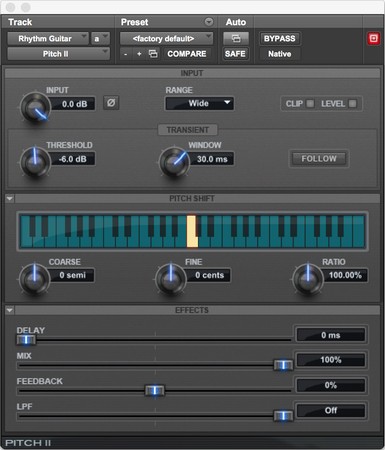 AudioSuite plug-in windows have some similar controls.
- Plug-in Selector: From this menu, choose from any AudioSuite plug-in listed in the AudioSuite menu.
- Selection Reference: This menu lets you choose which clips are processed. By default, when you select a clip in the track, the playlist, or the Audio Clips list, all occurrences of the selected clip are processed. You can limit the processing to the track/playlist or the Audio Clips list by selecting from the drop-down menu. Your choices are
- Playlist: If you choose Playlist, only clips that are selected in tracks or playlists in the Edit window are processed.
- Clip List: If you choose this option, only clips selected in the Audio Clips list are processed.
- Use in Playlist: This button lets you choose whether your chosen processing happens to all instances of your selected clips throughout the session, or whether processing happens to only those you have selected. The settings are as follows:
- Off: When this button is disabled, your processed audio is added to the Audio Clips list but not put into the session.
- On: When this button is enabled, the processed audio is placed in the playlist according to the Selection reference you chose. (See the Selection Reference bullet.) If you have Clip List selected, all copies of the clip are replaced within the session. If you selected Playlist, only the clips that you selected in the tracks are replaced.
- File Mode Selector: From this menu, choose how your audio is processed. You have three options:
- Overwrite Files: This option destructively overwrites your original file. Not all plug-ins have this option.
- Create Individual Files: This option creates a new audio file for each clip processed. These clips appear in the Audio Clips list.
- Create Continuous File: Choosing this option processes the selected clip as a single audio file. This option isn’t available when you have Clip List chosen as your Selection reference. (See the earlier Selection Reference bullet.)
- Process Mode Selector: This menu appears if you have a selection that includes more than one clip. With it, you can select whether processing is done clip by clip or whether it affects the entire selection.
- Settings menu: This drop-down menu lets you save, copy, paste, import, delete, and lock your plug-ins settings as well as set plug-in preferences (such as where to store these settings).
- Librarian menu: From this drop-down menu, choose from plug-in settings that you have stored.
- Compare button: Click this button to compare the unprocessed sound with the processed sound.
- Preview button: Pressing this button lets you preview the audio before you commit to processing it.
- Bypass button: This button bypasses the effect, allowing you to quickly and easily compare the affected and unaffected sounds. (This button applies only to the Preview feature and doesn’t change the processing of the file.)
- Process: Clicking this button processes the clip(s) you selected according to the rest of the settings in this window.
Using AudioSuite plug-ins to process an audio clip
You can use the AudioSuite plug-ins to process any part — or all — of an audio clip. If you choose part of a clip, that clip is split so the selected part becomes its own clip.To use an AudioSuite plug-in, follow these steps:
- With the Selector tool, select the clip or clips (click and drag across them) in the Edit window you want to process.
When you process audio by using the Reverb or Delay plug-ins, make sure your selection includes extra room at the end of your material to include the actual reverb and delay; otherwise, the sound will be cut off.
- Choose the plug-in from the AudioSuite menu.
The Plug-In window appears.
- Click the Speaker icon in the lower left (Preview Processing) to hear your selected material.
- Adjust the plug-in controls until you get the sound and processing settings you want.
The previous section spells out what these settings are for.
- Click the Render button.
Pro Tools processes your audio.
Be aware that the processing can take some time and always demands some computer resources.


