

You probably don’t know how you like your preferences, at least not yet. But you will soon. This article helps you adjust each item in every preferences pane.
Take a quick look at each of the preferences panes so that you know what they are, where they are, and how to configure them appropriately. For many of you, I’m hoping to do this before you try to make music.
General pane
Using the General pane is generally painless. In this section I examine each option, starting at the top.To get to the General pane (and the other preferences panes), choose GarageBand→Preferences (or press Command+,) and click the General tab at the top of the Preferences window. The pane shown appears.
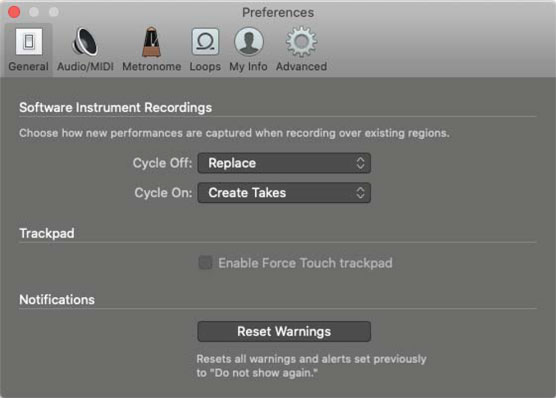 The General Preferences pane.
Software Instrument Recordings section
The first section of the General Preferences pane governs what happens when you record over an existing software instrument recording, known as a region in GarageBand parlance. To understand the Cycle Off and Cycle On pop-up menus, you first have to understand the cycle area and cycle mode, labeled.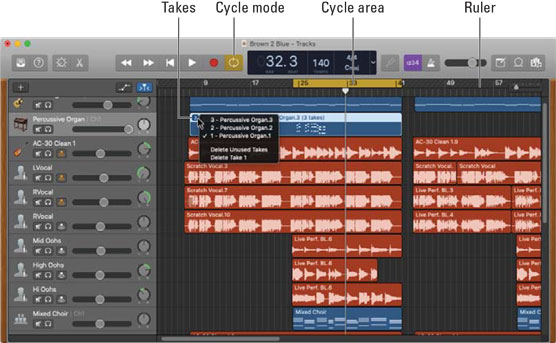 Use the cycle area to continuously replay a part of your project.
You use the cycle area to play a specific part of your project over and over. It’s handy any time you need to hear part of a song repeatedly, such as when you want to practice a challenging passage before recording it; record multiple takes without pausing; listen critically to a specific part of the project while mixing or mastering.
To enable the cycle area, do one of the following:
- Click the cycle mode icon in the toolbar.
- Click and drag in the top part of the ruler.
- Press the C key on your keyboard.
Now that you know about the cycle area, let’s dig into the pop-up menus on the General pane.
The Cycle Off pop-up menu determines what happens when you record a software instrument track over an existing region with cycle mode off:
- Choose Replace to overwrite previously recorded regions when cycle mode is off.
- Choose Merge to merge your performance with previously recorded regions when cycle mode is on.
- Choose Create Takes to record multiple takes on a single track. You can then choose which take is active by clicking the take number for the track and choosing a take from the drop-down menu, as shown.
- Choose Merge to merge your performance with previously recorded regions on that track.
Enable the Force Touch Trackpad check box
Enabling the check box labeled Enable the Force Touch Trackpad adds additional gestures you can use with your Force Touch trackpad.This check box is disabled if your Mac doesn’t have a Force Touch trackpad. (It's disabled in the figure because my MacBook Pro doesn’t have a Force Touch trackpad.)
Reset Warnings button
Use the Reset Warnings button to reset all warnings and alerts previously set to Do Not Show Again. Put another way, click the button if you’d like to see those warnings and alerts again.Audio/MIDI pane
Many Macs have built-in microphones and speakers as well as audio input and audio output. If you have a USB or Thunderbolt audio interface, the interface has at least one audio-in and one audio-out port. The Audio/MIDI Preferences pane lets you specify which device you want to use for output (listening) and input (recording).The Audio/MIDI pane, shown, is where you select the input and output that you want GarageBand to use. It’s also where you optimize GarageBand’s performance. Last but not least, this pane tells you how many MIDI devices GarageBand recognizes at the moment.
 The Audio/MIDI Preferences pane.
To open this pane, choose GarageBand→Preferences (or press Command+,) and click Audio/MIDI at the top of the Preferences window. The following sections explain your options.
Devices section
The first section in this pane is Devices, which contains the Output Device and Input Device menus. If your Mac has more than one audio input (for example, the built-in audio-in port plus a USB or Thunderbolt audio interface) or output (for example, the built-in headphone port or a USB or Thunderbolt audio interface), choose the one you want to use from these menus.That’s it. If you see only one input and output choice in either menu on your Mac, wave bye-bye. You won’t have to use them much until you add a new audio device to your setup, and you can ignore the upcoming warning.
If you see two or more input or output choices, read the upcoming warning carefully.
If you see two or more choices in either menu and you like to plug and unplug your audio devices with reckless abandon (like yours truly), you should read this warning even more carefully, because it’s even more likely to apply to you.
When you don’t hear what you expect to hear; the sound is not coming from the speakers or headphones that you expected; or your microphone or instrument doesn’t play through, don’t panic. GarageBand has a maddening tendency to change the inputs and outputs you’ve selected for no apparent reason and without permission. So, if the music isn’t coming or going where you expect it, check these two menus first.
Here’s another tidbit: If you unplug the current input or output, GarageBand, always the model of politeness, informs you of the change. I disconnected my Scarlett Solo audio interface and saw the warning dialog shown.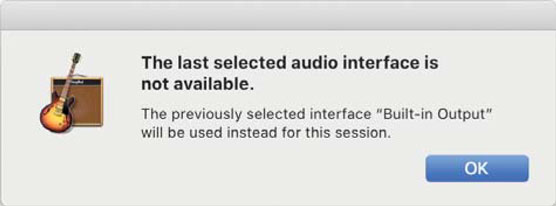 You’ll see a warning like this if you disconnect an output (or input) device while GarageBand is running.
Effects section
The Effects section has a single check box that determines whether or not GarageBand will recognize third-party plug-ins known as audio units. If you have never downloaded or purchased a plug-in, feel free to leave the Enable Audio Units check box deselected. But, if you do have plug-ins, you won’t see them in GarageBand unless audio units are enabled here.MIDI section
The last section in the Audio/MIDI pane is MIDI. In this section, you see the MIDI Status item, which reports how many MIDI devices GarageBand believes are connected to your Mac at the moment. So, MIDI Status isn’t a preference; it just displays a bit of information.In the preceding figure, you can see that my device (a MacBook Pro) has one MIDI device connected to it.
Now wave bye-bye to this feature. You probably won’t need to look at it again.
Metronome pane
Before I talk about the Metronome Preferences pane, let me explain what a metronome is and why you will probably need to use it.It’s important to keep time with your song so you can play the right notes at the right time. To do that, you need to hear a steady beat. GarageBand’s built-in metronome plays that steady beat (sometimes called a click track) to help you play and record in perfect time at the project tempo you’ve specified.
You can turn the metronome on or off at any time — while recording, playing back, mixing, or mastering. But you’ll probably find it most useful while recording tracks.
To make a choice that suits you, here are some tips to keep in mind:
- To play or sing in time with a song’s time signature, tempo, and other tracks, use the metronome every time that you record a track. Just remember that YMMV (your mileage may vary). Some musicians have perfect time and can play entire pieces without missing a beat. I’m such a lousy musician that I have trouble staying in time, even with the metronome clicking away.
- You may prefer to toggle the metronome on and off, which I do often. To do so, click the metronome icon in the toolbar (and shown in the margin) or press the K (for klick) key. You can tell whether the metronome is on (without listening) because the icon is highlighted in purple. If it's on and you click the icon (or press the K key) again, the button turns gray and the metronome shuts up.
As the song’s track count increases, it gets harder to hear the metronome anyway. That’s why you may want to record your rhythm tracks — mostly drums and bass — first.
Just know that the metronome is there if you want it, during recording or playback. It can be turned on and off in a heartbeat by pressing its keyboard shortcut (K)— that is, unless that heartbeat happens to beat while you’re playing or recording.If you’re playing or recording, follow these steps to toggle the metronome on or off:
- Press the spacebar (to pause recording or playback).
- Click the metronome icon (or press the K key) to turn the metronome on or off.
- Press the spacebar to start playback or press R to start recording.
- Tone slider: Move this slider left or right to change the sound of the metronome. Play with various settings to determine which tone works best for you.
- Volume slider: Move this slider left to make the metronome quieter or to the right to make it louder.
 The Metronome Preferences pane.
Loops pane
The Loops Preferences pane has three little settings, as you can see.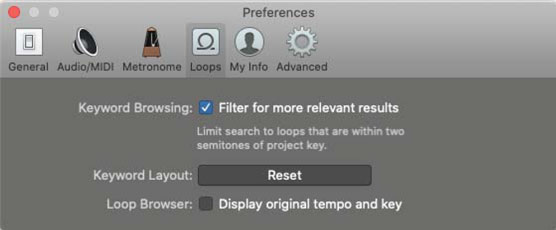 The Loops Preferences pane.
Keyboard Browsing setting
In the first setting, the Filter for More Relevant Results check box does exactly what it says: If you deselect this check box, you see more loops, but many of them won’t sound good in your song.It may seem that finding more loops would be a good thing, but it’s not — so resist the temptation. Try it if you have the time, and you’ll see my point.
I always keep this check box selected. You can deselect yours if you like, but if you do, I hope you don’t waste too much time with loops that sound lousy in your composition.
Keyboard Layout setting
The loop browser uses keywords to describe the sounds in loops. The keywords appear on buttons in the loop browser’s button view (shown) and can be customized by clicking and dragging a button to a different position. Click the loop browser icon and then click Instrument (shown here), Genre, or Descriptors, each of which presents a different set of buttons.
The Reset button in the Loops Preferences pane will set your mess back to the original layout when you decide that you hate what you’ve created.
Blowing away these customizations isn’t a big deal; you don’t lose sounds or settings. Only the positions of the keywords in the loop browser’s button view are changed.
Loop Browser setting
Last but not least, enable the Display Original Tempo and Key check box to see the tempo and key for each loop in the loop browser. If you don’t care to see the tempo and key for every loop, leave it deselected and leave more room onscreen for the loop’s name.My Info pane
You use the My Info pane, shown, to set your desired playlist, composer, and album name when you export a finished song into iTunes. As usual, you get to the pane by choosing GarageBand→Preferences (or by pressing Command+,) and clicking My Info at the top of the window.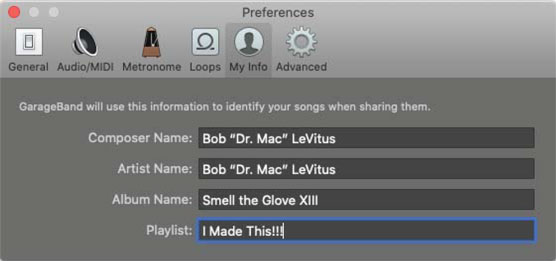 The My Info Preferences pane.
When you’re ready to export a song, GarageBand uses the information in the four text fields shown in the pane: Composer Name, Artist Name, Album Name, and Playlist.
So, when I export a finished song by choosing Share→Song to Music (or iTunes on Macs running macOS Mojave or earlier), the song arrives in the Music app (or iTunes) with the information that I typed in the My Info pane already entered for me in the Share to Music (or iTunes) dialog, as shown.
 I’ll send this finished version of Brown 2 Blue to the Music app now.
That’s nice, but what’s nicer is that the app also picked up the title of the song — which I never typed into the preferences pane!
All the fields are editable, so you can make changes before you click the Share button and send the song to Music (or iTunes).
Advanced pane
The Advanced pane, shown, doesn’t contain anything advanced. My guess is that Apple is trying to keep you from changing these settings unless someone else tells you to.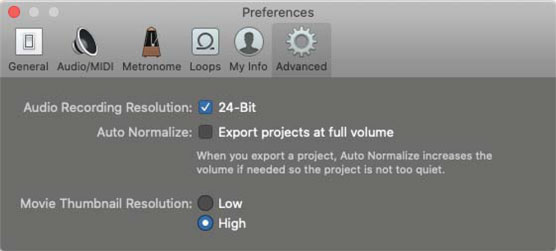 The Advanced Preferences pane.
Audio Recording Resolution setting
GarageBand can record audio at two resolutions (kind of like quality levels). The default is to record higher quality 24-bit audio, but you can disable the 24-bit check box if you want to record smaller, lower quality 16-bit files instead.In my humble opinion, you should always record at the highest resolution available. You can always compress (shrink) the file later if necessary. If you record at 16 bits, your song will sound worse than at 24 bits. Sure, you’ll save a few megabytes of disk space, but it’s usually not worth it.
Record something in 24 bits, then record it again in 16 bits. If you don’t hear a difference, or the difference doesn’t bother you, disable the 24-bit check box and save some space.Auto Normalize setting
The Export Projects at Full Volume check box is selected by default, so GarageBand automatically exports your project at the optimum loudness — the highest volume level at which no distortion occurs. If you’ve set your track or master levels imperfectly, Auto Normalize does a great job of making them sound better when you export them, which is why I recommend keeping this check box enabled. Unless, like yours truly, you prefer to manage final volume levels manually when you master.One last thing: This setting has no effect on the volume level of tracks playing back in GarageBand; it comes into play only when you share (export) your song.


