
So, if you’re using GarageBand on an iDevice, give the Mac keyboard shortcuts a try. And, if you record a great take (on any device) with one or two small mistakes, here’s the easiest way to silence the boo-boos and salvage your otherwise stellar performance.
GarageBand keyboard shortcuts for the Mac
Keyboard shortcuts are awesome —they save you time and effort every time you use them. It will pay to memorize these useful shortcuts as quickly as possible to make working with GarageBand faster and easier.
Working on the Timeline
| Action | Shortcut |
| Go to beginning | Return |
| Go to beginning and play | Enter |
| Go to the end (of the last region) | Option-Return |
| Play/Pause | Spacebar |
| Record | R |
| Move playhead back one bar | , (comma) |
| Move playhead forward one bar | . (period) |
| Zoom in | Command+right arrow |
| Zoom out | Command+left arrow |
Showing & Hiding Various Functions
| Action | Shortcut |
| Automation | A |
| Smart Controls Window | B |
| Score Editor | N |
| Loop Browser | O |
| Piano Roll Editor | P |
| Library | Y |
| QuickHelp | Shift+/ (backslash) |
| Full Screen | Command+Control+F |
| Musical Typing | Command+K |
| Master Track | Command+Shift+M |
More Useful Shortcuts
| Action | Shortcut |
| Cycle area toggle | C |
| Metronome toggle | K |
| Count-in toggle | Shift+K |
| Snap to grid toggle | Command+G |
Editing and Arranging
| Action | Shortcut |
| Undo | Command+Z |
| Redo | Command+Shift+Z |
| Split region | Command+T |
| Join selected regions | Command+J |
Tricks with Tracks
| Action | Shortcut |
| Create new track | Command+Option+N |
| Create new real audio track | Command+Option+A |
| Delete selected track | Command+Delete |
| Mute toggle for selected track | M |
| Solo toggle for selected trackS | |
Silencing mistakes in GarageBand
Some tracks just can’t be fixed. But if nothing else so far in this chapter has helped, you can try one more tool: the track volume automation rubber band, which you use to make the mistake fade out gradually so that no one knows that the mistake was ever there.
Using Track Volume Automation Control Rubber Bands on a Mac
Here’s how to use the track volume automation rubber band to erase a mistake on a Mac:
- Click the automation icon at the top of the track list. The automation icon looks like this:
The track volume automation rubber band controls are now enabled.
- Select the track that you want to adjust and choose Volume from the Automation Parameter pop-up menu. Listen to the track and find the mistake.
- Click the rubber band to create a control point one or two seconds before the mistake.
- Add two more control points in the middle of the mistake, and another a second or two after the mistake.
- Now drag the two middle control points downwards to reduce or eliminate the sound during that portion of the track, as shown in the figure.
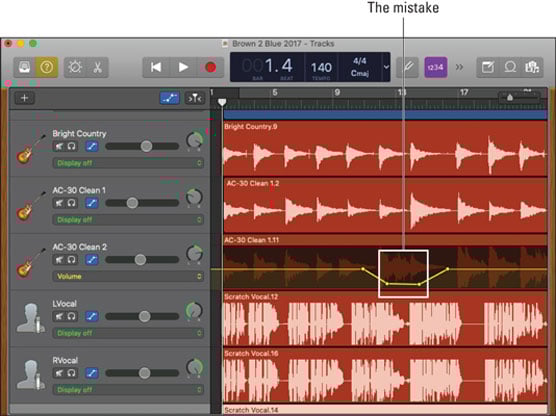
To find the precise location to start fading out and in, move the playhead back and forth and click the play icon or press the spacebar to listen. Or use the cycle area to listen to a small segment repeatedly. When you find the mistake, begin your fade out before the mistake occurs and end your fade in after the mistake ends.
This trick won’t work every time, but if your song has enough other stuff going on, you can usually fade a mistake right out of the mix, with no one (except yourself) the wiser.
With Automation Curve Rubber Bands on an iDevice
Some tracks just can’t be fixed. If nothing else you’ve done has worked, you can try one more tool: automation curves, which you use to make the mistake fade out gradually so that no one knows that the mistake was ever there.
If this feature sounds like the track volume automation controls you use in the Mac version, you’re right — it’s the same feature but with a different name. Why would Apple do that? Who knows.
Here’s how to use automation curves (the feature known as track volume automation controls on the Mac) to erase a mistake:
- Listen to the track and find the mistake.
- Tap any track header, and then tap it again to reveal the available commands.
- Tap Automation. All tracks expand to reveal their track automation curves, as shown in the figure.
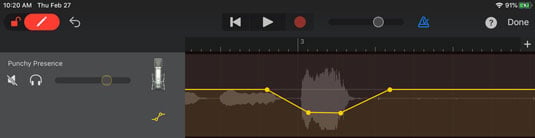
If part of the vocal is too loud, use the automation curve to make the loud part quieter. - Slide the pencil on the left edge of the control bar to the right to unlock the automation curves so you can add control points.
- Tap the track’s automation curve (rubber band) to create a control point one or two seconds before the mistake.
- Tap to create three more control points—two in the middle of the mistake and one after the mistake, as shown.
- Drag the two middle control points downward to reduce or eliminate the mistake, as shown.
To adjust precisely when this adjustment begins and ends, drag the first or fourth control point to the left or right. To make the adjustment louder, drag the two middle control points upward; to make it quieter, drag the two middle points downward. To delete a control point, tap it once.
This trick won’t work every time, but if your song has enough other stuff going on, you can usually fade a mistake right out of the mix, with no one (except yourself) the wiser.