


Page formatting commands in Word 2013 usually affect every page in a document: The settings for margins, page orientation, paper size, and other types of formatting apply themselves not to a single page but rather to every dang doodle page, from 1 to N, where N is the mathematical concept best explained as "I don't know how huge this number could be."
Sometimes, however, you need a document that isn't formatted the same way, page after page. For example, you may want to change page number formats, or have the first page of a document be an unnumbered cover page. These tricks are possible with sections.
Understand sections
A section is a part of a document that contains its own page formatting. It can be a single page or a range of pages, or a section can comprise the entire document.
All Word documents have one section. That’s how page formatting works, and it's why all the page-formatting commands affect all pages in a document in the same way. When you need to change the page formatting within a document, you carve out a new section.
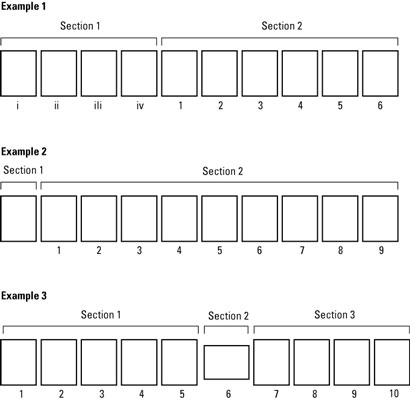
In Example 1, a single document contains two sections. The first section uses Roman numeral page numbers. The second section uses human numerals.
In Example 2, the document also contains two sections. The first section is a cover page that has no page numbering. The second section — all the remaining pages — uses page numbering. Also, see how the second page in the document is numbered as page 1? Again, that’s because the page numbering applies only to section 2.
In Example 3, there are three sections in the document. The first and third sections sport the same formatting; the second section was created so that page 6 could be presented in landscape orientation.
When your document demands a change in page formatting, you use Word’s section commands to make it happen.
A section is basically a chunk of your document where page formatting can be different from, or unique to, the rest of your document.
Text and paragraph formatting, as well as any styles you may create, don’t give a hoot about sections. Sections affect only page formatting.
How to create a section
Most often, a new section begins on a new page. It’s called a section break, and it’s similar in appearance to a page break. The difference is that the new section can sport its own formatting.
To create a new section in your document, heed these steps:
Position the toothpick cursor where you want the new section to start.
Click the mouse where you need to begin a new section, similar to creating a new page break.
Click the Page Layout tab on the Ribbon.
Click the Breaks button.
The Breaks button is found in the Page Setup group. Upon clicking that button, you see a menu with seven items. The last four items are various section breaks.
Choose Next Page from the Breaks button menu.
A page break is inserted into your document; a new section has started.
After the section is created, you can then modify the page layout and format of each section in your document.
How to use sections
To apply a specific page format to one section only, use the dialog box associated with the format, such as the Page Setup dialog box. In the dialog box, look for the Apply To drop-down list. To apply the format to the current section, choose This Section. That way, the format controls only the pages in the current section.
Follow these general steps:
Set the page number for the first section.
If the first section isn’t to have page numbering, don’t set a thing.
Create a new section at the page where you want the numbering style to change.
You need to make a Next Page type of section break.
In the new section, use the Page Number Format dialog box to set the new page numbering style: Choose the Start At option to start new numbering in the current section.
Click OK.
The second section starts page numbering at the number and in the style you specified in Step 3.
To change page orientation in the middle of a document, obey these general steps:
Move the toothpick cursor to the page where you desire the new orientation.
Create a Next Page section break.
Choose the new orientation from the Orientation button on the Page Layout tab.
The document at this point has two sections: The initial section uses one orientation, and then the last page has a different orientation. To set the rest of the document back to the original orientation, continue with Step 4:
Create another Next Page section break.
The document now has three sections.
On the new (last) page of the document, restore the original orientation.
In the end, you have a document with three sections and two orientations.
How to delete a section break
A section break is just like a character in your document. To delete the break, you can use the Backspace or Delete keys. For example: Position the insertion pointer just before the section break and then press the Delete key.
When you have trouble finding the section breaks, switch to Draft view: Click the Views tab and choose Draft from the Views group. You can also summon the Section indicator on the status bar. In that case, position the toothpick cursor at the top of the page and then press the Backspace key.
Deleting a section removes any formatting, including headers and footers, that was unique to the section. If you accidentally delete a section break, you lose any special formatting that you applied to the section. In this case, press the Undo shortcut, Ctrl+Z, before you do anything else.


