


When things grow complicated with your document’s graphics in Word 2013, you enter the realm of image organization. Multiple images often require positioning, aligning, arranging, and grouping into a unit. It’s not a complex thing, but rather a timesaver that you can employ.
All commands are found on the Format toolbar, in the Arrange group. Obviously, the graphical image(s) must be selected for that toolbar to appear.
To select multiple images, press and hold the Shift key as you click each image.
How to line up your graphics
One way to help organize and lay out multiple images on a page is to show the grid: Choose the View Gridlines command from the Align button’s menu. Instantly, the page turns into graph paper, to assist you in positioning your graphics and text.
When you find the grid annoying, you can disable gridlines: Choose the View Gridlines command from the Align button’s menu again. But you can also employ the Alignment Guides feature. It’s also found on the Align button’s menu.
With the Alignment Guides option on, a lime green line appears as you drag an image close to the page margins, or when the image is aligned with the top or bottom edge of another graphic on the page. Use that green line to more precisely position the image.
How to arrange multiple images
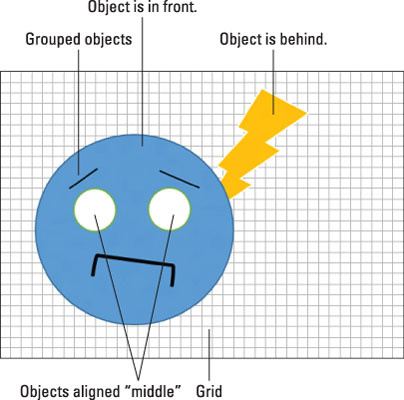
New images are plunked down on a page one atop the other. You don't notice this arrangement unless two images overlap. When you're displeased with the overlapping, you can change the order of an image by selecting it and using the Bring to Front and Send to Back buttons in the Format tab’s Arrange group.
To help you keep multiple images lined up, use the Align button's menu. After selecting multiple images, choose an alignment option. For example, using the Align Middle command sets the eyeballs on the face image. Further, the Align Selected Objects option was chosen from the menu to ensure that the objects align with each other and not with the edge of the page or the paragraph’s margins.
To align objects to the page’s edge, choose the option Align to Page from the Align menu. With this setting on, images can be aligned with the page’s edge by using the Align menu.
To line up a caption box below an image, ensure that the setting Align Selected Objects is chosen from the Align menu. Start by selecting both the image and its caption and then choose the Align Center option. You might also want to group the image and its caption.
The Distribute Horizontally and Distribute Vertically commands on the Align menu can help you evenly space out a row or column of images.
How to group images
When you cobble together a complex image using smaller pieces, or when you arrange shapes or pictures — or an image and its caption — keep those items together. That way, you can move them as a single unit, copy and paste, or apply image effects. The trick is to group the separate items into a single object.
To group images in your document, select the images and then choose the Group command from the Group Objects menu. The images are then treated as a unit, which is a collection of individual Word shapes.
To ungroup, click on the grouped images and then choose the Ungroup command from the Group Objects menu.


