


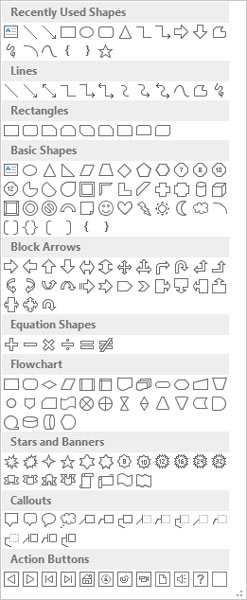
To draw an object on a PowerPoint 2016 slide, first call up the Insert tab on the Ribbon. Then click the Shapes button (located in the Illustrations group) to reveal a gallery of shapes you can choose from, as shown here. Finally, select the shape you want to draw from the Shapes gallery.
Here are some pointers to keep in mind:
Choosing a location: Before you draw an object, move to the slide on which you want to draw the object. If you want the object to appear on every slide in the presentation, display the Slide Master by choosing Slide Master in the Master Views section of the View tab on the Ribbon or by Shift+clicking the Normal View button.

Fixing a mistake: If you make a mistake while drawing a shape, the Undo command on the Quick Access Toolbar can usually correct the mistake for you.
Holding down the Shift key: If you hold down the Shift key while drawing a shape, PowerPoint forces the shape to be "regular." That is, rectangles are squares, ellipses are circles, and lines are constrained to horizontal or vertical, or 45-degree diagonals.
Drawing straight lines
You can use the Line button to draw straight lines on your slides. Here's the procedure:
Click the Line button in the Shapes group on the Insert tab.

Point the cursor to where you want the line to start.
Click and drag the cursor to where you want the line to end.
Release the mouse button when you reach your destination.
After you've drawn the shape, the Ribbon displays the Drawing Tools tab, as shown. You can then use the controls in the Shape Styles group to change the fill, outline, and effects applied to the line.

After you've drawn a line, you can adjust it by clicking it and then dragging the handles that appear on each end of the line.
Remember that you can force a line to be perfectly horizontal or vertical by holding down the Shift key while you draw. If you hold the Shift key and drag diagonally while you draw the line, the line will be constrained to perfect 45-degree angles.
Drawing rectangles, squares, ovals, and circles
To draw a rectangle, follow these steps:
On the Insert tab, click the Shape buttons (in the Illustrations group), then click the Rectangle button.

Point the cursor to where you want one corner of the rectangle to be positioned.
Click and drag to where you want the opposite corner of the rectangle to be positioned.
Release the mouse button.
The steps for drawing an oval are the same as the steps for drawing a rectangle except that you click the Oval button rather than the Rectangle button. To draw a square or perfectly round circle, select the Rectangle button or the Oval button but hold down the Shift key while you draw.
You can adjust the size or shape of a rectangle or circle by clicking it and dragging any of its love handles (the small circles you see at the corners of the shape).


