


Most PowerPoint 2013 presentations have at least some slides that include a bulleted list, which is a series of paragraphs accented by special characters lovingly known as bullets. In the old days, you had to add bullets one at a time. Nowadays, PowerPoint comes with a semi-automatic bullet shooter that is illegal in 27 states.
PowerPoint lets you create fancy bullets that are based on bitmap pictures rather than simple dots and check marks. Before you go crazy with picture bullets, take a look at the basic way to bite the bullet.
To add bullets to a paragraph or series of paragraphs, take aim and fire, like so:
Highlight the paragraphs to which you want to add bullets.
To add a bullet to just one paragraph, you don’t have to highlight the entire paragraph. Just place the cursor anywhere in the paragraph.
Click the Bullets button found in the Paragraph group of the Home tab.
PowerPoint adds a bullet to each paragraph that you select.
The Bullets button works like a toggle: Press it once to add bullets and press it again to remove bullets. To remove bullets from previously bulleted text, therefore, you select the text and click the Bullets button again.
If you don’t like the appearance of the bullets that PowerPoint uses, you can select a different bullet character, picture, or even a motion clip by clicking the down arrow at the right side of the Bullets button. This action reveals a list of choices for various types of bullets.
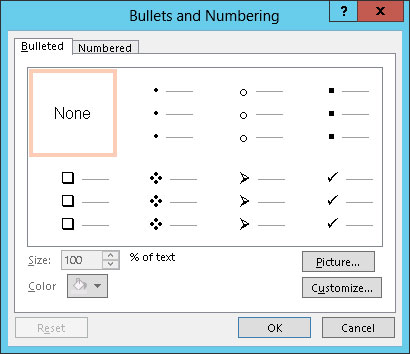
If none of the bullets in this list are acceptable, you can bring up the Bullets and Numbering dialog box by clicking the arrow at the right of the Bullets button and then choosing Bullets and Numbers. This step summons the Bullets and Numbering dialog box. From this dialog box, you can choose a different bullet character, change the bullet’s color, or change its size relative to the text size.
The following paragraphs point out some important tidbits to keep in mind when you use bullets:
Customize bullet characters: You can choose from among several collections of bullet characters that are available. If you don’t like any of the bullet characters displayed for you in the dialog box, click Customize in the lower-right corner of the dialog box.
This brings up a dialog box that lists a variety of useful alternative bullet characters, such as pointing fingers, a skull and crossbones, and a time bomb. Pick the bullet that you want to use and then click OK. If you can’t find a bullet that suits your fancy, choose a different font in the Font control drop-down list.
Change the size of bullet characters: If the bullet characters don’t seem large enough, increase the size in the Bullets and Numbering dialog box. The size is specified as a percentage of the text size.
Change the color of bullet characters: To change the bullet color, use the Color drop-down list to choose the color that you want to use. Colors from the current color scheme appear in the drop-down menu that appears. For additional color choices, choose More Colors to call up a dialog box that offers a complete range of color choices.
Use images for your bullet characters: To use a picture bullet, click the Picture button located in the lower right of the Bullets and Numbering dialog box. This click brings up a dialog box, which lets you choose from several sources for a picture to use as a bullet.


