


In the past, it was difficult to gain access to enterprise software, such as SharePoint, because it took an astute tech person to set up the environment. The tech person had to find hardware capable of running the software and then install the operating system, all supporting software, and finally SharePoint. Even if everything went as planned, the process took at least a week and possibly a lot longer. With Office 365, you, as a business user, can go straight to the Office 365 website, sign up for a trial, and start exploring SharePoint in a matter of minutes!
Activating Office 365 licensing
The process for assigning and activating licensing has dramatically improved over the last year. In the past, the process was often described as painful. The new process is streamlined and lets you add and remove users and licenses based on your immediate needs.To add licensing, you need to add users to the plan by clicking on the Users tab, and then selecting Active Users.
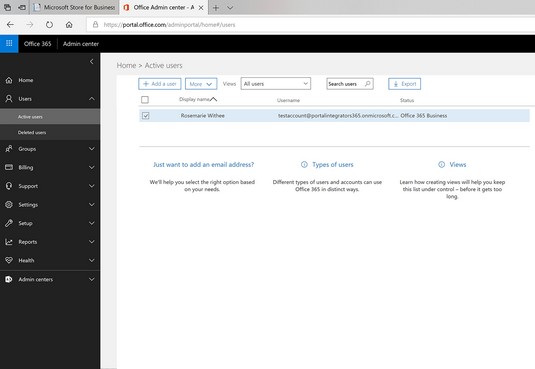 The Active Users screen in the Office 365 Admin Center.
You begin the process of adding a user by clicking the plus symbol from the Ribbon of the Active Users screen. As you walk through the wizard, you’re asked to enter information, such as the user’s first and last name and administrative rights the user should be assigned. In addition, you have the opportunity to assign specific licensing to the user.
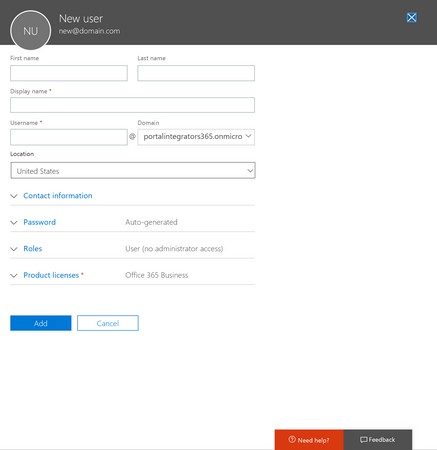 Assigning Office 365 licensing to a new user.
Office 365: Migrating mailbox data (Exchange)
One of the most visible aspects of an Office 365 implementation is the migration of email data into the Exchange Online system. To begin a migration, you use the Email Migration page. You can access this page by clicking the Manage link under the Exchange Online section on the main Office 365 Admin Center and then clicking the Recipients link in the left navigation pane. Then, click the Migration tab.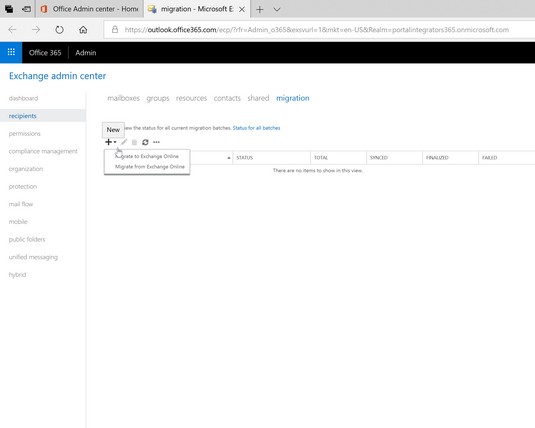 Migrating mailbox data on the Exchange Online Admin Center.
To begin a new migration, click the plus symbol, then click Migrate to Exchange Online to begin walking through the Migration wizard. The Migration wizard will let you migrate your Exchange settings. If you’re migrating from Exchange 2007 or later, the wizard will use Autodiscover to auto detect settings. If you’re migrating from Exchange 2003 or IMAP, then you need to enter the settings manually. After completion of a migration, user email will be available in the Office 365 system.
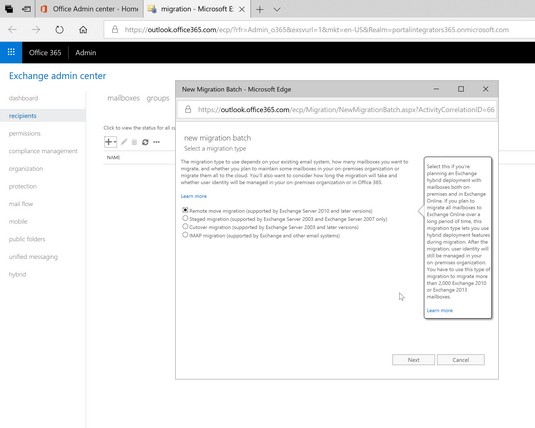 Beginning a new email migration in Office 365.
A number of other tools and partners are available to assist in email migration. Find these resources in Pinpoint.
Office 365: Migrating portal content and functionality (SharePoint)
The SharePoint platform has become one of the most successful products in Microsoft’s history. SharePoint is a platform and as a result, it tends to get complicated, which often leads to an organization employing the help of consultants. Much of the complexity of SharePoint lies in the infrastructure of the platform. A SharePoint implementation requires a number of different engineers all working in unison to make the platform available to users. The good news with Office 365 is that Microsoft takes over this complexity of building and maintaining the platform, and you, as a user, can focus on just using the product.Migrating to SharePoint Online (which is part of Office 365) requires you to migrate any content or custom functionality that you may currently be using in your portal environment. As you begin to delve farther into SharePoint, you find that one of the major attractions is the ability to consolidate the functionality of multiple disparate systems into the SharePoint platform. This consolidation creates a one-stop shop for business tasks as compared to logging into multiple systems that rarely communicate with each other.
Migrating content to SharePoint Online
Migrating content to SharePoint can be as easy as uploading the documents you have saved on your local computer or as complex as moving massive amounts of digital content from one Enterprise Content Management (ECM) system to another. If you’re a small or medium organization, then you can gain familiarity with content management in SharePoint and in particular with document library apps. You can also check out SharePoint 2019 For Dummies by Rosemarie Withee and Ken Withee.Migrating custom functionality to SharePoint Online
One of the best things about SharePoint is that it is a platform and not a specific tool. As a result, you can build just about any business functionality you need to run your business right into your SharePoint implementation.With so much power at your disposal in SharePoint, you need to think about what you have developed. If you’re one of the rare few who has never used SharePoint, then you can simply start using SharePoint Online. If, however, you have already used SharePoint either on premise or through another hosting provider and are moving into SharePoint Online, then you will need to move your custom functionality into your new portal. Migrating functionality that you have developed can be a challenge. One of the best ways to tackle this challenge, however, is to carefully document your current environment and then determine if it is better to try to migrate the functionality or to re-create it in the new environment.
If the functionality you have developed is a simple list or library app, then you can go into the List Settings page and save the list as a template with content. This creates a file that you download to your computer and then upload to SharePoint Online. After you install the template into SharePoint Online, you can then re-create the list or library app by using the template. The result is that your list or library app is transported into SharePoint Online with only a few clicks of a mouse.
For more advanced functionality, you can either redevelop it in the new environment or hire a consultant to undertake the project under your guidance.
Throwing the switch on Office 365
After you have migrated both email and portal data, you’re ready to throw the switch and direct all traffic to the new Office 365 environment. Throwing the switch is accomplished by updating your Domain Name System (DNS) records in your domain registrar. The results of this simple procedure are enormous. After you update DNS, every user of your current system is directed to the Office 365 system.A DNS record is a translator from human readable computer names to computer readable computer names. For example, if you type www.microsoft.com into your web browser, the Microsoft home page appears. How does this happen? Your computer sees microsoft.com and knows it is a text entry. Computers talk to other computers by using numbers known as Internet Protocol (IP) addresses. Your computer needs to find out the IP address of the computer running the microsoft.com website. It does this by querying a DNS server. The DNS server looks up the text-based address (known as a domain name) and sends back the IP address. Your computer can now use the IP address to contact the Microsoft computer.
When you update the DNS records for the email, for example, you’re telling the DNS lookup system that when someone wants to send you an email, their computer should use the IP address of Office 365 rather than the one you were using before. In essence, after you update DNS you have thrown the switch and are using Office 365 rather than the old system.
Configuring mobile phones for Office 365
The cloud offers the advantage of being fully connected at all times to your important data and communications. There is no better way to access your Office 365 environment on the go than with your mobile phone. Mobile apps are available for both iOS and Android, which allows you to connect with your SharePoint and Office documents as well.Microsoft has taken the approach that they will make Office 365 available to people regardless of the device they use. Gone are the days when you needed a Windows device to use Microsoft products. Today you can get Office 365 apps for your iPhone, iPad, Android Phone, and Android Tablet. You can even get Office for your Mac.
Microsoft has worked hard to make Windows 10 a seamlessly integrated experience with Microsoft Office, but that doesn’t mean you have to choose Windows 10. Microsoft is taking the approach that they want you to choose Windows 10 because it’s a better and more integrated experience. However, if you don’t choose it, they’re still spending billions of dollars to make Office 365 apps available on Apple and Android phones.
You can find more information about setting up your mobile phone with Office 365 at the Office Support page.
For example, for Outlook, you can navigate to the Apps →Outlook support page. You can then browse support for the Outlook app on such topics as getting started, scheduling meetings, working with tasks, and Outlook on mobile and tablet devices.
 The Outlook Help Center.


