


Relational databases split data among two or more tables. Access 2016 uses a linking field, called a foreign key, to tie related tables together. For example, one table may contain volunteer names and addresses, whereas another table tracks the volunteer event participation history. The event participation information is tied to the volunteer information with a linking field, which (in this example) is probably a Volunteer ID.
If you can drag-and-drop, you can build a table relationship.
Keep these three limitations in mind:
You can only relate tables that are in the same database.
You can relate queries to tables, but that’s unusual.
You need to tell Access specifically how your tables are related.
When you’re ready to play the matchmaker between your loving tables, here’s how to do it.
The Relationships window
To build a table relationship, first open the Relationships window. Follow these steps:
Click the Database Tools tab on the Ribbon.
The Relationships group appears on the Ribbon.
 The Relationships button on the Database Tools tab.
From the Relationships group, click the Relationships button.
The Relationships window appears. The first time you set a relationship, the Show Table dialog box appears as well.
If some tables are already listed in the window, someone (or some wizard) has already defined relationships for this database. If you’re not sure how they got there and if more than one person is working on your database, stop and consult all database developers before changing the relationships. What might work for you could be disastrous for your colleagues.
When the Relationships window is open, you can select and relate tables.
Table relationships
For each pair of tables you relate, you must select the tables and then join their common fields.
Selecting tables
To select tables to relate, open the Relationships window and follow these steps:
Choose Show Table from the Ribbon’s Relationships group. (If you don’t see the Relationships group, select the Database Tools tab on the Ribbon.)
The Show Table dialog box appears, listing the tables in the current database file.
For each pair of tables you want in the relationship, follow these steps:
Click the table.
Click Add.
In the large Relationships workspace, a little window lists the fields in the selected table. As you add tables to the layout, a separate window appears for each table. You can see these windows below the Show Table dialog box.
 Use the Show Table dialog box to add tables to the Relationships diagram.
Repeat Step 2 for each pair of tables you want to relate. If one of the tables in the pair is already present (because of an existing relationship it has with another table), you don’t have to add it again.
After you finish adding tables, click the Close button.
When you have all the tables present, you’re ready for these tables to get to know each other.
Managing relationships
This section contains all the information you’ll need to create, edit, and delete your table relationships.
Creating relationships
After you select the tables, follow these steps to create a relationship between two tables:
Decide which two tables you want to relate.
Because the one-to-many relationship is the most common, these instructions pertain to it. The two tables in a one-to-many relationship are designated as fulfilling one of two roles:
Parent: In the parent table, the related field is the primary key. Each record in the parent table is uniquely identified by this related field.
Child: In the child table, the related field contains the same information as the field in the parent table. Typically, it has the same name as the corresponding field in the parent table — although this is not a requirement.
To make relating tables easier, put related fields near the beginning of the field list. In Access, you must see the related fields on the screen before you can make a relationship. If the related fields are not at the beginning of the field list, you have to do a lot of scrolling to find them. To move a field, open the problem table in DesignView, point to the button that’s left of the field name, then press and drag on the button to move the field up.
Follow these steps to select the parent field from the list:
Put the mouse pointer on the field you want to relate in the parent table.
Usually the field you want to relate in the parent table is the primary key.
Hold down the left mouse button.
While holding down the left mouse button, follow these steps to join the parent field to the child field:
Drag the mouse pointer from the parent field to the child table.
A plus sign appears at the base of the mouse pointer.
Point to the related field in the child table.
Release the mouse button.
The Edit Relationships dialog box appears, detailing the soon-to-be relationship.
 The Edit Relationships dialog box details how Access connects two tables.
Be very careful before releasing the mouse button. Put the tip of the mouse pointer directly on the child field before you let go.
If you drag between the two fields correctly, the Edit Relationships dialog box displays the parent and child fields side by side.
If you miss, click Cancel in the Edit Relationships dialog box and try Step 3 again.
In the Edit Relationships dialog box, select the Enforce Referential Integrity option.
Double-check that your field names are the correct ones and then click Create.
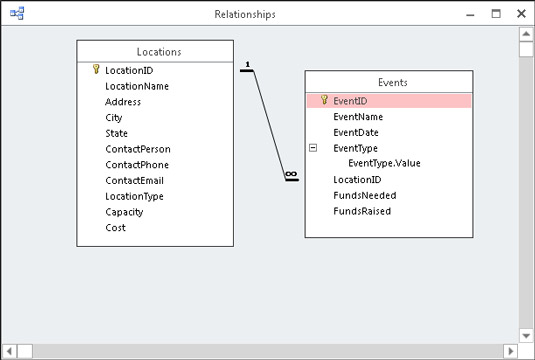
Access illustrates the new relationship in the Relationships window:
A line between the related fields shows you that the tables are related.
If you checked the Enforce Referential Integrity option in the preceding step, Access places a 1 next to the parent in the relationship and an infinity symbol next to the child..
To relate another pair of selected tables, repeat Steps 1 through 5.
Access also provides tools for modifying and removing relationships.
Modifying relationships
After you relate tables, you can see, organize, and remove the relationships.
If you create a relationship you don’t want, open the Relationships window and follow these steps to delete the relationship:
Click the Relationship line connecting the two tables.
If you are successful, the line will thicken. That means the line is selected.
Tap the Delete key on your keyboard and then Yes in the resulting message box.
Voilà! The relationship is gone.
If you’re relating many tables together, the Relationships window may look a little messy because Relationship lines will cross each other. This makes it difficult to determine which tables are related to each other. To rectify this situation, click and drag the title bar of a table window to another part of the screen.
It’s good practice — although not always possible — to show parents either above or to the left of their children. Try to arrange the parent and child tables so the lines between the parent and child tables don’t cross over any lines that illustrate other table relationships.
Having trouble understanding your relationships? (Who isn’t?) Are you scrolling all over the place in the Relationships window to see everything? If so, the Relationship Report is just for you. To preview this report, click the Relationship Report button in the Tools group on the Ribbon’s Design tab. All the related tables in your database will display in an easy-to-read report. (Okay, easier to read!)


