


Nobody’s expecting perfection at this stage of the game. Certainly not in your first foray into database creation in Access 2016, and not even on your second or third attempt. Even seasoned experts forget things now and then, realizing after they’ve built a table that they didn’t need it, or after they’ve started setting up reports and queries that they’ve forgotten a table that they needed. It can happen to anyone.
What to do? Use Access’s simple interface to add the tables you want and delete the tables you don’t.
Adding new tables
If, after you start building your database, you decide that your database warrants more than one table — in other words, if you realize you need a relational database — then you need to add another table. If you already knew that your database was going to need multiple tables, then — after building the first one — the only thing to do is build the rest, one by one.
To add new tables to an existing database, repeat the following steps for each new table:
Click the Create tab on the Ribbon.
The Create tab’s buttons appear.
 The Create tab is the logical place to go when you want to create a new table.
Click the Table button on the Ribbon.
A new table, blank and awaiting the name for the first field, appears.
 Looks familiar, doesn’t it? A new table awaits fields and field names, not to mention records.
Build and name the fields for this new table.
Save your database periodically as you work.
Continue adding tables, using Steps 1 through 3 for as many tables as you need in the database.
You don’t have to do this perfectly from the start — you can always go back to rename fields and add or remove tables (more on how to do that in a second). The goal here is to just do it — just get started and get the database going so you can see what you have and start working with it.
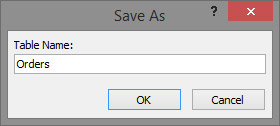
Naming tables is important — because you’re going to need to know, at a glance at that left-hand panel, what’s in Table1 or Table2 or Table3, right? Better to name them Customers, Orders, Products, and so on, so you don’t have to remember each one by a generic number. To name a table, you can do so when you first close it and are prompted to save it.
The Save As dialog box gives you a Table Name box. Type the name and press Enter. If you decide you don’t like the name later on, simply right-click the name it currently has, as displayed in the left-hand panel, and the current name is highlighted. Type the new name, and press Enter to confirm it.
You can also choose Rename from the menu that appears if you right-click the table’s name in the left-hand panel that lists your database components. This also gives you the opportunity to type a replacement name.
Deleting a table
So you have a table you didn’t want. Maybe you realize after building Table C that you really only need Tables A and B — or that Table D, which you’ve also created, really makes Table C unnecessary. Whatever the reason, tables, even ones with records in them, are easy to get rid of.
Tables are easy to get rid of. Perhaps too easy. Before you delete a table, check and recheck your database to make sure you aren’t deleting information that you need to keep. When a table is deleted, all connections to it — including all relationships and references in queries and reports — are deleted, too. A prompt appears when you choose to delete a table, reminding you of this.
Still committed to ditching the table? Here’s how it’s done:
With your database open, look at the panel on the left side of the workspace.
You should see a list of your tables in that panel.
 Each table has its own button, emblazoned with the name you gave the table.
Right-click the table name in the panel on the left side of the workspace, and choose Delete from the pop-up menu.
 Choose Delete to get rid of the unwanted table.
Click Yes in response to the resulting prompt if, in fact, you do want to delete the table.
All gone!
Now, you probably think it’s time to start entering records, but no, don’t start that just yet. Before you start populating your tables with data, it’s a better idea to set up your table relationships, establish the key fields that will connect your relational tables, and define the specs for each of your fields — taking advantage of the field options.
Even if your database will be a (relatively simple) flat-file database, you need to iron out the settings for your fields before you start entering data — establishing the rules for entering names, numbers, dates, and so on — so that what you enter is graciously accepted by the fields you’ve set up.


