

At last, in desperation, you resort to reading the documentation you find on Google or another search engine, but that documentation forces you to complete a long series of steps to get to the screen, and then you still have the frustrating experience trying to navigate from the steps listed in the documentation to the actual menu items in the application, which don’t always agree because the documentation may be somewhat out-of-date or pertain to a slightly different version of the software.
Microsoft makes it a little easier to find help with Dynamics 365.
Searching for screens and reports in Dynamics 365 Business Central
In Business Central, Microsoft has devised a better way to find any screen in the application, in the form of a global menu search available for the application: the Search for Page or Report feature. This search doesn’t look for individual records (such as a particular vendor or customer) but rather for links to screens (such as the Vendor or Customer Card Maintenance screen). The Search for Page or Report feature is accessed by clicking the Magnifying Glass icon, found on the right side of the top black navigation bar. (This navigation bar is also referred to as the address bar.)Using the Search for Page or Report feature, you can find your way around Business Central without having to memorize where menu items are located within a cascading maze of menus. The bonus plan here is that this same feature can be used to find both screens and built-in reports; by the way, many reports are more often printed to the screen, rather than on hard copy (paper), and can therefore, in essence, be thought of as screens as well).
The Escape (Esc) key on the keyboard is important in Business Central because some of the screens don’t display Exit or Close command buttons. Instead, use the Esc key to close a window and go back to the previous screen. Alternatively, to close the window, you can click the X icon (for eXit), located at the far right end, on top of a window (if one is available). Typically, screens in Business Central don’t have command buttons labeled Save, Close, or Save & Close (as you might see in Dynamics 365 for Customer Engagement), but don’t worry: Conveniently, your changes are saved on or before exiting, without your having to click a Save button.
As an example of navigation by means of the Search for Page or Report feature, see the images below. In this example, you search for the Vendor Maintenance screen. Keep in mind that navigating to the vendor card is easy enough by simply using the menu navigation; however, for many screens that are harder to find, you can locate them by using the Search for Page or Report feature.To navigate to the Vendor Maintenance screen using the Search for Page or Report feature, follow these steps:
- Click the Magnifying Glass icon on the address bar.The Magnifying Glass icon on the address bar (the black navigation bar at the top of the web page) launches the Search for Page or Report feature.
The Search for Page or Report dialog box displays.
 Searching for page or report in Business Central.
 - Enter a page or report name. (For this example, type vendor.)
The search will include items that begin with the search text you enter.
With each letter you type into the search box, the list of page and report links below it changes to reflect the change in search criteria.
In the Name column, you see the name of the page or report.
In the Department column, you see the navigation path for that page or report (where it’s located within the hierarchy of menus).
- Click the Lists button to filter the search results to show only list-related links — in other words, links to open lists of records.Besides filtering on the pages and reports that are related to lists, you have the choice to filter by Reports and Analysis, Archive, Administrative, Tasks, and more. The choices for filtering change to reflect the types of items that have shown up in the search results.
For example, if you were looking for a report, you would click Reports and Analysis to narrow the search results to display only links to reports.
- Click the Vendors link at the top of the search results.The Vendors List window appears.
 Navigating within the list of vendors.
Note the three small buttons located above the list to the right. You can use them to toggle the list between viewing the vendors as text or as tall icons (tall tiles) or wide icons (wide tiles).
One tab (or ribbon, as it’s sometimes called) is labeled Navigation; clicking the Navigation ribbon reveals navigation shortcuts related to the type of record you’re viewing — in this case, vendors. (The ribbon is also referred to as a FastTab.)
The Magnifying Glass icon located to the far right above the list of vendors allows you to filter the list of vendors (vendor tiles) displayed; as you type in the search box, the vendors are instantly filtered by each letter as you key them in; filtering is based on vendor name. The asterisk (*) may be used as a wildcard character.
- Click any Vendor icon (tile) to open the Vendor Card (Maintenance Window) for that vendor.The vendor card displays.
Navigating by menu in Dynamics 365 Business Central
Navigating by menu in Business Central is straightforward. You’ll find a Navigation area near the top of the screen located directly under the black navigation (address) bar, with top-level menu choices for each module of the application as well as a self-service menu and a settings menu. When you click a top-level menu choice, a second level of menu choices related to what you clicked appears immediately below in a row of choices. Clicking one of the second-level choices opens a screen, which is usually in List view.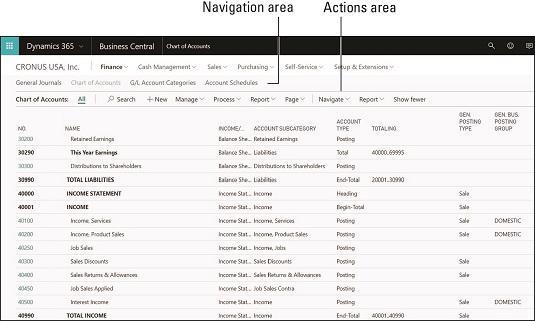 Menu navigation in Business Central.
For example, this image shows that if you choose Finance → Chart of Accounts from the module's main menu/navigation area, the chart of accounts is displayed in a list. When the list appears, you see a command bar in the Actions area with command buttons (a button you click that opens another window or performs a command) and pull-down menus (a button you click that causes yet another little menu to drop down from the button, giving you more selections). The buttons that have pull-down menus can be identified by the down arrow immediately to the right of the menu item name.
If you take another look at the image above, you can see that the + New Button has no down arrow to the right of it. Clicking the New button opens the G/L Account Card window. On the other hand, the Process button does have a down arrow to the right of it. When you click the Process button, no command is issued right away, but instead a pull-down menu appears, giving you more menu choices. When you click a menu choice on the pull-down menu, the command is issued. The commands on the command bar pertain to the list of records you’re viewing, and specifically to a particular record or records you have selected in the list.
To add a new G/L Account card to Business Central, the navigation is shown here:
Finance → Chart of Accounts → New
The G/L Account Card window displays.
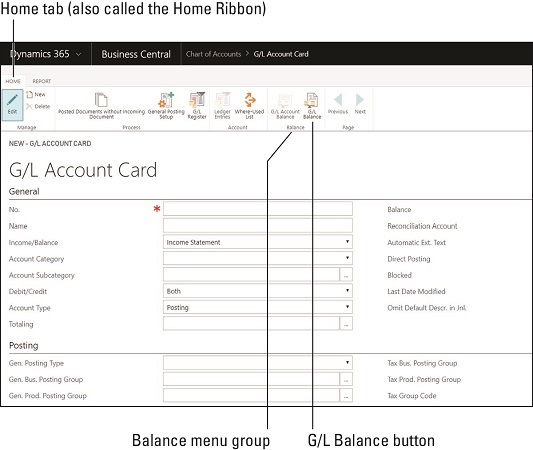 A G/L Account Card in Business Central.
Notice that more menus appear at the top of the window; in fact, menu ribbons are located at the top of most windows. In this example, the Home tab and Report tab that you see along the top of the menu can be clicked to cause the menu ribbon to display another set of related buttons (menu choices). The buttons found on a ribbon are further organized into menu groups. Note in the image above that the Balance menu group has two buttons: the G/L Account Balance button and the G/L Balance button. When you hover the mouse over any one of these buttons, a pop-up Help balloon appears, to describe what the button is meant to be used for.
Feeling at home in your Dynamics 365 Business Central Role Center
The home page when you sign in to Business Central is called a Role Center. The Role Center concept was introduced as part of a user-centric design philosophy embraced by the Microsoft design team as a core principle in moving Dynamics NAV to the cloud as a SaaS offering and rebranding it as Dynamics 365 Business Central.A user-centric design means, among other things, that the menus, buttons, and information that are displayed when you sign in reflects what is important to you, not just a standard menu structure that everybody, regardless of their job title, has to live with. Rather than struggle to learn how to navigate a maze of menus, you’re presented with only the menu items, quick-access command buttons, actions, and links that take you to the functions and features that matter most to you. Your Role Center page may appear different from those of other users, depending on your role in your organization. Your user profile in Business Central determines your Role Center home page. Default profiles can be specified for each user group. Every user who has the same profile starts out with the same Role Center.
A great feature is the ability to customize any Role Center to fit the specific needs of any individual user; this means that your home page can be completely unique, tailored to your precise preferences. The Business Central user interface can be customized by way of personalization and configuration. As a user, you can tailor your own home page (an example of customization through personalization); as a Business Central system administrator, you can set up and modify Role Centers (an example of customization through configuration).
The Role Center provides yet another important way to navigate throughout Business Central. In fact, if your Role Center is tailored just right, it pretty much takes care of all your navigation needs, because all the links you use daily are at your fingertips.
Role Centers may include many different types of elements, such as the ones described in this list:- Standard (top-line) menus: These menus, which are organized mainly by module or functional area, are directly under the address bar (the black navigation bar at the top).
- Actions: Actions are, in essence, command buttons — a link you click that executes an action. Actions that normally appear in menu navigation ribbons (tabs) across the top of various windows can also be displayed on the Role Center. In other words, you can take menu items (actions) from anywhere in Business Central and have a shortcut link to that menu item on a Role Center page.
- Insights: Insights are prebuilt queries that refresh every ten minutes; they find interesting facts within your organization’s data and display them as headlines, similar to a news feed.
Your system administrator must install the Essential Business Insights Extension for Business Central before Insights can be displayed on your Role Center home page.
- Cues with drill-down: Cues are tiles that show a number, such as the number of unposted (pending) sales invoices.
You can then click the tile to drill down into the details. For example, you can drill down to display a list of unposted sales invoices.
- Power BI visualizations: Graphs and reports developed using Power BI (Microsoft’s report writing tool).
Download and install Power BI Desktop if you want to create your own Power BI reports.
- Default
- Business Manager
- Accountant
- Order Processor
- Relationship Manager
- Team Member
- Project Manager
- Administrator
Personalizing your Role Center is as easy as clicking the Gear icon, which brings the screen into Edit mode. However, your system administrator may want to control the level of Role Center customization, so that person may limit access to the Designer feature. Creating a new Role Center or modifying an existing Role Center requires some fairly advanced technical knowledge. Please confer with your Dynamics 365 system administrator or authorized Dynamics 365 solution provider for more details.
The quickest way to navigate back to your Role Center home page is to click your company name in the upper left corner of the screen. Alternatively, you can click the Magnifying Glass icon on the address bar (the black navigation bar at the top of the web page), which launches the Search for Page or Report feature. Type home in the search box, and then click the Home link when it appears in the search results.
To navigate to a previous window in Business Central, you can use the Go Back arrow (the left-pointing arrow) as you would in any typical web application; browsing back is yet another way to navigate in Business Central.


