

PowerApps are a solid avenue for getting the most out of your Dynamics 365 subscription. Read on to find out how to add an option set, integrate data from other platforms, and modify app settings to get more out of PowerApps.
Adding an Option set to PowerApps
Generalized descriptions of all available options in the PowerApps universe are all well and good, but it wouldn't hurt to walk through one particular PowerApps variant. For example, if you’re building apps for your organization’s marketing department to use to control the marketing materials they deliver to prospects — and these materials can be either case studies, brochures, or white papers — you might want to create a picklist that you can use throughout your application to categorize marketing materials. When users are prompted to tag the marketing material that they have uploaded to SharePoint using the app, they’re presented with a drop-down list box giving them these choices:- Brochure
- Case Study
- White Paper
- Go to the PowerApps website.
- In the upper right corner of the web page, click the Sign In link.
- Provide your user ID and password credentials that you use to sign in to Dynamics 365 and/or Office 365, and then click Next.
Your browser is directed to an introductory web page.
- In the navigation pane on the left side of the web page, click the Data button.The list of data sources/methods expands.
- Click Option Sets.The Picklists (in other words, Option Sets) window is displayed to the right of the navigation menu.
If you have previously created picklists, they appear in a list on this page.
- Click New Picklist, found in the upper right corner of the web page.The New Picklist dialog box appears.
 The New Picklist dialog box in PowerApps.
 - Fill out the Name and Display Name fields.The name is one that you give to the object you’re creating for your own purpose of managing that option set, whereas the display name is what the user of your app sees as a label for this field when running your app.
Typically, the display name is a more user-friendly descriptive name, but both names can be the same.
The name cannot contain spaces.
Note that the Description field is optional.
A red asterisk following a field name label indicates that the field is required.
- Click the Next button.
A new screen appears, displaying a blank list of items to be included in the picklist you just created.
The name of your picklist appears above the list of items.
The first item in the list says NewItem because the system doesn’t yet know what you want to call it.
- Click NewItem, under the Items Name heading, to edit the name of the item.
A rectangular text box appears.
- Mouse over NewItem and then type CaseStudy in the Name column, Case Study in the Display Name column, and A write-up of a successful customer experience in the Description column.Alternatively, you can leave the Description field blank. (The Description column is optional.)
- Click the Add Item button in the upper right corner of the web page.A new line appears above the CaseStudy item you just entered.
- Create two more lines — one for brochure and one for white paper — to complete the example.
- Click the Save button in the lower right corner of the web page.The picklist becomes available to you when creating apps in PowerApps.
Adding a data connection to PowerApps
Connections to an ever-expanding selection of services are available and easy to add within PowerApps. Here’s a list of some of the well-known and widely used websites that you can find connections available for in PowerApps:- com
- OneDrive for Business
- Trello
- Vimeo
- Gmail
- GoToMeeting
- WordPress
- YouTube
- Workday HCM
- Go to the PowerApps website.
- In upper right corner of the web page, click the Sign In link.
- On the new screen that appears, enter the user ID and password credentials you use to sign in to Dynamics 365 and/or Office 365, and then click Next.
Your browser is directed to an introductory web page.
- In the navigation pane on the left side of the web page, click the Apps button.The apps you have created previously are displayed.
If you have not already created any apps, you see a No Apps Found message.
- Click the Create an App button, located on the left side of the menu bar.You may see a purple Create an App button located under the No Apps Found message in the middle of the page.
Whichever button you click, a new web page or web page tab (depending on how your browser settings are configured) launches, displaying shortcuts for creating a new app. Here are your options:
- Start with Data
- Start with a Blank Canvas
- Start with a Template
- Choose the Start with a Blank Canvas option.
Use Phone Layout if you’re programming your app for a smartphone.
A new web page tab launches, and a Welcome dialog box appears that says “Welcome to PowerApps Studio,” prompting you to either create a form, create a gallery, or take an interactive tour.
- Click the gray Skip button.
You’re now in PowerApps Studio in a blank app, ready to start creating the app.
- Choose File from the File menu in the upper left corner of the screen.The black navigation pane appears on the left side of the screen.
- Click Connections in the black navigation pane.
- On the menu bar above the list of connections, click New Connection.A list of available connections displays.
You can sort this list by clicking the Name column heading — the first column of the list.
- Type the word Gmail in the Search text box, located above the column headings, toward the right side of the web page.The list of available connections is automatically filtered based on your search criteria.
The connector for Gmail should now be visible in the list of connections.
- Click the + sign or click anywhere on the Gmail Connector row.A dialog box appears that provides a brief description of what you can do with the connector (in this case, send or receive an email message to a Gmail account).
The dialog box prompts you to create the connection.
- Click the Create button.A dialog box appears, prompting you to sign in to a Google Gmail account.
- Select an existing account that is recognized by your browser (and thus will be listed), or select Use Another Account.
- If you have chosen Use Another Account, enter the email address you want to use and then click Next.Another dialog box prompts you for a password.
- Again, if you have chosen Use Another Account, enter your password and then click Next.
A dialog box appears, warning you that this action will allow Microsoft PowerApps and Flows to read, send, delete, and manage your email.
- Click the blue Allow button.You have now added Gmail as a connection that can be used in any apps you build in PowerApps or in any workflow you create in Microsoft Flow.
Making your PowerApp your own with App Settings
PowerApps provides easy point-and-click configuration to design your app to your liking. For example, many aspects of your app can be easily configured from the App Settings screen with a simple click of the mouse.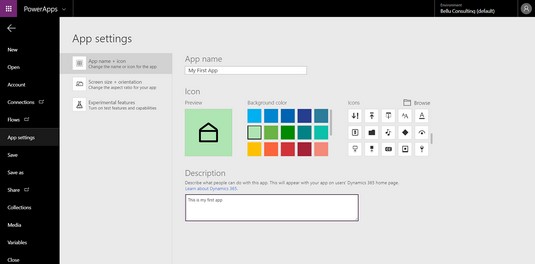 App settings in PowerApps.
These settings are among the ones you can configure from the App Settings screen:
- App Name: Enter a short and distinctive name for the app you’re creating; make sure the name isn’t already used for another app.
- Background Color: Click the colored square to change the color.
- Icons: Use the slider bar on the right to see more preloaded icon choices, or load your own icon by clicking the Browse button; PNG, JPG, and JPEG file formats are accepted; the recommended image size for icons for PowerApps is 245 x 245 pixels.
- Description: Be sure to enter a description that lets users know what your app can do.
- Screen Orientation: Your choice is Landscape or Portrait.
- Screen Size: Your choices are 16:9 (Default), 3:2 (Surface Pro 3), 16:10 (Widescreen), 4:3 (iPad), or Custom; if you choose Custom, you must enter a width and height.
On the App Settings screen, the options for Lock Aspect Ratio (which maintains the height and width in the same proportion) and Lock Orientation (which maintains the same screen orientation even if the tablet or smartphone is rotated) are defaulted to On. You might think it would be nice to let users rotate your app or resize it any which way they prefer, but both options can easily distort your app’s display and render it useless. So, unless you truly know what you’re doing and can successfully test your app in different aspect ratios and portrait and landscape positions, it’s safer to leave these setting turned on, to simply lock both the aspect ratio and the orientation to ensure that your app displays correctly.


