
Power BI is a monster when it comes to being able to connect to data sources of all shapes and sizes. The general methods of Power BI connectivity are described in this list:
- Connect to a file, such as an Excel file, XML file, or CSV (comma-separated values) text file.
- Connect to a database such as SQL Server, Oracle, or IBM DB2 (and many more by means of other database connectors).
- Connect to Azure (Microsoft’s cloud services), including SQL databases stored in Azure.
- Connect to Online Services, including the Power BI Service, SharePoint Online List, and — most importantly for our purposes — Dynamics 365 (online) services.
Power BI comes with database connectors to non-Microsoft databases such as Oracle, IBM DB2, MySQL, PostgreSQL, Sybase, Teradata, SAP HANA, Snowflake, Amazon Redshift, and more, but some connectors are not enabled by default, so in Power BI you may need to enable them. Go to File → Options and Settings → Options → Preview Features to enable the database connector. You can then see the database connector you enabled in the list of available databases.
Connecting to a file
Sometimes you may want to connect to a file, especially if you’re just adding a bit of external information to a report, but generally speaking, files are rather limited. A file is usually the output of a report, not the source of a report. Excel files are sometimes sources of data rather than outputs of reports, but data stores are better housed in a relational management database system (RDBMS). Databases are where the action is. Databases contain tons of tables, each full of data. The real magic shows up when you can join related tables together using SQL queries and can summarize data usingSQL GROUP BY clauses.
Connecting to a SQL View
A SQL view is a SQL query that has been stored in the database as a sort of virtual table. A great way for end users to work with data is for an IT professional to create SQL views that do the hard work of joining together related database tables, and aliasing cryptic table column names to human-readable field names — data element names that an end user can easily understand, in other words. The column in the database might be calledEXPDELDT, but the SQL view will alias that field to something like Expected_Delivery_Date. The SQL view may also exclude fields that are not being used by your organization. For example, on sales orders, your billing clerks may not be entering any data in the Expected Delivery Data field because it's always assumed that the delivery date is the same as the invoice date, so in that case, that particular date field would be excluded from a SQL view of your sales order history.The SQL view is an easier-to-understand view of the data in a database — easier than peering into the raw physical database tables and trying to make sense of all the many strange columns of data. (It also helps you understand how to join tables together without inadvertently duplicating rows.) It’s a more user-friendly view that end users can then access as part of a dataset using Power BI to create their own reports, graphs, and dashboards. Some of these SQL views come built-in with the application you want to pull data from, and some can be written by your IT department or by IT consultants. Of course, because Power BI is able to connect to databases, you can easily connect to SQL views contained in those databases.
Connecting Power BI to Dynamics 365
Connecting Power BI to Dynamics 365 is quite doable. Let’s face it: Microsoft built Power BI for end users to connect to the mission-critical data in their organizations, and Dynamics 365 is a vital source of information for Microsoft customers who are using Dynamics 365 for Customer Engagement (CRM), Finance and Operations (ERP), Talent (Human Resources), and more.It’s also vital to Microsoft to migrate as many of its customers as possible onto Dynamics 365 (if they haven’t already started using it), so Microsoft cannot neglect the connectivity to Dynamics 365; it’s a top priority. Because connecting to Dynamics 365 from Power BI is such a high priority, Microsoft has tried to make it easy, and has provided several different means to do so.
Like many Microsoft technologies, these connectivity methods make for somewhat of a moving target; some new bit of technology is always on the horizon, and some other bit is always on its way out. Always inquire to see whether a new connector is available for your target data source.
Where connecting Power BI to Dynamics 365 gets somewhat complicated is when you start thinking about the fact that Dynamics 365 is more of an umbrella of cloud-based applications rather than a single app. Each of these Dynamics 365 applications can have a slightly different preferred method of connecting. To further complicate matters, a single application can have more than one way to connect to Power BI. Recall that Power BI can connect directly to a database, can connect to Azure, and can connect to other services, such as Dynamics 365 online services. Let’s take a look at some of the easiest and preferred ways to connect Power BI to Dynamics 365.Connecting Power BI to Business Central
One of the quickest and easiest ways to connect Power BI Desktop to Dynamics 365 is to use the Online Services options found in the software's Get Data window. For example, setting up a connection to Business Central using Online Services is a breeze.To connect Power BI Desktop to Dynamics 365 Business Central, follow these steps:
- From the Power BI Desktop menu, click Get Data on the Home tab.
The Get Data window appears.
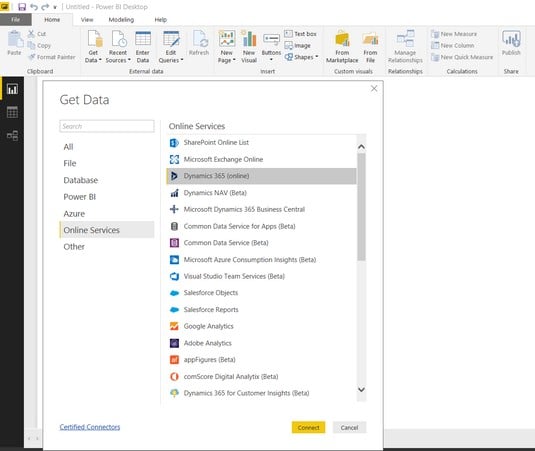 The Power BI Desktop Get Data window.
If, on your system, a pull-down menu appears, click the More button to open the Get Data window.
- Click Online Services in the navigation menu on the left side of the window.
The list of Online Services appears on the right side of the window.
- Choose Microsoft Dynamics 365 Business Central from the list and then click the yellow Connect button.
A dialog box appears, prompting you to sign in to Microsoft Dynamics 365 Business Central.
- Click the Sign In button.
- Use the same account credential that you use to sign in when running Dynamics 365 Business Central.
This is typically your work email address.
Enter your password, if prompted (your password may already be stored as part of being signed in to Office 365, Dynamics 365, or Windows).
- Click the yellow Connect button.
The Navigator window appears.
You’re now connected to Business Central.
- Click Display Options.
A drop-down menu appears. As you select data, select the check box for Enable Data Previews if you want to see some of the rows of data retrieved on the right side of the window.
- Click the Microsoft Dynamics 365 Business Central Folder.
A list of companies (organizations) that you have access to in Business Central displays.
- Click the name of the company (organization) that you want to explore.
A list of queries appears, such as
Chart_of_Accounts. - Click the check box to the left of the query name.
If you have enabled data previews, the data retrieved by that query is displayed in a grid on the right side of the window.
- Click the yellow Load button.
The data is loaded into Power BI Desktop.
- From the Power BI Desktop menu, click Edit Queries on the Home tab.
A pull-down menu appears.
- Again, select Edit Queries.
The Power Query Editor window appears.
- In the gray navigation pane on the left side of the Power Query Editor window, click the right arrow (>), if it’s not already expanded.
- Click on the name of the query you loaded in the navigation pane.
The loaded data is visible and ready to work with.
How you should connect Power BI Desktop to your organization’s instances of Dynamics 365 is typically determined by your IT department, who will provide, and perhaps insist on, a standard approach. Please contact your IT department, Help desk, or system administrator to ensure that you’re adhering to the recommended connection method.
Connecting Power BI to Finance and Operations
Connecting Power BI with Dynamics 365 for Finance and Operations (formerly Dynamics AX) is similar to connecting to Business Central (formerly Dynamics NAV). You can use Online Services. The name of the service differs from the service used for Business Central because, after all, it’s a completely separate application. The way you sign in is also slightly different.To connect Power BI Desktop to Dynamics 365 for Finance and Operations, follow these steps:
- From the Power BI Desktop menu, click Get Data on the Home tab.
If a pull-down menu appears on your system, you may need to click the More button.
The Get Data window appears.
- Click Online Services, on the left side of the window.
The list of online services appears on the right side of the window.
- Choose Microsoft Dynamics 365 (online) from the list and then click the yellow Connect button.
A dialog box appears, prompting you to specify the web API URL of your Dynamics 365 for Finance and Operations instance.
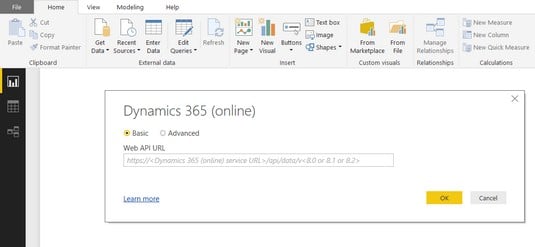 The Dynamics 365 (online) connection prompt.
In other words, it wants the website address you browse to when signed in to Finance and Operations.
- Enter the required web API URL.
You can cut-and-paste the website address from your browser; just be sure to remove any text after
dynamics.comand add the following text to the address:/api/data/v8 or /api/data/v8.1 or/api/data/v8.2(depending on your version number) - Click the yellow OK button.
You're now connected to Dynamics 365 for Finance and Operations.
To connect Power BI Desktop directly to a SQL database, follow these steps:
- From the Power BI Desktop menu, click Get Data on the Home tab.
If a pull-down menu appears, click the More button.
The Get Data window appears.
- Click Database in the navigation menu on the left side of the window.
The list of database connectors appears on the right side of the window.
- Select SQL Server Database from the list and then click the Connect button.
A dialog box appears, prompting you to specify the SQL Server database connection parameters.
- Click Advanced Options to expand the window.
- Enter the server name (and, optionally, the database name) of the SQL Server for your Dynamics 365 for Finance and Operations on-premise installation.
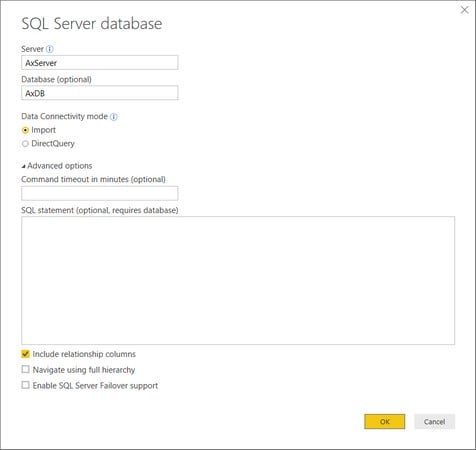 The Power BI Desktop SQL Server Database Connection window.
Ask your system administrator for the name of the server and the database. The database name is typically AxDB.
You can look up the name of the SQL Server yourself within Finance and Operations; to do so, choose System Administration → → Setup → Server Configuration from the main menu. After all that, you should see the SQL Server name in the AOS instance name field in the new window that appears.
- Click the yellow OK button.
You’re now connected to the SQL Server.
You can now browse the tables and views in Navigator and then load the data you want into a memory table within Power BI Desktop.
If you load data into Power BI Desktop, the load may take a while, but having the data loaded locally means that running your report is quicker.
Notable options that you can adjust when connecting Power BI Desktop to SQL Server databases include:- Data Connectivity Mode: Set this to DirectQuery if you don’t want to load the data into Power BI Desktop itself, but instead prefer to query the data each time you refresh the report. DirectQuery is recommended if you’re connecting to a very large dataset with hundreds of thousands of rows of data. Another advantage to DirectQuery is that your data is always fresh, whereas if you set this to Import, you’ll need to import again every time you want the most current information on your report, assuming that the underlying data has changed.
- Command Timeout: Normally, leave this one blank, but if you’re getting a timeout error, specify a value that gives the server more time to retrieve the data before it quits (times out, in other words). Timeout is specified in number of minutes.
- SQL statement: Normally, leave this one blank, unless you’re being precise about exactly which data you want from this connection (rather than seeing the full list of tables and views in the database). You must enter a valid SQL select statement if you decide to put something here.
- Include relationship columns: Normally, you should select this check box because, if you do, you will have an option in Navigator to let the system select related tables after you have selected a table. This is a handy way to determine which tables you will require for a report.
To find out the name of the table that has the data you’re looking for, to act as a dataset for your report, you can right-click on data in a window within a form within Dynamics 365 for Finance and Operations. A pull-down menu appears. Choose Form Information → Administration → DataSource from the menu to see the name of the table where that data is stored.
Connecting Power BI with Dynamics 365 Customer Engagement (CRM), which includes, among other things, the Sales application (for sales force automation), the Service application (for customer service), and the Marketing application (for marketing automation) can be done in more than one way. You can choose from the following two preferred methods to connect Power BI to Dynamics 365 Customer Engagement:- Connect directly to your online instance.
- Connect using content packs (collections of predefined reports and dashboards).