


Markers can be extremely helpful as you work in the Timeline. You can use markers as reference points for key events, visual indicators as you edit, or cues for events such as Web links or chapter references. Any markers that were added to a source clip before it was added to the Timeline will also appear in the Timeline. Markers that are added only to the Timeline, however, will not be added to the source clips. Timeline markers appear on the Timeline ruler, as shown in Figure 1.
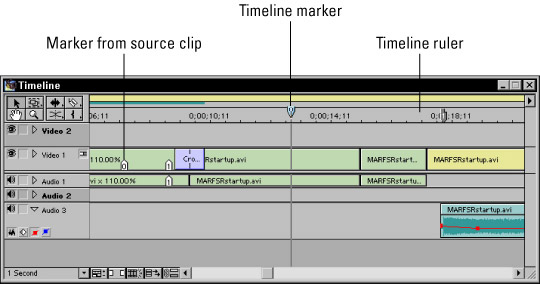
Figure 1: Timeline markers appear on the Timeline ruler.
Adding markers to the Timeline
Markers can serve various purposes. Figure 1 contains a Timeline marker to indicate where a specific visual event occurs. You could use that marker as a reference later if you planned to edit in some audio that needed to align with that marker. To add a marker to the Timeline:
1. Move the edit line to the exact location where you want to place a marker. If necessary, use the Frame Jog or Frame Forward/Frame Back buttons in the Monitor to move frame by frame to the correct location.
2. Choose Timeline --> Set Timeline Marker --> and choose a marker from the menu that appears.
The marker will now appear on the Timeline ruler. Pretty easy, huh? If you ever want to get rid of a marker, simply choose Timeline --> Clear Timeline Marker --> and sentence one of the listed markers to the electronic ether.
Moving around with markers
Moving around in the Timeline is perhaps the most fun way to use Timeline markers. As you're working through a project can say to myself, "I will probably want to come back to this point." That's your cue to create a marker. Eventually you have a collection of markers that you can use to quickly jump back and forth in the project. There are several methods for moving around in the Timeline using markers:
- Choose Timeline --> Go to Timeline Marker --> and then choose a marker.
- On the keyboard, press Command+Shift+Up arrow (Mac) or Ctrl+Shift+Up arrow (Windows) to move to the first marker in the Timeline. Substitute the down arrow to move to the last marker in the Timeline.
- In Windows, right-click the Timeline ruler, choose Go to Timeline Marker --> and select the marker to which you want to jump.
Using Timeline markers for fun and profit
Perhaps the greatest revolution in home multimedia entertainment that is happening right now involves DVDs. The Digital Versatile Disc is quickly becoming the standard for mass-market video distribution. After a few minutes spent watching a movie on DVD, it's easy to see why so many folks are eager to abandon their rattling old VHS tapes.
One of the unique DVD features is the ability to quickly jump from scene to scene with the click of a button. No more do we have to wait for a tape to cue forward or back when we want to skip to a specific scene. But when you click that button, how does the DVD player know where the next scene is? Someone who helped prepare that movie for DVD spent some time creating chapter references at key intervals in the program. Premiere lets you create your own chapter references in your projects. Chapter references will not only be useful if you decided to output your movie to DVD but also if you're distributing it online in QuickTime format. The Apple QuickTime Player supports chapter references as well.
To create chapter references in your Timeline, first create markers at the desired locations for the references. Then, double-click a marker. The Marker dialog box appears. Enter a name and/or number for the chapter reference in the Chapter field. Click OK when you're done.
Another excellent use of markers is to create keyframes. Most codecs (those are the compression/decompression schemes used to compress video for export) use keyframes to efficiently compress video. Rather than save 30 individual frames for one second of video, many codecs save two keyframes — one keyframe shows the first frame of that one second of video, and the second keyframe shows the frame at the end. The codec then extrapolates the difference between those two keyframes during playback.
Most codecs automatically set keyframes at specific intervals (once every 30 frames, for example). However, you can specify additional keyframes in certain circumstances. For example, suppose you have a clip that contains a relatively still subject. Then, suddenly, some action explodes onto the scene. If you place a keyframe at the very beginning of the action, most codecs will be able to compress the clip more efficiently. To do so, first set a Timeline marker at the desired frame. Later, when you export the movie, click Settings in the Export Movie dialog box, click Next until you see the Keyframe and Rendering settings, and place a check mark next to the Add Keyframes at Markers option. Note that this option will only be available if the export codec supports keyframes.


