


Adobe Premiere offers a plethora of settings, and you could easily spend a day or two trying to sort through them all. Some settings are immediately relevant to your work; some won't be used until you perform more advanced work. The next few sections show you some key settings that help you make more effective use of Premiere on a daily basis.
Setting up your scratch disks
The scratch disk is the disk where you store all of your video stuff. When you capture video onto your computer, you capture it to the scratch disk. Likewise, when you want to preview transitions, timelines, effects, and various edits, they must be rendered. Rendering is where the transitions or effects are actually applied to the clips. The rendered clips are stored as preview files on the scratch disk. The scratch disk is your Premiere storage place — your video data bucket, so to speak.
If your computer has just one big hard drive, then you won't necessarily have a separate scratch disk. Your scratch disk will actually be a folder on your main hard drive. But if you can get a separate hard drive to use exclusively as a Premiere scratch disk, go for it. Because big and fast hard drives are so cheap these days, there is almost no reason to not have a separate scratch disk.
A scratch disk must be not only big, but fast. You'll need a 7200rpm IDE drive at the very least, or if you can afford it, a SCSI drive. If your drive isn't fast enough, you'll drop frames during rendering and when you try to output video to tape.
You can choose different scratch disks and folders for different types of files. Premiere will always use whatever location you specify. To set up your scratch disks, follow these steps:
1. On the Premiere menu bar, choose Edit --> Preferences --> Scratch Disks and Device Control.
The Preferences dialog box appears, as shown in Figure 1.

Figure 1: Configure your storage space using the Scratch Disks settings.
2. Use the Captured Movies menu to adjust the scratch disk setting for clips that you capture using Premiere.
When you capture movies from a camera, video deck, or other source, this is where the video files are stored. The default location on a Windows PC is "My Documents." On a Macintosh, the default location is the Adobe application folder on the hard drive where you installed Premiere. To choose a different location, choose Select Folder from the menu. When a standard Browse (Windows) or Finder (Macintosh) dialog box appears, use it to navigate to and select a new disk and folder.
3. Choose a scratch disk for video previews from the Video Previews drop-down menu.
When you want to preview part of your project or the whole thing, Premiere must render a preview file. The default location for these preview files is "Same as Project File," which as the name suggests is the folder where your Premiere Project (.PPJ) file is saved. You can select a different folder if you wish.
4. Choose a scratch disk for audio previews from the Audio Previews drop-down menu.
Audio must also be rendered before it can be previewed.
5. Click OK when you are done adjusting your Scratch Disk settings.
If your computer is on a network, you will be able to choose network drives on other computers when you set up your scratch disks. However, it's not a good idea to use network drives as scratch disks. Most networks are not fast or reliable enough to adequately handle large video files without dropping frames and causing other problems.
Customizing other options
You can customize what happens when you first start Premiere. Right now you probably see the Load Project Settings dialog box every time you start Premiere. If you wish something else would happen on startup instead, try this:
1. Launch Premiere, and click Cancel to close the Load Project Settings dialog box if it appears.
2. Choose Edit --> Preferences --> General and Still Image.
The General and Still Image Preferences dialog box appears, as shown in Figure 2.
3. In the Window at Startup drop-down menu, choose None if you don't want any dialog boxes or windows to appear when you first start Premiere.
Other "Window at Startup" options include the following:
• Choose Open Dialog if you want the Open Project dialog box to open at startup.
• Choose New Project if you want the New Project Settings dialog box to appear at startup.
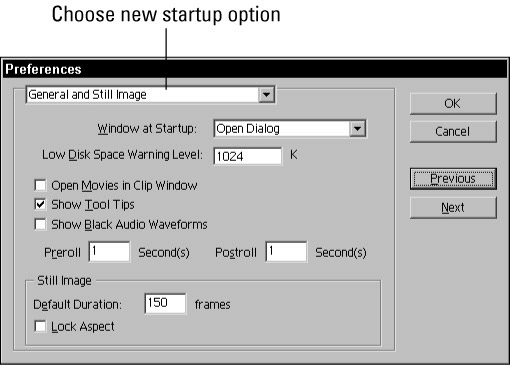
Figure 2: Change what happens when Premiere starts up.
While you have the Preferences dialog box open, open the menu at the top of the dialog box and choose Auto Save and Undo. You should now see a group of Auto Save options. If you place a check mark next to "Automatically Save Projects," Premiere automatically saves your work every five minutes (or you can choose another interval).
Auto Save can work in conjunction with the very cool Project Archive feature. When you set Premiere to automatically save your work periodically, and you have numbers listed next to "Maximum Files in Archive" and "Maximum Project Versions," Premiere then saves a different version of your project every time it autosaves — which can really help you out if you want to go back to an earlier version of the project. The archive files are saved in the same folder as your main .PPJ (project) file, so opening an archived version is as easy as choosing File --> Open.
Because .PPJ files are small, you can safely use the Project Archive feature without eating up a lot of disk space. In the Preferences dialog box, you set how many versions you want saved. When the specified limit is reached, the oldest version is deleted in favor of the new one.
Finally, open the menu at the top of the Preferences dialog box again — and this time, choose Titler. The Titler options appear, as shown in Figure 3. Here you can choose a specific Startup Template for when you first launch the Titler, and you can choose which characters to use for font and style samples. But the most important options here are the two check boxes:
- Show Safe Title Margins — Virtually all TVs overscan the video image. Overscan means that some of the video image is actually cut off at the edges of the screen. When designing video for TV viewing, you must take overscan into account. The title's safe margin is actually a border that appears on the video image. If you keep your titles inside that border, the words shouldn't get cut off by overscan. Even if you're only developing video for the Web or other digital source, it's wise to keep the title's safe margins on at all times.
- Show Safe Action Margins — Action can usually be shown closer to the edge of the screen than titles, so the safe margins for action are closer to the edges of the video image than are the safe margins of titles. You may find that setting safe margins for actions isn't very useful when you're designing titles (unless you have animated objects or graphics in your titles).

Figure 3: Use the Preferences dialog box to control default settings for the Titler.
Setting online preferences
Adobe wants to help ensure that you have the latest and greatest version of Premiere. The company frequently releases updates and makes them available to you for free download online. The only catch is that you have to actually remember to check for those updates, unless you tell Premiere to automatically check for you. To get that automatic machinery in place, follow these steps:
1. From the Premiere menu bar choose Edit --> Preferences --> Online Settings.
A small Adobe Online Preferences dialog box appears.
2. From the Check for Updates drop-down menu, choose an interval at which you would like Premiere to check for updates.
You can tell Premiere to check for updates daily, weekly, monthly, or never.
3. To check for updates right now, click Updates.
Premiere will go online (if your computer has an Internet connection setup and active) and check for updates on the Adobe Web site. If updates are available, they will be downloaded and instructions on-screen will help you through the installation process.
4. When you're done fiddling with online settings, click OK to close the dialog box.


