


Preparing Premiere Pro for Your Movie
Think of a Premiere Pro project as the home base for your movie. It’s the place where multiple sequences, your video and audio assets, and alternate ways to view them all come together. Here’s how to set up a new project:
- Create a project. After opening Premiere Pro, you can either click New Project in the welcome screen or go to File ➪ New ➪ Project from the main menu.
- Name the project. Give it descriptive name and designate a older to save it with your other projects.
- Making your sequence. Also known as the timeline, to create each sequence go to File ➪ New ➪ Sequence.
- Name the sequence. Use a naming convention that provides pertinent information like location, subject, and date. For example: PODUNK_PLAY_20220202
- Import Content. This refers to getting your clip and assets into your project folder, either by ingesting from the camera, transferring from the media card, or import an existing file on your hard drive.
Bringing content into your movie
With features and functions that transform old school linear video editing from the suite to your desktop, Premiere Pro lets you bring content from a variety of sources into the workspace.
Let’s examine various ways to get that media into the project.
Not sure what format you want? Here’s the lowdown on some of the most common and why you should or should not use it:
- QuickTime: More than a format, it’s an entire framework, but that’s not what matters in this situation. The QuickTime file format will give you an uncompressed file that’s perfect for archiving and high-level showing, but not so much for online use or sharing.
- Adobe Bridge: Use Bridge to locate video, audio, and photo files throughout your system and import them into Premiere Pro.
- Camcorder: Many allow you to connect via USB and capture directly into Premiere Pro.
- Hard drive: Saved files can be imported from your hard drive or an external drive into your project.
- DVD: Grabbing files from a data DVD is as easy as finding them on your other drives. Importing from a self-playing DVD is not as easy, but with the proper software, you can extract sections with ease.
- Recorded from Zoom: Recording interviews over Zoom has become quite popular, and the files are easily importable.
- Photos from cameras or devices: Plug it in, search for the file, and import it into Premiere Pro.
- Downloading from your smartphone: Grab content from the cloud or plug in your smartphone, export it to a drive, and import it.
Exporting your movie
In the spirit of just about everything else in Premiere Pro, there’s no single solution when it comes to exporting your production. Numerous choices for export are available, and at your fingertips.
Whether you’re hoping to post a video to your YouTube channel or show it on a big screen at a wedding, the journey to exporting video out of the timeline begins with the Export panel, shown below.
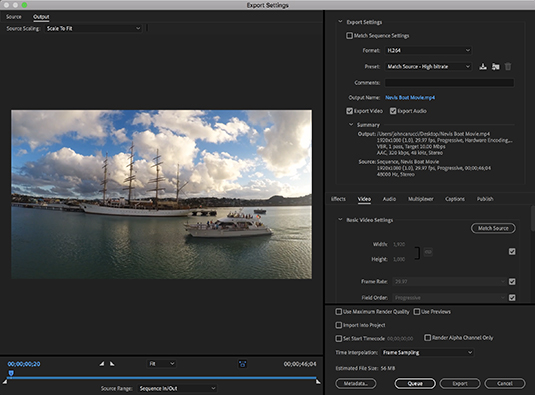
Let’s run through the process and then examine the options. Here’s how to export your movie.
- Go to File ➪ Export ➪ Media (or use the shortcut Cmd+M in MacOS or Ctrl+M in Windows).
- Choose your format. QuickTime and H.264 are the most popular choices.
- Pick your preset. This is specific to the format and depends on your needs. (See the section, “Choosing a format,” if you’re not sure.)
- Change the output name (if necessary) by clicking on the link and changing the filename when the dialog pops up.
- Be sure that the audio and video checkboxes are selected, or your file will be missing these components when the export is complete. Premiere Pro allows you to export audio and video separately, so be sure the boxes are checked. This comes in handy when all you need is video for an art installation, or audio, as part of a soundtrack.


