


An effective photo import workflow
Things you want to keep in mind before you start the import process:- What import method are you going to use?
- Are you going to back up your imported copies?
- Do you know where you want your photos to go/remain?
- Are there things like keywords or presets you want to apply?
- Have you created a filename template for the file-naming convention you want to use?
- Initiate the import. You can initiate an import in several ways, but nothing happens without you taking the first step.
- Select the photos you want to import. No matter where your photos originate, you have to choose which ones to import.
- Configure the settings to meet your input needs. Having answers to the questions at the start of this section allows you to quickly set up the Import dialog and click that Import button.
Initiating the import of photos into Lightroom
The Import dialog is the gateway all photos have to pass through. You can open the door in several ways:- Click the Import button in the Library module. This method might be the most common way to launch an import because the big Import button in the Library module is easy to spot (and who doesn’t love to click a button). It can be used when importing from any disk or device.
- Connect your camera or a memory card to your computer. If you enable this feature in Lightroom Classic’s Preferences file ahead of time, the Import dialog automatically launches whenever it detects the presence of a memory card — either solo or as part of a digital camera. This can be a real time-saver if the only time you connect a camera or memory card is when you want to conduct a Lightroom Classic import.
- Choose File→ Import Photos and Video from the main menu. Use this option if you’re importing files from a memory card or those already on your hard disk.
- Drag and drop. You can drag and drop a folder of images from your file browser right onto the Library module to start the import process.
Selecting the photos you want to import into Lightroom Classic
Although it may be true in most cases that you’ll want to import every photo on the memory card, it’s still worth your while to scan through the images to verify that you really want to import them all. The Don’t Import Suspected Duplicates option on the File Handling panel is checked by default to ensure that you don’t import the same photos twice, but when scanning the previews, you might find you just don’t need to waste time importing some of the (bad) photos. Uncheck the check box on any photos that you don’t want to import at that time.In some instances, you may find it easier to click the Uncheck All button at the bottom of the dialog and then just check the boxes for photos you do want to import. You can use faster methods to sort the wheat from the chaff in the Library module, but there’s no need to import photos of the inside of your lens cap.
Configuring the settings to meet your input needs
When you know which photos you want to import, it’s time to make choices regarding how they’re imported and whether you’re going to multitask a little and process them on their way in the door.The Import dialog gives you four options along the top center. The source you are importing from largely determines which options are available in the Import dialog.
If you are importing from a memory card, Copy as DNG and Copy are the only available options. If you are importing from a drive all options, Copy as DNG, Copy, Move, and Add are available.
Here’s why. If you’re importing from a device (say, a memory card), you don’t want the Add option because memory cards are only temporary storage devices. Lightroom Classic knows this and disables the option. Move also isn’t an option, based on best practices for dealing with memory cards.First, you don’t want to remove files from your memory card until you can visually verify that the files have been copied safely to at least one other disk (two if you want to be safe). The idea here is that you don’t want to risk something going wrong in the moving process because you haven’t yet created a backup.
Second, it’s better to use your camera to reformat the card when you’re ready to erase the contents than it is to let your computer perform that task. When you reformat the card in-camera, the process is done in the best way for the camera, which means you experience less chance of corrupted data when the camera is writing files to the card in normal operation.
The Copy and the Move file-handling options include additional settings not found when using the Add option. The reason for this is that when you’re only adding, you aren’t changing anything about the photos. You’re simply telling Lightroom Classic where the files are located and getting on with the business of importing their data. It would follow that if you’re choosing to copy or move the photos and then import, you would need to tell Lightroom Classic where you want them to go and whether you want to change their names in the process.
To that end, when you choose one of the Copy or Move file-handling options, you see the following options appear in the Import dialog:
- Destination: Even though this option appears at the bottom of the Import dialog, I’m talking about it first because it is the most important. You do two things here: select the destination where the photos will go and control the folder structure that is created in the import process. You can choose three Organize methods:
- By original folders: This option is useful when you’re moving or copying from a disk and want to replicate the same folder structure on the destination disk.
- By date: The is the default option. Lightroom Classic provides eight date-based folder structures (YYYY/MM-DD, YYYY/Month/DD, and so on) to choose from. The capture dates from the photos are used to create the actual dates used, which is reflected in the space below the Organize field. The slash separating some of the date options means a folder and subfolder structure will be created.
- Into one folder: This option allows you to put all your photos into a single folder without regard for dates or original folder structure.
- File Renaming: Provides the option to change the filenames when placed in the destination folder. Choose Filename from the Template drop-down menu if you want the filenames to keep the original names. An example of how the filenames will look is displayed above the Template field, using the selected template.
Lightroom Classic’s file-renaming function is quite powerful and versatile. It’s a great option to have during import, but keep in mind that you can rename files later in the Library module. So, don’t feel pressure to do it at import.
Lightroom Classic installs with a number of prebuilt filename templates for you to use, but its true power is unleashed when you use the Filename Template Editor, as shown, to create your custom templates. You access the editor by clicking the Template drop-down menu and choosing Edit.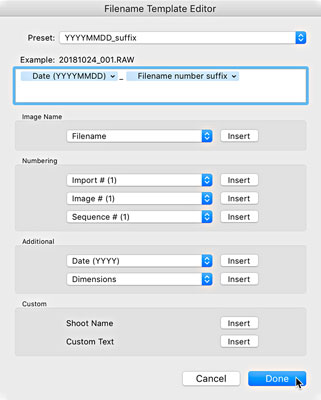 The Filename Template Editor.
The editor works by using what it calls tokens to represent various text strings that you can assemble into various configurations. There are tokens for image name data, image numbering options, date formats, metadata, and even custom text. The assembled tokens can be saved as reusable templates any time you want to rename files. (You’ll use the same editor and tokens if you rename after import as well.)
Click through the various sections to get a sense of what data is possible to include in your filenames. Give your attention to two tokens in particular:
- Import #: You can use this token to include the import number in your filename. The Import Number is managed from the File Handling tab of the Catalog Settings dialog box.
- Image #: You can include this token when you want to number files incrementally across multiple imports. Controlled by the Photos Imported value, Image # is managed from the File Handling tab of the Catalog Settings dialog box.
Follow along this example in which you create a custom template that combines date information and part of the original, camera-generated filename (refer to the preceding figure to see what the template ends up looking like):
- Click the Template drop-down menu, and choose Edit.
Doing so launches the Filename Template editor. When the editor opens, notice that the active template displays in the Preset field at the top of the editor and that the tokens that make up that template appear in the Editing field. Take a moment to click through the other templates and see how the tokens are constructed.
- Delete any tokens that appear in the editing field. Start with a clean slate. Just click into the field behind the tokens and press Delete (Backspace for Windows). Notice the example above the field changes as you add or remove tokens to preview how the filename will appear.
- Click the drop-down menu in the Additional section of the editor, and choose the Date (YYYYMMDD) token. Just selecting from the menu adds the token to the editing field.
- Click the editing field behind the date token and type an underscore.
You aren’t limited to using just the tokens to build your filenames. You can type right into the editing field. Just remember that with filenames, you don’t want to make them any longer than necessary, and you want to avoid all nonalphanumeric characters except for dashes and underscores to prevent potential problems down the road.
- In the Image Name section of the editor, choose the Filename Number Suffix token from the drop-down menu. This is the camera-generated file number.
- Click the Preset drop-down menu at the top of the editor, and choose Save Current Settings As New Preset. Doing so opens the New Preset dialog. In case you haven’t noticed, the folks at Adobe use the words template and preset interchangeably. Don’t let that confuse you.
- Give the preset (template) a descriptive name, and click Create. After you click Create, you see this name appear in the Preset menu.
- Click Done. You’re brought to the Import dialog with your new template selected.
- Develop Settings: While some prebuilt Develop settings are available to you out of the box, I don’t recommend using any at this point. Applying a Develop setting to all photos at import can be helpful at times (such as when you’re shooting in a studio and want to apply a custom white-balance setting), but the majority of your imports can do without Develop settings — which means you should leave this set to None.
- Metadata: There’s no reason not to apply a basic set of metadata to all imported photos. Create a preset (more on that later) that contains your basic copyright and contact information, and apply it every time.
- Keywords: Keywords identify your photos and — when used consistently — provide a powerful means to find specific photos after your catalog grows. It isn’t a sexy aspect of the import process, but do it, and you’ll reap the rewards. During import, you only want to be careful about getting too specific because the keywords you enter here are going to be applied to every imported photo in the session.
To create a basic Metadata preset, you do the following:
- In the Apply During Import panel of the Import dialog, click the Metadata drop-down menu, and choose New. Doing so launches the New Metadata Preset dialog (see the following figure).
- Enter a name for your new preset in the Preset Name field.
- Fill out all the fields in the IPTC Copyright and IPTC Creator fields.
This is the basic information about who holds the copyright to this photo and how to contact them. Adding it here means it’s written into the metadata of your exported files and can be written to the XMP metadata of your source files.
Here's how to create the (c) symbol so that it can be included in the Copyright field. If you are working in Windows and have a separate number keypad, hold down the Alt key and press 0169 on the keypad, and then release the Alt key. If you’re on a laptop with a keypad overlay on your regular keyboard, hold down the function (Fn) key and the Alt key, and then press 0169. If you’re working on a Mac, hold down the Option key and press G.
- Click the Create button. This saves the preset using the name you entered in Step 1 and closes the Metadata Preset dialog. You see the new preset in the Metadata field of the Import dialog.
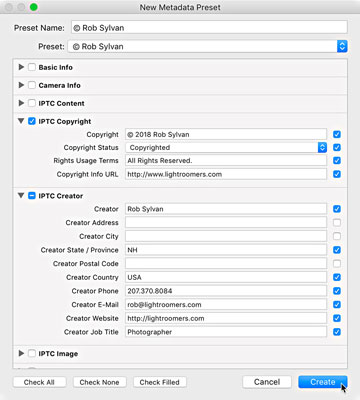 The New Metadata Preset dialog.
The last setting to configure before clicking the Import button is Build Previews in the File Handling panel. Lightroom Classic begins rendering the previews after the import process is complete. This setting determines the size of the previews it starts creating after import. Here are your options:
- Minimal: With Minimal selected, the lowest-resolution previews are grabbed from each file as quickly as possible. Lightroom Classic renders its previews as needed when you are working.
- Embedded & Sidecar: Some photos have a larger or full-size preview embedded within their files (or their companion metadata files). With this option, that preview is grabbed first, which may provide higher initial quality viewing over what you see if you choose the Minimal option. This is a great option for a fast import with the ability to check focus and separate the keepers from the deletions. I use this option almost all the time.
- Standard: This setting tells Lightroom Classic to go ahead and start rendering standard-sized previews based on those settings for all recently imported images.
- 1:1: This is a full-size, pixel-per-pixel preview of the source file that Lightroom Classic displays when you are viewing photos up close in the Library module. With this option is set, Lightroom Classic doesn’t wait until 1:1 previews are needed; instead, Lightroom Classic starts rendering them after the import is complete.
No matter which setting you use, Lightroom Classic still eventually renders the previews it requires when needed. The main purpose of the setting is to give you a little control over this background process that happens after the import is complete. I routinely choose the Embedded & Sidecar option.
Importing your photos to Lightroom Classic
The two most common types of imports you perform are the Add (especially for new Lightroom Classic users) and Copy variants.Importing from a drive (Add)
For photos on your hard drive that you want to manage with Lightroom Classic, but keep them right where they are on your hard drive, you use the Add method. Here are the steps for adding existing photos to the catalog:- Click the Import button in the Library module to open the Import dialog. Note: To get to the Library Module, press G (for Grid) from anywhere in Lightroom Classic.
- In the Source panel, navigate to the top-level folder that contains your photos and select it, making sure that Include Subfolders is checked.
- Click the Add button.
- Leave all photos checked for import.
- You can use Lightroom Classic's tools later to sort out and delete any less-than-perfect photos.
- In the File Handling panel, set Build Previews as desired.
- In the Apply During Import panel, set the Develop Settings drop-down menu to None, and choose your Metadata preset in the Metadata menu.
- Apply any globally applicable keywords (doubtful that any would apply to all photos when you’re first importing).
- Click the Import button.
Importing from a memory card (Copy)
Use a card reader instead of directly connecting your camera. A card reader is cheap and portable, doesn’t drain your camera batteries, and frees your camera to take more photos if you have multiple memory cards. Card readers often provide a faster data transfer rate than most cameras do. Card readers are so common these days that many laptops and monitors have them built right in!Time to go through the steps for importing from a memory card — no matter how you connect the card to the computer. These steps are for the manual method and work only if you disable the Show Import Dialog When a Memory Card Is Detected preference setting:
- Connect your memory card to the computer, and click the Import button in the Library.
- Verify that your memory card is selected in the Devices section of the Source panel.
- Confirm Eject after Import in the Source panel is checked.
- Scan the previews, and uncheck any photos you don’t want to import.
- Choose the Copy option at the top of the Import dialog.
- Go right to the Destination panel, and choose where you want the new copies to be saved.
- Click the Organize drop-down in the Destination panel, and choose how you want the photos organized.
- Confirm that Don’t Import Suspected Duplicates in File Handling is checked.
- (Optional) Check the Make a Second Copy To box in the File Handling panel, and configure a backup location.
- Set Build Previews as desired.
- In the File Renaming panel, choose a file-naming template from the Template drop-down menu.
- In the Apply During Import panel, click the Develop Settings drop-down menu, and choose None.
- While you are in there, click the Metadata drop-down menu and select an existing preset or create a new one.
- Apply any globally applicable keywords.
- Double-check settings in the Destination panel.
- Click the Import button.

