


Employing an export workflow
Lightroom Classic (as you’ve probably figured out by now) is a workflow application, and within the larger workflow of taking your photos from input to output, there exist many smaller workflows within workflows. Export is no exception. Here are the basic steps:- Select the images you want to export.
- Initiate the Export command.
- Configure settings as needed to meet your output needs.
- (Optional) Save settings as a preset for reuse.
Step 1: Selecting the images you want to export
The photos you select for export are determined by your needs at the time. You can export images from within any Lightroom Classic module, but the Library module gives you the greatest access to your entire portfolio and exporting from there usually makes the most sense. So, if you’re not there already, press G to jump to the Library’s Grid view. From here, you have access to all your folders and collections, as well as the Library Filter bar, meaning that you can go ahead and track down the images you want. (Go ahead; take your time.)After you locate the images you want to export, you can select them by any of the following methods:
- Pressing Command +A (Ctrl+A for Windows) to select all photos within a folder or other grouping of photos.
- Clicking the first image in a series, holding the Shift key, and clicking the last image in the series to select all images in between.
- Holding the Command key (Ctrl key for Windows) and clicking each image individually to make a noncontiguous selection.
Step 2: Initiating the Export command
After you select the images, you can initiate an export from any module (except where noted) through the following means:- Choose File→ Launches the Export dialog.
- Choose File→Export with Previous. Skips the Export dialog and simply exports selected files by using the settings from the last export.
- Choose File → Export with Preset → Select Preset. Allows you to select a preset and export without additional configuration of the Export dialog.
- Press Command +Shift+E (Ctrl+Shift+E for Windows). Keyboard shortcut that launches the Export dialog.
- Press Command +Option+Shift+E (Ctrl+Alt+Shift+E for Windows). Keyboard shortcut for Export with Previous.
- Right-click a selected photo and choose one of the previously mentioned export options from the contextual menu that appears.
- Click the Export button at the bottom of the left panel in the Library module. Only visible in the Library module, but comes in handy.
Use the keyboard shortcuts in your export workflow as soon and as often as possible. They’ll be second nature before you know it, and they’re great time-savers.
Step 3: Configuring settings to meet your output needs
The first choice you’re going to make is if you plan to export to your hard drive, to a CD/DVD burner (if you even still have one!), an email or some export plug-in you’ve installed. Your most common choice will be Hard Drive. From there, you configure all the panels relating to the choice you made. While additional panels will appear with different export plug-ins, they are too specific and varied to be covered here; I focus only on the panels that come with the hard drive, as that covers the most options.THE EXPORT LOCATION PANEL
The Export Location panel, shown here, is used to configure where you want to save a batch of copies on your hard drive. Even if you ultimately burn these copies to DVD or hand them off to another application, Lightroom Classic first needs to save the copies to your hard drive.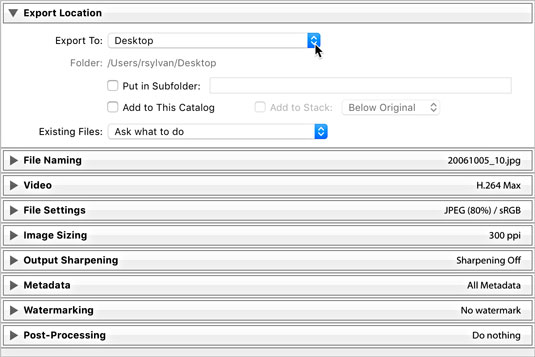 The Export Location panel expanded.
Where you choose to save the files is driven by two factors: how you manage your files and what you determine your output needs to be. The Export To drop-down menu provides a few options for designating a location:
- Specific Folder: When you select this option, you can point Lightroom Classic to any folder on your disk. Just make sure it has enough free space to hold all the new copies. Click the Choose button and navigate to the folder you want to use.
- Same Folder As Original Photo: This option does exactly what it describes, which is to put your exported copies back into the same folder as the original.
- Choose Folder Later: This option is useful when you’re creating presets and don’t want to hard-code a specific location into the preset. When you use a preset, Lightroom Classic prompts you to provide a location.
- User Locations: Below those options will be a list of common user locations like Desktop, Documents, Home, Movies, and Pictures folders to make it easy to select.
- Put in Subfolder: This option allows you to create a subfolder within the designated export location. Check the box and enter a name for the subfolder in the corresponding text field.
- Add to This Catalog: Think of this as an Automatic Import option. After your copies are exported, they appear inside Lightroom Classic without your having to go through the Import dialog.
- Add to Stack: Stacking is a function that allows you to arrange groups of photos under a single thumbnail for organizational purposes. This option is only available when you’re exporting copies back to the same exact folder as the originals (and not putting them in a subfolder). When checked, the exported photos appear stacked with the source photos when you view that folder in Lightroom Classic.
- Ask What to Do: This option is the safest option and the one recommended. If such a situation occurs, Lightroom Classic prompts you for further instructions and then you choose one of the other three options.
- Choose a New Name for the Exported File: In this case, Lightroom Classic simply appends a new sequence number to the end of the exported file, so you end up with two copies of the same file but with unique names.
- Overwrite WITHOUT WARNING: Does what it says (and it even uses all caps in the drop-down menu). Only choose this option if you are really sure it is what you want to do. Note that Lightroom Classic does not allow you to overwrite the source photos, so don’t choose this option thinking you can export copies with Lightroom Classic adjustments and save over the existing source files — it won’t work.
- Skip: If you choose this option, no new copy is created (that is, Lightroom Classic skips the file) when an existing file with the same filename is encountered.
THE FILE NAMING PANEL
In many cases, you’ll want to maintain name consistency between your source files and your exported copies. By simply choosing the Filename template, you can achieve just that. Other times, you may want to use custom names that are completely different or perhaps some variation of the original name, as shown. In any case, because you’re always creating copies, you must tell Lightroom Classic how you want them named, and just as when you use the Import command or rename files in the Library module, Lightroom Classic uses filename templates to do it.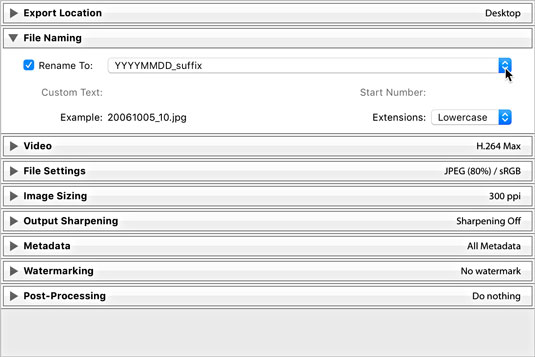 The File Naming panel.
Click the Template drop-down list and choose one of the installed templates, or you can click Edit and create a custom filename template using the good old Filename Template Editor.
THE VIDEO PANEL
If you have a video file selected for export, you need to check the Include Video Files check box to access the (limited) format options for video, as shown.- DPX: A lossless format suited for sending to professional video editing tools (like Adobe Premiere). Choose this only if you know it is required.
- 264: Good for exporting compressed video files for viewing and sharing. A description of each quality setting appears under it when selected.
- Original, unedited file: Produces an exact copy of the original.
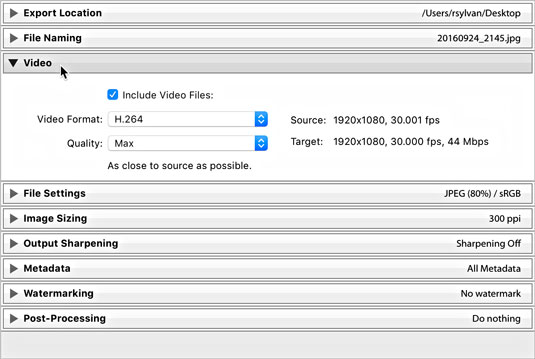 The video panel expanded.
THE FILE SETTINGS PANEL
Choose your file format based on your output needs (such as choosing JPEG for photos going on a website). Some formats require additional settings. Here’s a list of the formats and their options:- JPEG: When you choose the JPEG (or JPG) format, you also need to choose the level of compression to be applied to each JPEG file. You make this selection by using the Quality slider, as shown in the following figure. The higher the quality value, the less compression — and the larger the file size. JPEG compression is always a tradeoff between file size and image quality. If you’re not too concerned about file size, leave it set around 90. The Limit File Size To option is useful if you need to achieve a specific file size in bytes, but keep in mind that you may need to also reduce the pixel dimensions when exporting large files.
- PSD: PSD is Photoshop’s native file format. You can choose between 8- and 16-bit.
- TIFF: TIFF is a widely supported format. Use the panel’s Compression drop-down list to pick one of the lossless compression options. “None” is pretty straightforward; ZIP and LZW reduce the file size, but the length of time to open and close the file increases. (Note that not all image editors can open compressed TIFF files. Also note that only the ZIP compression option is available with 16-bit files.) If your photo contains transparent pixels and you want to keep them in the exported copy, check the Save Transparency box.
- DNG: This is Adobe’s open format for raw (unprocessed by the camera) photos. Note that the Use Lossy Compression option is occasionally useful for situations in which you want to keep the exported copy as a DNG file while also reducing its pixel dimensions by using the options in the Image Sizing panel.
- Original: Selecting Original from the drop-down list results in the creation of an exact copy of your source image. (Raw and DNG photos will include Lightroom Classic edits in the photo’s XMP metadata.) No additional file settings are available with this option.
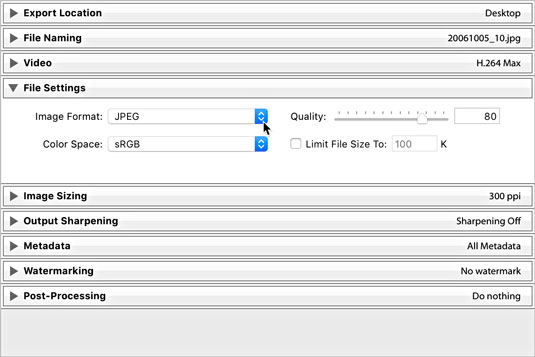 The File Settings panel expanded to show JPEG format and Quality slider.
Two additional options, which appear only when you choose JPEG, TIFF, and PSD formats, warrant a separate discussion. (Raw files are always 16-bit and don’t have a color space.)
- Color Space: A photo’s color space is what determines the range of possible colors it can contain. You need to decide what color space you want these copies converted into during the export process. Your choice of color space is determined by the reason you are exporting these copies to begin with and where they will be used. Here’s a look at your choices:
- sRGB: This color space contains the narrowest range of colors and is the standard for exporting photos destined for the web. It’s also used by some print services.
- AdobeRGB (1998): Contains a wider range of colors than sRGB and is most often used when additional editing or printing is the next destination for your files.
- ProPhoto RGB: Contains the widest range of colors and should only be used with 16-bit files. (I discuss bit depth in the next boldfaced bullet.) This is the best option when you want to retain all the color information that was in your source files. Not recommended when delivering copies destined for the web or anyone not used to working with ProPhoto color space.
- Other: While the previous three options are the most common, there may also be advanced situations where you need to convert your files to a custom color space for printing purposes. Consult your print service to see whether it provides or requires custom profiles, and it will help you get them installed. By choosing Other, you’ll be taken to the Choose Profiles dialog, where you can select a color profile.
- Bit Depth: Bit depth determines the amount of data a file contains. The higher the bit depth, the more data is contained in the file (which also means its file size is going to be larger too). If you’re working with raw files, you’re working with 16-bit files. If you’re working with JPEG files, you’re working with 8-bit files. During export, you have the option of saving PSD and TIFF files as 16-bit. If you choose JPG, bit depth is grayed out, but know that JPEGs are all 8-bit by default. Saving files in 16-bit only makes sense when both the source files were originally 16-bit and when the output needs require this original data (such as when you plan to archive the exported copies to DVD or edit them in some other image editor). In all other situations, 8-bit is the more common choice.
THE IMAGE SIZING PANEL
Sometimes, you need to save your exported copies in a different size from the source photos, such as when you want to email them or put them in a web page. To do so, you use options in the Image Sizing panel (see the following figure). Lightroom Classic can make the exported images smaller or larger than the original images — a process known as resampling. The six options for resizing your exports are- Width & Height: The values entered for width and height define the maximum amount each side can be resized to fit while maintaining original aspect ratio.
- Dimensions: This option resizes exported images to fit within the entered dimensions while maintaining aspect ratio. When this option is selected, height and width are no longer associated with the values fields. You just enter the maximum dimensions you want the images resized to fit, and Lightroom Classic does the rest regardless of orientation.
- Megapixels: If you need to resize to a specific total number of pixels (width times height), this is your option.
- Long Edge and Shortest Edge: These options function in the same manner. You set the maximum value for the edge in question, and Lightroom Classic resizes all images to fit.
- Percentage: This option is useful when you want to create exported copies that are a certain percentage smaller than the original.
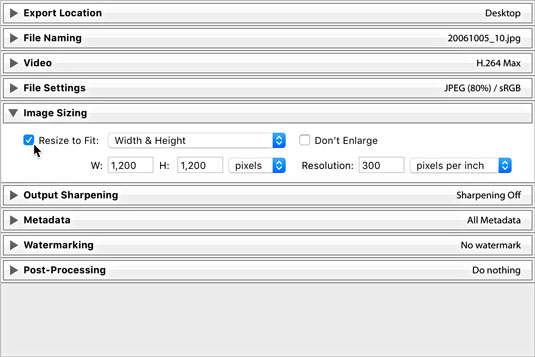 The Image Sizing panel.
Check the Don’t Enlarge box to prevent an image from being resampled larger than its original pixel dimensions. (This option is grayed out when Resize to Fit is unchecked.)
If your output needs require your photos to print at a specific size and at a specific number of pixels per inch (PPI), you can set its resolution value — the metadata tag used by software to determine how big the printed file appears. For example, the value of 300 PPI is commonly requested by print services, in which case you would enter 300 and choose pixels per inch. 300 PPI is always a safe choice, but if your photos are destined for the web only, this value is meaningless and can be ignored.
THE OUTPUT SHARPENING PANEL
I love having the ability to add sharpening tailored for the specific output destination as part of the export process. The Output Sharpening panel, shown in the following figure, is where you choose and configure your output sharpening settings. The possible output settings are defined as- Screen: Use this option when your photo’s final viewing destination will be on a computer screen (that is, on a web page).
- Matte Paper: Use this option when you’re sending your photos to be printed on a type of photo paper that has a matte (non-shiny) finish.
- Glossy Paper: Use this option when you’re sending your photos to be printed on a type of photo paper that has a glossy (shiny) finish.
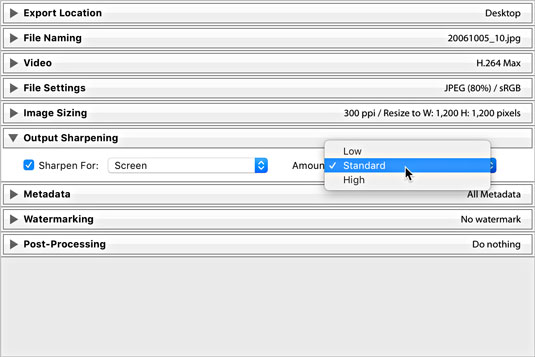 The Output Sharpening panel.
After you identify the output you are sharpening for, you can set the amount of sharpening to apply; your choices here range from Low (almost none) to High (often too much), with Standard in the middle (just right).
THE METADATA PANEL
The Metadata panel, shown in the following figure, allows you some level of control over what metadata is included in the exported copies. Clicking the Include drop-down menu offers the following options:- Copyright Only: Only the metadata entered into the Copyright field of the Metadata panel is applied to copies.
- Copyright & Contact Info Only: This is the same as the above option with the inclusion of any contact information you applied via the Metadata panel (or a metadata template).
- All Except Camera Raw Info: Camera Raw Info means the actual slider values dialed into Lightroom Classic, written as part of the metadata (the adjustments themselves are applied to the pixels regardless of any of these settings). So, this option builds on the above option and then includes all other metadata except the slider values (Camera Raw Info).
- All Except Camera & Camera Raw Info: This does everything that the previous option but leaves out the camera-generated EXIF metadata and the Camera Raw Info.
- All Metadata: Nothing is left out. All EXIF metadata created by camera, plus everything added in Lightroom Classic, is applied to copies.
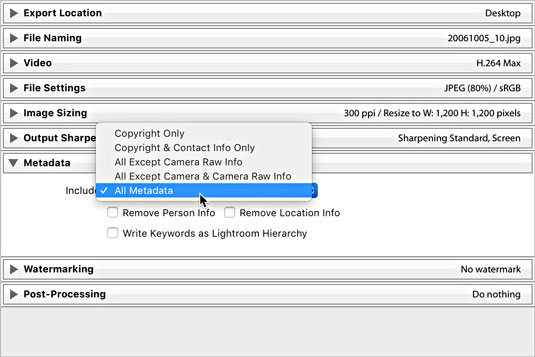 The Metadata panel expanded.
Th Metadata panel has three additional check boxes:
- Remove Person Info: If you used People view to tag photos with the names of the people shown, you can check this box to avoid writing that information into the metadata of the exported copies.
- Remove Location Info: If your photos have GPS information in them, you can check this box to avoid writing that information into the metadata of exported copies.
- Write Keywords as Lightroom Hierarchy: Keywords are the descriptive terms you assign to your photos in the Library module. When you enable this option, and \ use keywords with parent/child relationships (meaning that the keywords are in a hierarchical structure), the exported copies retain that same keyword structure. This feature is useful for photos that will be imported into another Lightroom Classic catalog or managed with Adobe Bridge.
THE WATERMARKING PANEL
You can apply one of three types of watermarks to exported copies. Check the Watermark box to enable the drop-down choices. The most basic is the Simple Copyright Watermark, which pulls the information from the Copyright field of each file’s metadata and renders it as a watermark in the lower-left corner of each exported copy. This type of watermark has no configuration options.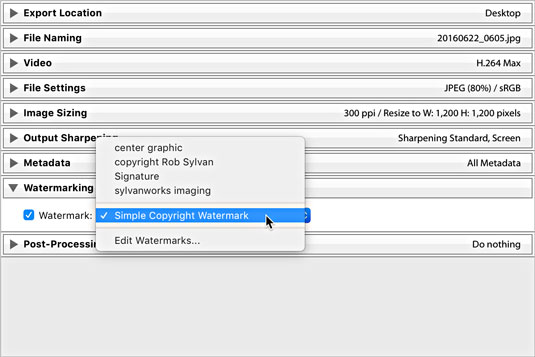 The Watermarking options.
For greater control, choose Edit Watermarks to enter the Watermark Editor, where you can create either a text-based or graphical watermark with more control and save it as a preset for easy reuse.
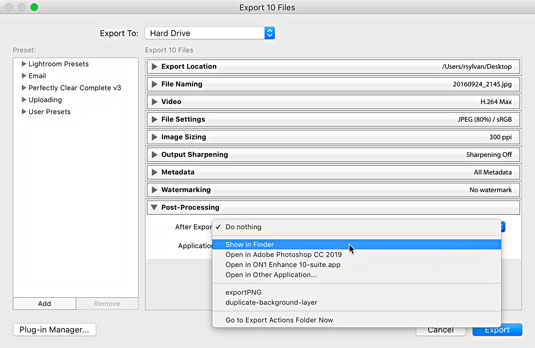
THE POST-PROCESSING PANEL
This is an optional panel, but it can provide a nice productivity boost to your output when you know your photos are going to be opened in some other application after they have been created (such as for additional image editing or viewing in your file browser). The Post-Processing panel (with the After Export drop-down list expanded) is shown in the following figure.With the help of the options in this panel, you can tell Lightroom Classic to hand off your exported images to another application — in effect, having Lightroom Classic perform what is commonly referred to as an “export action” on your photos. The After Export drop-down list includes the following preinstalled options:
- Show in Finder (Show in Explorer for Windows): Automatically opens the folder containing the exported images in your file browser.
- Open in Photoshop: If you have Photoshop installed, you have the option to open the exported images in Photoshop after they’re saved to the export location.
- Open in Additional Editor: If you configured an additional external editor you see it listed here as an option.
- Open in Other Application: Selecting this option gives you the opportunity to designate another application (such as an email client, an alternative image editor, or an FTP client) that will be invoked at the end of the export. Lightroom Classic attempts to open the exported photos in that application; just keep in mind that not every application can accept images this way. Click the Choose button and navigate to the application you want to send your photos to.
 Post-Processing panel expanded to show After Export options.
At the bottom of the After Export drop-down list is the Go to Export Actions Folder Now command. Selecting this option opens Finder (or Windows Explorer for Windows) with Lightroom Classic’s Export Actions folder selected. You can place either an executable file or an alias (shortcut for Windows) to an executable file in the Export Actions folder to include it as an option in the After Export drop-down list the next time you start Lightroom Classic. This is another way to set things up so you can send your photos to a specific program or a Photoshop droplet with one quick command.
“What’s a droplet?” you say. A droplet is a Photoshop action that you manage to turn (with Photoshop’s help) into a tiny executable file. After you create a droplet, you can literally drag and drop photos on top of it to run the photos through the action automatically — a really powerful way to run a batch of images through a favorite action, such as applying a specific Photoshop filter, converting to an alternative color space, or applying a custom watermark. By including the droplet as an export action, Lightroom Classic automatically runs the exported copies through the droplet after they are created.
Saving export settings as a preset for reuse
Presets are such an awesome time-saver! Just think about it — you get to save scads of commonly used settings and then access them any time you want to directly from the Export with Preset menu (choose File → Export with Preset). Sweet!Refer to the following figure to see the Presets panel — it’s there on the left side.
 The Export dialog.
You get four preinstalled presets to start you off, right under the Lightroom Classic Presets heading — presets that can’t be ditched or updated, by the way. They are
- Burn Full-Sized JPEGs: Sets JPG as the file format with the least compression and no resizing and then adds burning the exported images to a disc as an After Export step.
- Export to DNG: Sets DNG as the file format, which essentially means you’re set to convert to DNG on export. Note that using this preset makes sense only when your source files are raw format.
- For Email: Sets JPG as the file format with JPG compression set to 60 and resizes all images to fit within 500 x 500 pixels. This option tells Lightroom Classic to pass exported copies to your default mail client when you export them.
- For Email (Hard Drive): Sets JPG as the file format with JPG compression set to 50 and resizes all images to fit within 640 x 640 pixels. Note that this preset doesn’t actually pass files to your e-mail client; it just configures the export to an email-friendly size and saves them to a location of your choosing on your hard drive.
- Click the For Email preset to load its settings into the Export dialog.
- Expand the File Settings panel. If you prefer a higher Quality setting, set to 70.
- Expand the Image Sizing panel. If you prefer a larger pixel dimension, set to 1000 pixels.
- Expand the Output Sharpening panel. Check the Sharpen For box and selected Screen at a Standard amount.
- Leave the settings in the remaining panels as they are.
- Click the Add button at the bottom left of the Presets panel. This opens the New Preset dialog.
- Enter a descriptive name in the Preset Name field.
- (Optional) Create a new folder in the process of saving your preset.
You can click the Folder drop-down list and choose an existing preset folder or create a new one.
- Click the Create button to complete the process and add the preset to the Preset panel.
You can delete custom presets and folders by highlighting them and clicking the Remove button. Note, however, that removing a folder deletes any presets inside it!
You can update custom presets with new settings by adjusting the settings as you want, right-clicking the preset, and then choosing Update with Current Settings.
