

- The top menu bar, with a < (back) icon on the left, the Lux icon in the center, and the Next link on the right
- The viewer, which displays your photo
- A row of filter thumbnail images so you can see what your photo will look like with a filter applied
- The bottom menu bar, with a Filter menu option (selected by default) and the Edit option
 Instagram’s Filter screen.
Not interested in editing your photo in Instagram? Simply tap the back icon in the upper-left corner to save your photo. Instagram saves your photo automatically and displays the camera screen so you can take a new photo if you want.
Applying an Instagram filter
Below your Instagram photo in the viewer is a row of filters. Each filter includes a thumbnail image so you can see the filter’s effect on your photo.Swipe from right to left in the row of thumbnail images to view all 23 of Instagram’s filters, from Clarendon to Nashville. (Normal is the default image, without a filter.) Tap a filter thumbnail image, and the photo in the viewer changes to show you the photo with that filter applied.
To return to the original photo, tap the Normal thumbnail. To continue processing the photo with a filter, either tap Edit at the lower-right corner of the screen to edit your photo further, or tap Next in the upper-right corner of the screen to add a description to your photo.
What happens when a filter is not quite to your liking and you’d like to tweak it? You can change the intensity of any Instagram filter (except Normal) by tapping the filter thumbnail image again. A slider appears; move it to the left and right to change the intensity. The photo in the viewer changes to reflect the selected intensity. The default intensity for each filter is 100.In iOS, a white box appears to the right of the slider. Tap this box to add a white frame around the photo. If you don’t like having the white frame, tap the box again.
When you’ve set the intensity to just the right amount, tap Done (iOS) or the check mark (Android). If you’re still not satisfied and want to return the photo to its original intensity, tap Cancel (iOS) or the X (Android).
Keep in mind that any Instagram filter settings will revert to the default after you leave this screen.
If you want to see how the photo with a filter compares to the original photo, tap and hold down on the viewer to view the original photo. Release your finger to see the photo with the applied Instagram filter.
Managing Instagram filters
Are there too many filters or are your favorite ones are too far down in the list? No problem. Swipe to the end of Instagram’s filter list, and you’ll see a Manage icon. Tap the icon to open the Manage Filters screen where you can perform three tasks: Change the order of filters in the row, add filters, and disable filters. Swipe up and down in the Manage Filters screen to view the entire list of filters.
The filters on the Manage Filters screen appear in the same order as they do in the Filter screen. You can change the order of Instagram’s filters as follows:
- Tap and hold down on a filter name in the list.The filter name gets larger after you hold down on the name for about a second.
- Move the name in the list.As you move the filter name, other filter names helpfully move out of the way so you can see where your selected filter will appear in the list.
- When the filter is where you want it, release your finger.The filter name appears in your desired location in the list.
When you swipe up and down in the list of filters on the Manage Filters screen, you may see several names that don’t have check marks to the right of the filter name. These filters are disabled, but it’s easy to add any of them to the Filter screen: Simply tap a filter name that doesn’t have a check mark to the right of the name.
A check mark is added, which means the filter is active. Tap Done, and you return to the Filter screen, where you see your new filter in the row of filters.
If you decide that you don’t want to include one or more filters in the Filter screen, you can disable it by tapping the filter name in the list on the Manage Filters screen. The check mark to the right of the name disappears. (To add it back, just tap the disabled filter name again.) When you’re finished, tap Done (iOS) or the check mark in the upper right (Android).
Tweaking your Instagram photos with the editing tools
When you’ve finished experimenting with filters, view Instagram’s editing tools by tapping Edit (iOS) or Edit/Filter (Android) at the bottom of the screen. (Some Android users may see a wrench icon instead.) A row of editing tools appears below Instagram’s viewer. The tool name appears above each tool icon.
Swipe from right to left in the row of editing tools to see all 13 tools. Tap a tool to open it below the viewer.
What you see below the viewer depends on the tool you tapped. For example, when you tap the Brightness tool, a slider appears so you can increase or decrease the photo’s brightness. No matter what tool you use, the photo in the viewer reflects the changes you make and a gray dot appears below the tool icon.
Here’s what you can do with each of Instagram’s editing tools:
- Adjust: You can adjust your photo in several ways by using the Adjust tool. Instagram automatically adjusts your photo to center it before you make any adjustments. A row of three icons and an associated slider bar appear below the photo so you can make the following changes:
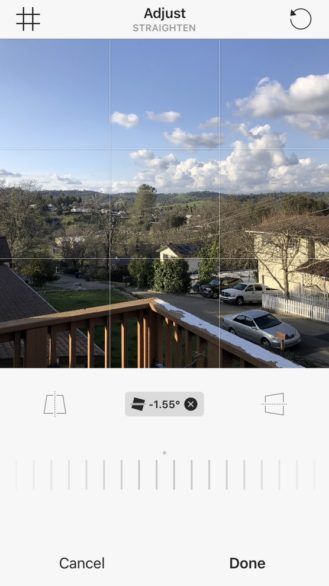 You can overlay a grid on the photo to help you center it. On the iPhone and iPad, the grid icon appears at the upper-left corner of the screen. Tap the grid icon to change the size of the grid. On an Android device, tap the photo until you see the size of the grid you want. If you tap the grid icon or photo often enough, you’ll remove the grid entirely.
- Change the vertical or horizontal perspective of the photo by tapping the left or right icon, respectively, below the photo. After you tap the icon, it’s highlighted in black. The slider bar is a series of vertical lines. Swipe left and right in the slider bar to see the change reflected in the photo. As you slide, the highlighted icon above the slider bar is replaced with a box that shows you the change amount measured in degrees.
- If the object in your photo appears tilted, tap the straighten icon in the middle of the icon row. Then swipe left and right in the slider bar to tilt the photo so that the object appears straight. As you swipe in the slider bar, a box appears in place of the straighten icon and shows you the number of degrees you’re tilting the photo.
- Rotate the photo 90 degrees counterclockwise by tapping the rotate icon in the upper-right corner of the screen. Keep tapping the rotate icon to continue to rotate the photo in the viewer.
- Crop the photo to a specific area by first zooming in (touch the photo and spread your thumb and index finger apart) in the viewer. Then hold down on the photo and drag it in the viewer until you see the part of the photo you want to post on your Instagram feed. If you decide you don’t want to crop the photo, zoom back out to the photo’s original size by pinching your thumb and index finger together in the viewer.
You can overlay a grid on the photo to help you center it. On the iPhone and iPad, the grid icon appears at the upper-left corner of the screen. Tap the grid icon to change the size of the grid. On an Android device, tap the photo until you see the size of the grid you want. If you tap the grid icon or photo often enough, you’ll remove the grid entirely.
- Brightness: In the slider bar below the viewer, slide the dot to the left to darken the photo or to the right to make the photo brighter. As you move the slider bar, the photo in the viewer darkens or brightens accordingly.
- Contrast: In the slider bar, make the light areas of your photo even lighter by sliding the dot to the left. Make the dark areas even darker so the focus is on the lighter areas of your photo by sliding the dot to the right.
- Lux tool: At the top center of the Filter and Edit screens is an icon that looks like a magic wand. Tap it to open the Lux tool, which you can use to quickly change the exposure level and brightness instead of using the separate Brightness and Contrast editing tools. Move the slider to change the exposure level and brightness. When you’re finished, tap Done to save your changes, or tap Cancel to discard them.
If you want to undo any edits you’ve made, tap the Lux icon and then move the slider to its default location, 50. (The default setting for the Brightness and Contrast editing tools, however, is 0.) When you’re done, tap Done.
- Structure: This tool enhances the details in the photo, such as adding color in an area that appears washed out in the original. In the slider bar, slide the dot to the right to see how the tool increases the details of the photo in the viewer. If you think the photo is too detailed, slide to the left to make the photo fuzzier.
- Warmth: In the slider bar below the viewer, slide the dot to the right to make the colors warmer by adding orange tones or to the left to make the colors cooler by adding blue tones.
- Saturation: In the slider bar, slide the dot to the right or left to increase or decrease, respectively, the intensity of all colors in your photo.
- Color: You can change the color of your photo’s shadows or highlights or both, as well as change the intensity of the tint. Eight colors are available: yellow, orange, red, pink, purple, blue, cyan, or green.
 Tap the color dot to select a color for your photo shadow.
- To change the color of shadows in your photo: Tap Shadows, if necessary (it’s the default), and then tap one of the color dots.
- To change the highlight color: Tap Highlights, and then tap one of the eight color dots, which are the same colors as those used for shadows.
- To change the tint intensity for the shadow or highlight color: Tap the color dot twice. In the slider bar that appears below the viewer, slide the dot to the left or right to decrease or increase the intensity, respectively. When the intensity looks good to you, release your finger from the dot and then tap Done (iPhone or iPad) or tap the check mark (Android) to return to the Color page.
- Fade: Do you want your photo to look like it’s been sitting in a shoebox for years . . . or decades? In the slider bar, slide the dot to the right to fade the color from your photo or to the left to add color.
- Highlights: In the slider bar, slide the dot to the right to increase the brightness in bright areas of the photo. Slide to the left to darken the bright areas in the photo.
- Shadows: In the slider bar, slide the dot to the right to lighten the dark areas in your photo. Slide to the left to darken the dark areas.
- Vignette: This tool allows you to darken the edges of the photo so people will focus on the center of the photo. In the slider bar, slide the dot to the right to darken the photo edges.
- Tilt Shift: You can blur the outer edges of your photo and keep the center in clear focus so people will automatically look at the focused area. Tap Radial below the viewer to blur all four edges of the photo and keep the center focused in a circular shape. Tap Linear to blur just the top and bottom edges of the photo.
You can change the size of the “unblurred” area of the picture by tapping the center of the photo with your thumb and forefinger. Then spread them apart to make the area larger or together to make the area smaller. Tap Off if you don’t like the changes and want to keep your entire photo in focus.
- Sharpen: This tool sharpens features that aren’t visible in the original photo, such as the texture on a wall. In the slider bar, slide the dot to the right and left to make the photo less and more fuzzy, respectively.
Saving the changes (or not) to your Instagram photos
When you’ve finished using Instagram’s editing tools and filters, you can do one of three things:- Discard your changes and return to the Photo screen by tapping the left arrow icon in the upper-left corner and then tapping Discard in the pop-up menu.
- Save your changes and continue editing by tapping the left arrow icon and then tapping Save Draft in the pop-up menu. Then Instagram takes you back to the camera screen, not your photo, so you’ll have to select the photo in your library to continue editing it.
- Add a description to the photo by tapping Next in the upper-right corner. The New Post screen appears, where you can add a caption and location, tag friends, and decide if you want to share the photo on other social networks.


