


Here, you get an overview of Android Studio's main window. The focus here is on the most useful features that help you build Flutter apps, but keep in mind that Android Studio has hundreds of features and many ways to access each feature.
Starting up Android Studio
Each Flutter app belongs to a project. You can have dozens of projects on your computer's hard drive. When you run Android Studio, each of your projects is either open or closed. An open project appears in a window (its own window) on your computer screen. A closed project doesn't appear in a window.Several of your projects can be open at the same time. You can switch between projects by moving from window to window.
Here, an open project's window is often referred to as Android Studio's main window. This can be slightly misleading because, with several projects open at a time, you have several main windows open at a time. In a way, none of these windows is more “main” than the others. When you see the term main window here, it’s a reference to the window whose Flutter project you're working on at that moment.
If Android Studio is running and no projects are open, Android Studio displays its Welcome screen. The Welcome screen may display some recently closed projects. If so, you can open a project by clicking its name on the Welcome screen. For an existing app that's not on the Recent Projects list, you can click the Welcome screen's Open an Existing Android Studio Project option.If you have any open projects, Android Studio doesn't display the Welcome screen. In that case, you can open another project by choosing File→Open or File→Open Recent in an open project's window. To close a project, you can choose File→Close Project, or you can do whatever you normally do to close one of the windows on your computer. (On a PC, click the X in the window's upper right corner. On a Mac, click the little red button in the window's upper left corner.)
Android Studio remembers which projects were open from one run to the next. If any projects are open when you quit Android Studio, those projects open again (with their main windows showing) the next time you launch Android Studio. You can override this behavior (so that only the Welcome screen appears each time you launch Android Studio). In Android Studio on a Windows computer, start by choosing File→Settings→Appearance and Behavior→System Settings. In Android Studio on a Mac, choose Android Studio→Preferences→Appearance and Behavior→System Settings. In either case, uncheck the Reopen Last Project on Startup check box.
Android Studio’s main window
Android Studio's main window is divided into several areas. Some of these areas can appear and disappear on your command. What comes next is a description of the areas you see below, moving from the top of the main window to the bottom. Android Studio's main window has several areas.
The areas that you see on your computer screen may be different from the areas you see above Usually, that's okay. You can make areas come and go by choosing certain menu options, including the View option on Android Studio's main menu bar. You can also click the little tool buttons on the edges of the main window.
The top of the main window in Android Studio
The topmost area of Android Studio contains the toolbar and the navigation bar.- The toolbar contains action buttons, such as Open and Save All. It also contains the Target Selector and the Run icon.
The Target Selector is the dropdown list whose default option is
The Run icon is the thing that looks like a green Play button.
- The navigation bar displays the path to one of the files in your Flutter project.
A Flutter project contains many files, and, at any particular moment, you work on one of these files. The navigation bar points to that file.
The Project tool window in Android Studio
Below the main menu and the toolbars, you see two different areas. The area on the left contains the Project tool window, which you use to navigate from one file to another within your Android app.At any given moment, the Project tool window displays one of several possible views. For example, in the image above, the Project tool window displays its Project view. In the image below, the drop-down list was clicked and Packages view selected (instead of Project view).
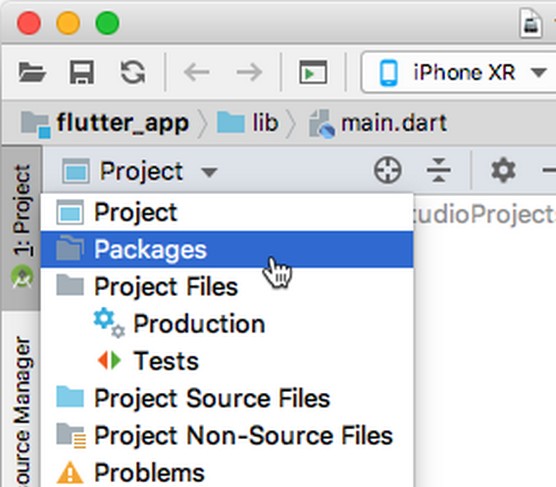 Selecting Packages view in Android Studio.
Packages view displays many of the same files as Project view, but in Packages view, the files are grouped differently. When you get started with Flutter app development, the Project tool window is in its default view; namely, Project view.
If Android Studio doesn't display the Project tool window, look for the Project tool button — the little button displaying the word Project on the left edge of the main window. Click that Project tool button. (But wait! What if you can't find the little Project button? In that case, go to Android Studio's main menu and select Window→Restore Default Layout.)
The Editor area in Android Studio
The area to the right of the Project tool window is the Editor area. When you edit a Dart program file, the editor displays the file's text. You can type, cut, copy, and paste text as you would in other text editors.The Editor area can have several tabs. Each tab contains a file that's open for editing. To open a file for editing, double-click the file's branch in the Project tool window. To close the file, click the little x next to the file's name on the Editor tab.
The lower area in Android Studio
Below the Project tool window and the Editor area is another area that contains several tool windows. When you're not using any of these tool windows, you might not see this lower area.In the lower area, the tool window that’s often used in the Flutter app development process is the Run tool window. The Run tool window appears automatically when you click the Run icon. This tool window displays information about the run of a Flutter app. If your app isn't running correctly, the Run tool window may contain useful diagnostic information.
You can force other tool windows to appear in the lower area by clicking tool buttons near the bottom of the Android Studio window. For example, when you click the Terminal tool button, Android Studio displays the Windows Command Prompt, the Mac Terminal app, or another text-based command screen that you specify.
A particular tool button might not appear when there's nothing you can do with it. For example, the Run tool button might not appear until you press the Run icon. Don't worry about that. The tool button shows up whenever you need it.
The status bar
The status bar is at the bottom of Android Studio's window.The status bar tells you what's happening now. For example, if the cursor is on the 37th character of the 11th line in the editor, you see 11:37 somewhere on the status line. When you tell Android Studio to run your app, the status bar contains the Run tool window's most recent message.
The kitchen sink
In addition to the areas described above, other areas might pop up as the need arises. You can dismiss an area by clicking the area's Hide icon.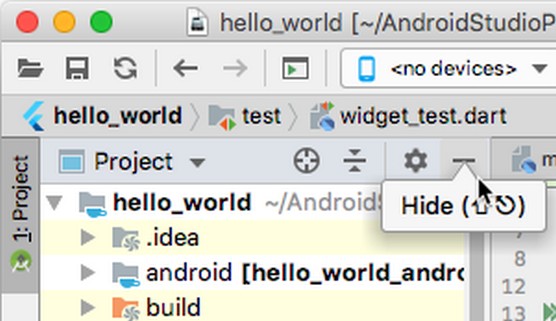 Hiding the Project tool window area.
Ready to give it a try? Use this guide to learn how to run your first Flutter app in Android Studio.


