


Deploying a Linux VM
It’s understandable that most Azure experts to get a kick out of the fact that Microsoft supports Linux natively in Azure. It was inconceivable up until a handful of years ago that we’d be able to run non-Windows VMs by using Microsoft technologies.Here, you learn how to deploy a simple Linux web server in a new virtual network, using an Ubuntu Linux 18.04 Long-Term Support (LTS) VM image from the Azure Marketplace.
Deploying from the Azure portal
Follow these steps to deploy a Linux VM in the Azure portal:- Choose Favorites→Create a Resource, and choose Ubuntu Server 18.04 LTS.
Alternatively, you can browse to the Virtual Machines blade and click Add to deploy a new resource.
If Ubuntu doesn’t show up in the Azure Marketplace list, type its name to find it in the VM template gallery.
- On the Create a Virtual Machine blade, complete the Basics tab.
The following image shows the Create a Virtual Machine blade. Oh, boy, it’s tough not to feel overwhelmed when you see all the tabs: Basics, Disks, Networking, Management, Advanced, Tags, and Review + Create.
 The Create a Virtual Machine blade.
Use the following information to complete the other fields:
- Virtual Machine Name: The name needs to be unique only within your resource group. Pay attention to the validation helpers that pop up when you place your cursor in a field.
- Availability Options: If you don’t see both Availability Zone and Availability Set in the drop-down menu, choose a different region. (East us 2 is a good choice.) Because this is a practice deployment, you can choose No Infrastructure Redundancy Required.
- Image: You specified the Ubuntu image in step 1, but if you’re curious about other options, open the drop-down menu to see the most popular VM images. You can also click Browse All Public and Private Images to view all templates in the Azure Marketplace.
- Size: For now, accept the Microsoft-recommended default VM size.
- Authentication Type: Linux VMs are different from Windows because you can use Secure Shell (SSH) key-based authentication or password-based authentication. For this exercise, choose password.
You should choose a creative default administrator account name. ARM won’t let you use commonly guessed administrator account names such as root an, admin.
- Public Inbound Ports: For testing purposes, associate a public IP address with this VM, and connect to the instance via SSH.
You’ll tighten network security group security later to prevent unauthorized access attempts by Internet-based bad actors.
- Select Inbound Ports: Choose SSH.
- Complete the Disks tab.
This tab is where you make an initial choice about the VM’s OS and data disks. Choose Standard HDD to save money.
The number of data disks you can create depends on your chosen VM instance size. You can always add data disks later, so for now, proceed to the next blade. Note that the default number of data disks Azure provides the new VM is zero; it’s up to you as administrator to decide whether you want to use them.
- Complete the Networking tab.
You have some crucially important decisions to make in terms of where you want to place your VM and how you want to configure its connectivity. Here are the configuration options:
- Virtual Network: The template deploys a new virtual network by default. That’s what you want here, so leave this setting alone.
If you place your VM on the wrong virtual network, you’ll need to redeploy it to move it, which is a pain, so try to make the right choice the first time around.
- Subnet: Leave this setting at its default.
- Public IP: Leave this setting at its default. You do in fact want a public IP address, at least initially.
- NIC Network Security Group: Select Basic.
- Public Inbound Ports: Allow Selected Ports.
- Select Inbound Ports: Select SSH.
- Accelerated Networking: Not all VM templates support this option. For VM templates that support this feature, accelerated networking gives the VMs a network speed boost by allowing the VM to use the Azure networking backbone more directly.
- Load Balancing: Select No.
- Virtual Network: The template deploys a new virtual network by default. That’s what you want here, so leave this setting alone.
- Complete the Management tab.Ensure that Boot Diagnostics is enabled and all other options are off. Boot Diagnostics is required to use the VM serial console, so it’s always a good idea to enable it sooner rather than later.
- Review the Advanced and Tags tabs.
You don’t need any of these options right now, but they’re worth examining. Extensions allow you to inject agent software and/or management scripts into the VM. You can handle configuration after deployment, however.
Taxonomic tags are a way to track resources across subscriptions for accounting purposes.
- Submit the deployment, and monitor progress.Click the Review + Create tab; then click Create after ARM informs you that your selections passed validation. If an error occurs, ARM places a red dot next to the configuration blade(s) where it detects invalid settings.
Connecting to the VM
Use Azure Cloud Shell to make an SSH connection to your VM. Follow these steps:- In Azure portal, browse to the Overview blade of your newly created VM, and note the public IP address.
You see a VM’s configuration below. Most admins use SSH (with or without Cloud Shell) to manage Linux VMs in Azure.
 - Open Cloud Shell, and connect to your Linux VM by specifying your default administrator account name and the VM’s public IP address.
To connect to a Linux VM at 13.68.104.88 using my tim admin account, you type: ssh tim@13.68.104.88
- Type yes to accept the VM’s public key and then type your password to enter the SSH session. At this point, you’re working directly on the Linux VM.
You can get help for any Linux command by typing man . Scroll through the help document with your arrow keys, and press Q to quit.
Deploying a Windows Server VM
Here, you learn how to create a Windows Server VM by using Visual Studio 2019 Community Edition and an ARM template.Visual Studio 2019 Community Edition is a free Visual Studio version that you can use for testing, development, and open-source projects.
Microsoft does make a Visual Studio version for macOS.
This procedure is especially important for you to understand for two reasons:- ARM templates form a basis for administrative automation, development, and operations.
- You’ll use ARM templates to complete most tasks.
Setting up your development environment
Follow these high-level steps to get your Visual Studio environment set up:- Download Visual Studio 2019 Community Edition, and run the installer.You need administrative permissions on your Windows 10 workstation to install the software.
- Choose the Azure workload.
This step is the most important one. Visual Studio is an integrated development environment that supports multiple development languages and frameworks. For the purpose of deploying a Windows Server VM, you need to install the Microsoft Azure software development kits and tools.The image below illustrates the user interface. You can leave the Azure workload components set at their defaults.
 Installing the Azure SDKs in Visual Studio 2019
 - After installation, open Visual Studio, and log in to your Azure administrator account.
When you start Visual Studio 2019, you’ll see a Get Started page. Click Continue Without Code; then open the Cloud Explorer extension by choosing View→Cloud Explorer. Authenticate to Azure Active Directory, and select the Azure subscription(s) you want to work with.
Deploying the VM
Assuming that you have Visual Studio open and you’re logged into your Azure subscription, you’re ready to rock. Here, you’re deploying a Windows Server VM from the Azure Quickstart Templates gallery. In this example, you use a template definition that includes Managed Disks. Follow these steps:- In Visual Studio, choose File→New→Project.
The Create a New Project dialog box opens. - Search the Visual Studio template gallery for Azure Resource Group, select it, and click Next.
- Name and save your project.
Choose a meaningful project name such as Simple Windows VM, choose your favorite directory location, and click Create. - Select the 101-vm-with-standardssd-disk template in the Azure Quickstart Templates gallery and click OK.
Here’s the interface.
 Creating a resource group deployment project in Visual Studio 2019.
 - Double-click your
azuredeploy.jsontemplate file.This action loads the JavaScript Object Notation (JSON) file into your code editor. Pay particular attention to the JSON Outline pane.
 The ARM template in the code editor.
 - Browse the ARM template’s contents.
The three elements shown in JSON Outline view are
- parameters: You supply these values to the template at deployment time. Note the
allowedValueselement on lines 26–30; the template author prepopulated the VM disk types to make validation and deployment simpler. - variables: These values represent fixed or dynamic data that is referenced internally within the template.
- resources: In this deployment, you create four resource types: virtual machine, virtual NIC, virtual network, and public IP address.
- parameters: You supply these values to the template at deployment time. Note the
- In Solution Explorer, right-click the project and choose Validate from the shortcut menu.The Validate to Resource Group dialog box opens.
- Fill in the fields of the dialog box and then click Edit Parameters to supply parameter values.
 Validating our ARM template.
Visual Studio allows you to validate your template before deploying it to Azure. The resource group is the fundamental deployment unit in Azure. Therefore, your deployments must specify a new or existing resource group.
- Click Validate, and watch the Output window for status messages.
Make sure to look behind your Visual Studio application; Azure spawns a PowerShell console session to prompt you to confirm the admin password.
The feedback you’re looking for in the Output window is:
Template is valid.If the template fails validation, Visual Studio is pretty good about telling you the template code line(s) on which it found an issue. You can debug and retry validation as many times you need to until the template passes.
- Deploy the VM by right-clicking the project in Solution Explorer and choosing Deploy from the shortcut menu.
The shortcut menu contains a reference to your validation configuration.
- Monitor progress, and verify that the VM exists in the Azure portal.
Successfully deployed template 'azuredeploy.json' to resource group 'your-resource-group'.
Connecting to the VM
You normally use Remote Desktop Protocol to manage Windows Servers remotely on-premises, and Azure is no different. Browse to your new VM’s Overview blade, and click Connect. The Remote Desktop Connection dialog box opens. You can download the .rdp connection file and open it from here.The steps to make an RDP connection are
- Click Connect from the Overview blade toolbar.
- Download the RDP connection file to your local computer.
- Open the connection using your preferred RDP client software.
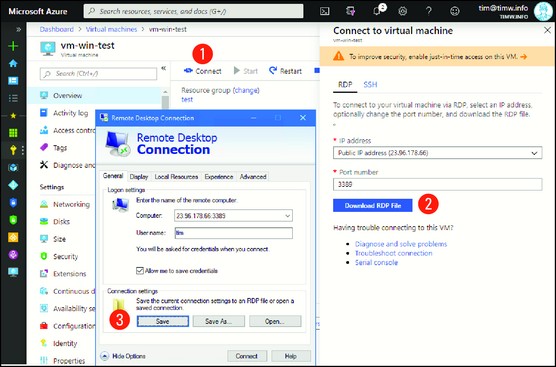 Remote Desktop Connection works the same way with Azure VMs as it does on-premises VMs.
Microsoft makes a native Remote Desktop Protocol client for macOS; it’s available in the Mac App Store.


