


- Turn on your Apple Watch by pressing and holding the side button. This is the one flush with the watch and not the Digital Crown that’s sticking out. You will see the Apple logo appear in the center of the screen. This is a good sign!
- Tap the Apple Watch app on your iPhone.
It’s a black icon that simply says Watch. If you don’t see the app on your phone’s Home screen, swipe left or right to look for it.
You need an iPhone 5 or newer and the 8.2 iOS (or newer) operating system installed to use Apple Watch for Series 1 and 2, and an iPhone 6 and iOS 12 or later for Series 3, Series 4, and Series 5. For Apple Watch Series 6 and Apple Watch SE, you need to have iOS 14 or later. To double-check what you have, tap Settings→General→About and look where it says Version. Your phone also notifies you about any available updates.
After you bring the Apple Watch close to your iPhone, you should see the words “Use your iPhone to set up this Apple Watch” appear on your iPhone screen. If you don’t, open the Apple Watch app on the iPhone and then tap Start Pairing. - Tap Continue. Now, keep your Apple Watch and iPhone close together until you complete these next steps.
- Follow the prompts. They ask you to hold Apple Watch up to the iPhone’s camera. You can then align the watch’s face within the viewfinder in the center of the screen. This should do the trick. See the following figures for a look at setting up Apple Watch for the first time.
 The Apple Watch app asks you to pair your Apple Watch. Easy peasy.
 Match up the Apple Watch inside the outline on your iPhone screen.
If that doesn’t work, tap the Pair Apple Watch Manually option, in orange, at the bottom of the app. You’re prompted to tap the “i” (“information”) app on your Apple Watch to view its name and then tap the corresponding name listed in the app. If it’s not listed, be sure your wireless connection is enabled; then, swipe up from the bottom of the screen and tap the icons for Bluetooth and Wi-Fi so they’re highlighted and not grayed out.
- If this is your first Apple Watch, tap Set Up Apple Watch. Otherwise, choose a backup. If prompted, update your Apple Watch to the latest version of watchOS, the name of Apple’s operating system that powers this wearable.
- Read the Terms and Conditions and tap Agree (twice). If asked, enter your Apple ID password. If you aren’t asked, you can sign in later from the Apple Watch app (General→Apple ID). Some features that require a cellular phone number won’t work on cellular models of Apple Watch unless you sign in to iCloud.
- Choose a text size for the Apple Watch. You may want the font larger, for example, to be easier to read. Who needs the crow’s feet (am I right?!).
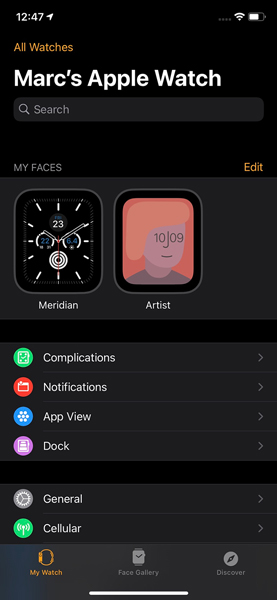
Once the pairing is successful, you can adjust additional watch settings from within the app by tapping My Watch at the bottom left of the screen (see the following figure). Take some time to familiarize yourself with this great app.
 While you might be anxious to play around with your new Apple Watch, spend some time familiarizing yourself with the Apple Watch app on iPhone as well.
In fact, the three main sections to the Apple Watch app are all listed at the bottom of the screen:
- My Watch: This is your main section, which lets you customize your watch face (complications), enable or disable features, tweak settings, and enable notifications per app. There is also a Search window if you want to type a keyword.
- Face Gallery: Tap this to view and change your Apple Watch clock faces.
- Discover: This section offers information on using your Apple Watch (such as customizing it), as well as an Explore Watch Apps area at the bottom of the screen to download and install third-party apps to your device (yes, an app store).
How does Apple Watch’s beautiful Retina display stay on all the time without killing the battery? At the risk of geeking out, it uses a LTPO display — a “low temperature poly-silicon and oxide” display — that drops the screen’s refresh rate from 60 Hz down to a “power-sipping” 1 Hz when the watch is inactive (that is, when you’re not looking at it). A low-power driver, ambient light sensor and efficient power management software also work together to keep your watch going up to 18 hours between charges. Just touch the screen or point it towards your face for full brightness. Cool, eh? Apple made several improvements with Apple Watch Series 6, too, making the always-on display even brighter without impacting battery life.
 Apple Watch Series 5 and Apple Watch Series 6 use a new kind of screen that never turns off 100 percent like previous models do. Instead, it dims right down when you’re not looking at it.

