If you’ve downloaded or purchased any iPad apps from the iTunes App Store, and you chose to let iTunes manage synchronizing your data automatically, you can still manage your automatic syncing options. Make sure that your iPad is selected in the source list.
Click the Apps button, and then select the Sync Apps check box.
The available apps appear.
Choose the individual apps you want to transfer to your iPad by selecting their check boxes.
For your convenience, a pop-up menu lets you sort your applications by kind, name, category, date, or size. Or, you can type a word or phrase into the Search field (the oval with the magnifying glass in the upper-right corner of the iTunes window) to search for a specific app.
(Optional) Rearrange app icons in iTunes by dragging them where you want them to appear on your iPad.
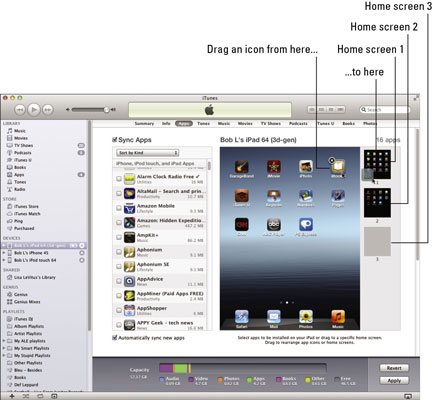
Your iPad came with apps at the bottom of the screen in the Dock plus 13 apps (first-generation iPad) on its Home screen. As you acquire new apps, your iPad creates additional Home screens automatically — up to 9 of them — to display the overflow.
In iTunes you can see the number of screens on the right (three Home screens are showing in this figure).
On your iPad, look for a series of little dots above the Dock. These indicate the number of Home screens, so in this figure, three dots means three Home screens. Note that the middle (second) dot is lit up in white, which indicates which Home screen you’re currently viewing (Home screen 2 in this figure).
If you have a lot of apps, you’re sure to love this feature, which was introduced in iTunes 9.
Click the Sync or Apply button in the lower-right corner of the window.
Your apps are synced, and your icons are rearranged on your iPad just the way you arranged them in iTunes.