


Switch apps quickly
Android apps don’t quit. Sure, some of them have a Quit action or Sign Out option, but most apps loiter in the device’s guts while you do other things. The Android operating system may eventually kill off a stale app. Before that happens, you can deftly and quickly switch between all running apps.

The key to making the switch is to use the Recent gesture or tap the Recent navigation icon, found at the bottom of the touchscreen. When you see the Overview, or list of open apps, swipe the screen up or down to peruse what’s available. To dismiss the list, use the Back or Home navigation gestures or navigation icons.
- To remove an app from the list of recent apps, swipe it from the list (up, down, left, or right). This technique is effectively the same thing as quitting an app.
- For devices with the Recent navigation icon, double-tap this icon to switch between the two most recently used apps.
Deploy the Flashlight
One of the first “killer apps” on mobile devices is the flashlight. It uses the camera’s LED flash to help you see in the dark. For a while, everyone had to get a flashlight app, but today the flashlight feature is frequently found on the quick settings drawer.![]()
Use two fingers to swipe down the screen and display the quick settings. If one of the icons looks like a flashlight, tap it to activate the flashlight feature. Tap again to turn off the flashlight.
- The flashlight feature might also appear as a lock screen app, or you might be able to place it on the lock screen as an option.
- Be aware that keeping the LED lamp on for extended durations drains the battery.
- Use the Flashlight quick setting instead of obtaining a flashlight app. Though it may no longer be the case, at one time flashlight apps spied on their users. The apps collected data and beamed it back to a remote server somewhere. Such malicious apps were purged from Google Play long ago. In any event, the availability of the quick settings feature has rendered such apps unnecessary.
Improve the display
Two things to consider helping your eyeballs when looking at your pet Android are to enable the dark theme and activate the night light feature.Dark theme inverses the color scheme of many apps, replacing the obnoxious, glaring, white background with a gentle, power-saving, dark background.
The night light feature removes the blue end of the spectrum from the display, which provides for an easy transition to sleep during the night hours.
Avoid data surcharges
An important issue for anyone using an Android phone or LTE tablet is whether you’re about to burst through your monthly data quota. Mobile data surcharges can pinch the wallet, but your Android has a handy tool to help you avoid data overages. In the Settings app, you can use the data usage screens, illustrated here.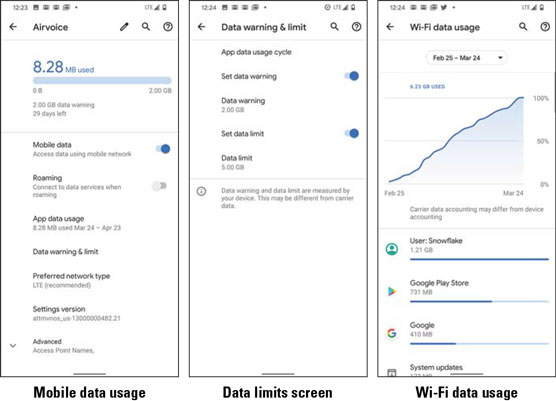 Data usage screens and settings.
To access the data usage screens, open the Settings app and choose Network & Internet. Tap the Mobile network item to view cellular data information, as shown on the far left.
To view the Wi-Fi usage screen (shown on the far right), from the Network & Internet screen, choose Wi-Fi and then Wi-Fi Data Usage.
On Samsung devices, in the Settings app, choose Connections and then choose Data Usage.
The data usage screens show how much data your device has consumed for both mobile data and Wi-Fi connections. A list of data-consuming apps is also presented.
Showing the details is interesting, but what’s useful is setting warnings and limits on mobile data. Follow these steps:
- Open the Settings app.
- Choose Network & Internet.
- Choose Data Saver.
- Ensure that the master control by Use Data Saver is in the On position.
- Use the Back gesture or tap the Back navigation icon to return to the Network & Internet screen.
- Choose Mobile Network.
- Choose Data Warning & Limit. The Data Warning & Limit screen appears.
- Tap Set Data Warning.
- Choose Data Warning and use the slider to set the data warning limit. Say your plan allows for 3.0GB (gigabytes) of mobile data per billing cycle. Set the warning at 2.5GB. Tap the Set button.
- Ensure that the master control by Set Data Limit is in the On position.
- Tap Data Limit and set a limit. This value should be just below your allowed usage — say, 2.8GB for a plan that allows 3.0GB per month.
- Open the Settings app.
- Choose Connections.
- Choose Data Usage.
- Activate the setting Alert Me About Data Usage.
- Choose the item Mobile Data Usage.
- Tap the Settings icon.
- Continue with Step 8 in the preceding set of steps.
It’s important to remember that your device and the cellular provider monitor data usage differently. For example, your monthly quota may be 5GB, but if you set the limit (when the device stops using the mobile-data network, in Step 5) to 5GB, you may still be surcharged. That’s why I recommend (in Step 5) to set a limit below your maximum allowed monthly usage.
Watch your Android dream
After the touchscreen time-out kicks in, the apps keep running and activity goes on, but does the device dream?Well, of course it does! You can even see the dreams, if you activate the Daydream feature — and if you keep a power source connected. Heed these steps:
- Start the Settings app.
- Choose Display.
- Choose Screen Saver. You may need to tap the Advanced item to find Screen Saver.
- Tap the Current Screen Saver item to choose a screen saver. On Samsung devices, the list of screen savers is shown instantly.
 Some daydream options feature the Settings icon, which customizes the daydream’s appearance.
 - Choose When to Start. If this item is unavailable, the screen saver is activated only when the device is charging.
- Select an option, such as While Charging or While Docked. Choosing the Never option disables the screen saver.
Bring back the navigation buttons!
Using gestures for the Home, Back, Recent, and other activities can be useful, but as an old-timer, I like having navigation buttons. To me, they bring a consistency to the interface and are welcome, like familiar friends.To restore the navigation buttons, heed these directions:
- Open the Settings app.
- Choose System.
- Choose Gestures.
- Choose System Navigation.
- Select 3-Button Navigation.
Add spice to dictation
If you’ve used dictation, you might notice that it occasionally censors some of the words you utter. Perhaps you’re the kind of person who doesn’t put up with that kind of s***.Relax. You can follow these steps to lift the vocal censorship ban:
- Start the Settings app.
- Choose System and then choose Languages & Input. On Samsung devices, choose General Management and then choose Language & Input.
- Choose Virtual Keyboard and then choose Google Voice Typing. On Samsung devices, choose On-Screen Keyboard and then choose Google Voice Typing.
- Disable the option Hide Offensive Words.
Visit the dictionary
Betcha didn’t know that your Android sports a dictionary. The dictionary keeps track of words you type that may not be recognized as being spelled properly.Unrecognized words are highlighted on the screen. Sometimes the word is shown in a different color or on a different background, and sometimes it’s underlined in red. To add that word to the internal dictionary, tap it and choose Add to Dictionary.
To review or edit the dictionary, follow these steps:
- Start the Settings app.
- Choose System and then Languages & Input.
- Choose Virtual Keyboard.
- Choose Gboard.
- Choose Dictionary.
- Choose Personal Dictionary.
- Choose English. Behold your added words, if any.
![]()
To add a new word to the list, tap the Add icon.
Samsung devices (which use the Samsung Keyboard instead of the Gboard) lack an editable dictionary. This situation may change in the future.
Add useful widgets
Your Android features a wide assortment of widgets with which to festoon the Home screen. They can be exceedingly handy, though you may not realize it because the sample widgets that are preset on the Home screen are weak and unimpressive.Good widgets to add include navigation, contact info, eBook, and web page favorites. Adding any of these widgets starts out the same. Here are the brief directions:
- Long-press a Home screen page that has room for a widget.
- Choose Widgets.
- Drag a widget to the Home screen.
- Complete the process. The process is specific for each type of widget suggestion.
Direct Dial widget
Use the Contacts/Direct Dial widget on an Android phone to access those numbers you dial all the time. After adding the widget, choose a contact from the address book. Tap this widget to dial the contact’s default number instantly.Directions widget
The Maps/Directions widget allows you to quickly summon directions to a specific location from wherever you happen to be. After you add the widget to the Home screen, select a traveling method and destination. You can type a contact name, an address, a business name, and so on. Add a shortcut name, which is a brief description to fit under the widget on the Home screen. Tap the SAVE button.Tap the Directions widget to use it. Instantly, the Maps app starts and enters Navigation mode, steering you from wherever you are to the location referenced by the widget.
eBook widget
When you’re mired in the middle of that latest potboiler, put a Google Play Books/Book widget on the Home screen: Choose the Book widget and then select which eBooks in your digital library you want to access. Tap the widget to open the Play Books app and jump right into the book at the spot where you were last reading.Web bookmark widget
If you collect bookmarks in the Chrome app, add their list to the Home screen. Choose the Chrome Bookmarks widget. For a specific web page, however, open the Chrome app and visit the page. Tap the Action Overflow and choose Add to Home Screen, edit the web page name (if necessary), and then tap the Add button. A widget is created to access that specific page.How to take a screen shot on Android
A screen shot, also called a screen cap (for capture), is a picture of your Android’s touchscreen. If you see something interesting on the screen or you just want to take a quick pic of your digital life, you take a screen shot.The stock Android method of shooting the screen is to press and hold both the Volume Down and Power/Lock keys at the same time. Upon success, the touchscreen image reduces in size, you may hear a shutter sound, and the screen shot is saved.
- Screen shots are accessed through the Photos app or from a screen shot notification. In the Photos app, the images appear along with any photos you’ve snapped from the camera.
- Some Samsung galactic gizmos use a Motion command to capture the screen: Hold your hand perpendicular to the touchscreen, like you’re giving it a karate chop. Swipe the edge of your palm over the screen, right-to-left or left-to-right. Upon success, you hear a shutter sound.
- Internally, screen shots are stored in the Pictures/Screenshots folder. They’re created in either the PNG or JPEG graphics file format.


