


Windows 10 Keeps Changing!
Microsoft sends two big updates to Windows 10 every year. (The latest update was released in the first half of 2020. It’s sometimes called the 20H1 update.) Each update contains hundreds of changes; many are simply “under-the-hood” bug fixes, others are subtle changes to the wording in menus, and others add big new features.Even when Windows 10 doesn’t change noticeably, its bundled apps do. Microsoft constantly tweaks its apps such as Mail and Calendar, Photos, Camera, Groove Music, and others. To see a list of changes, open the Microsoft Store app, click the three dots in its upper-right corner, and choose Downloads and Updates from the drop-down menu.
The Microsoft Store subsequently lists all your installed apps, and the last time they’ve been updated behind your back. (Click the Get Updates button at the page’s top to download the app’s latest versions.) Chances are good that you’ll see that many of your apps have been updated within the past week.
In short, Windows 10 changes constantly, and there’s no way for you to stop it. Menus may change their names overnight; the Start menu sometimes sprouts new buttons in new locations. Some apps gain new features or names, and others drop features. Some apps disappear altogether.
Rapid change is the price you pay for Microsoft’s “always up-to-date” vision for Windows 10. Unfortunately, there’s no way to lock it in place and say, “Stop changing!”
I Want to Avoid the Apps!
With the latest Windows 10 update, Microsoft continues its switch from the old-and-weary world of desktop programs to the mobile-friendly land of apps. After a year of updates, apps are more difficult to avoid than ever.Some people love apps. They’re designed for touchscreen tablets, as well as for phones, with limited screen real estate. They lack complicated menus and aim for touch-friendly simplicity. Other people hate apps, preferring to run more powerful programs on their desktop. After all, they’ve been doing it that way with a mouse and keyboard for more than two decades.
If you find Microsoft’s focus on apps to be misguided and annoying, here’s how to avoid them. Follow the tips in these sections to remove apps from the Start menu and your PC, keeping your focus on the desktop.
Pruning apps from the Start menu and your PC
Windows 10 stocks the Start menu’s right edge with app tiles. Windows 8 and 8.1 owners may be accustomed to Microsoft’s new app-loving lifestyle, but apps may be new and unwanted for recent Windows 7 upgraders.Luckily, you can prune those tiles fairly easily. To remove a Start screen tile, right-click it and, when the pop-up menu appears, choose Unpin from Start. Repeat with all the other tiles until they’re gone, gone, gone.
That removes the app tiles from the Start menu. But the apps still remain on the Start menu’s All Apps alphabetical list. And it doesn’t remove the apps from your PC.
To go one step further and uninstall the apps, follow these steps:
- Click the Start button, and choose the Settings icon from the Start menu. The Settings app appears.

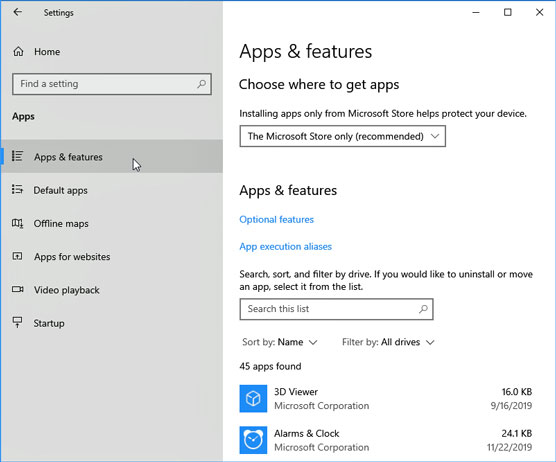
- Click the Settings app’s Apps category (shown in the margin). When the Apps window appears, click the Apps & Features link along the window’s left edge. The Apps & Features window appears, listing your installed apps along its right side, as shown.
- To remove an app, click its name, and click the Uninstall button that appears below its name. Then click Uninstall again when Windows asks whether you’re sure you want to delete the app. Windows deletes the app from your computer, removing it from the Start menu along the way. Not all apps can be deleted, unfortunately. If the Uninstall button is grayed out, that app can’t be uninstalled.
 To remove an app, click its name and click the Uninstall button.
You can reinstall a mistakenly deleted app by visiting the Microsoft Store, searching for the app in the Store’s Search box, and reinstalling it. (It’s also listed when you click the “three dots” icon near the upper-right corner of the Microsoft Store and choose My Library from the drop-down menu.)
Telling desktop programs, not apps, to open your files
Some people don’t mind apps, as long as the apps don’t intrude on chores normally handled by their traditional desktop programs. But in Windows 10, apps often want to open your desktop files. Clicking a music file from the desktop’s File Explorer, for example, fetches the Groove Music app rather than Media Player, which has held the reins for years.To return an app’s duties to your favored desktop programs, follow these steps:
- Click the Start button, and click the Settings icon from the Start menu. The Settings app appears.
- When the Settings app opens, click the Apps category (shown in the margin) and then click the Defaults Apps option from the left pane. The Choose Default Apps screen appears.
- For each type of file, choose the program that should open it. In the Music Player section, for example, click the currently listed program. When the Choose an App screen appears, showing apps and programs capable of playing music, choose the desktop player you want to handle the job.
I Want to Avoid the Desktop!
A touchscreen tablet entices you to stick with apps for their finger-sized tiles and easy-to-touch icons. Smartphone owners have enjoyed the app lifestyle for years. Easily downloadable apps offer help for nearly every niche, from birdwatching to car repair.A tablet’s lightweight yet large screen makes it easy to read digital books, newspapers, and magazines. You can browse your favorite websites while away from your desk. The newly beefed-up Settings app in Windows 10 makes it easier than ever to avoid the desktop.
But staying nestled within the world of apps can be more difficult than it appears. No matter how hard you try to avoid the desktop and its pin-sized controls, you’ll find yourself dragged there when you do any of the following things from the Start menu:
- Manage gadgetry: The Devices category of the Settings app lists all the devices connected to your computer, from printers to mice to portable hard drives. But it shows only their names; to change the settings of many of those devices requires a trip to the desktop’s Control Panel and its Hardware and Sound category.
- Run desktop programs: If you install or run any older programs designed for the desktop, you’re back in the old-school land of the desktop and its mouse-central design.
- Manage files: You can access your photos and music files from the Photos and Music apps, respectively. But if you need to visit your OneDrive files or do more advanced tasks — sorting files by creation date, for example — it’s time to visit the desktop’s File Explorer.
If you constantly return to the desktop for certain tasks, consider visiting the Microsoft Store to search for an app that can handle the job. Microsoft stocks the store with more apps every day, and as the apps fill more niches, you’ll find yourself relying on the desktop less often.
Until the apps catch up with the desktop, tablet owners might want to pop a portable Bluetooth mouse into their gadget bags for those inevitable trips to the desktop and its tiny buttons and menus.When running Windows on a tablet, make sure you’re in Tablet mode: Slide your finger inward from the screen’s right edge. When the Notifications pane appears, make sure the Tablet mode button is highlighted. If it’s not highlighted, tap it to switch back to Tablet mode.
I Don’t Want a Microsoft Account
Microsoft wants everybody to sign in with a Microsoft account. To Microsoft’s credit, Windows 10 is much easier to use with a Microsoft account. Many services require one. Without a Microsoft account, you miss out on the benefits of OneDrive’s online storage space. Your child even needs to sign in with a Microsoft account if you want to track his computer usage.But if you don’t want a Microsoft account, you don’t need one. Just sign up for a Local account instead. However, Local account holders limit themselves to the “old school” world of life on the desktop. For many people, the desktop works just fine.
A Local account lets you use your desktop and desktop programs, just as they’ve worked on Windows 7 and earlier Windows versions.
Windows Makes Me Sign in All the Time
The power-conscious Windows normally blanks your screen when you haven’t touched a key for a few minutes. And, when you belatedly press a key to bring the screen back to life, you’re faced with the lock screen.To move past the lock screen, you need to type your password to sign back in to your account.
Some people prefer that extra level of security. If the lock screen kicks in while you’re spending too much time at the water cooler, you’re protected: Nobody can walk over and snoop through your email.
Other people don’t need that extra security, and they simply want to return to work quickly. Here’s how to accommodate both camps:
To keep Windows from asking for a password whenever it wakes back up, follow these steps:
![]()
- Click the Start button, and click the Settings icon. The Settings app appears.
- Click the Accounts category from the Settings app, and click Sign-in Options from the left panel.
- Click the Require Sign-In drop-down menu, and change it to Never.
Unfortunately, it also leaves you with a less-secure Windows. Anybody who walks by your computer will have access to all your files.
To return to the safer-but-less-friendly Windows, follow these same steps, but in Step 3, select the When PC Wakes Up from Sleep option. Your changes take place immediately.
If you hate signing in, you’re a perfect candidate for Windows Hello. Instead of having to type a name and password, you simply slide your finger over a fingerprint reader. Windows immediately greets you and lets you in.
The Taskbar Keeps Disappearing
The taskbar is a handy Windows feature that usually squats along the bottom of your desktop. Sometimes, unfortunately, it up and wanders off into the woods. Here are a few ways to track it down and bring it home.If your taskbar suddenly clings to the side of the screen — or even the ceiling — try dragging it back in place: Instead of dragging an edge, drag the entire taskbar from its middle. As your mouse pointer reaches your desktop’s bottom edge, the taskbar suddenly snaps back into place. Let go of the mouse, and you’ve recaptured it.
Follow these tips to prevent your taskbar from wandering:
- To keep the taskbar locked in place so that it won’t float away, right-click a blank part of the taskbar and select Lock the Taskbar. Remember, though, that before you can make any future changes to the taskbar, you must first unlock it.
- If your taskbar drops from sight whenever the mouse pointer doesn’t hover nearby, turn off the taskbar’s Auto Hide feature: Right-click a blank part of the taskbar, and choose Taskbar Settings from the pop-up menu. When the Taskbar’s settings page appears, turn off the toggle switch called Automatically Hide the Taskbar in Desktop Mode. (Another toggle keeps the taskbar from hiding in Tablet mode as well.)
I Can’t Line Up Two Windows on the Screen
With its arsenal of dragging-and-dropping tools, Windows simplifies grabbing information from one window and copying it to another. You can drag an address from an address book and drop it atop a letter in your word processor, for example.However, the hardest part of dragging and dropping comes when you’re lining up two windows on the desktop, side by side, to swap information between them.
Windows offers a simple way to align windows for easy dragging and dropping:
- Drag one window against a left, right, top, or bottom edge. When your mouse pointer touches the screen’s edge, the window reshapes itself to fill half the screen.
Windows 10 also lets you drag windows to corners, which is your way of telling the windows to reshape themselves to fill one-quarter of the screen. By dragging a window into each corner, you can align four windows neatly on the screen.
- Drag the other window against the opposing edge. When your mouse pointer reaches the other edge, the two windows are aligned side by side.
Try dragging windows to each position on the desktop, including the corners, so you’ll be prepared when you need to view several files onscreen simultaneously.
It Won’t Let Me Do Something Unless I’m an Administrator!
Windows gets really picky about who gets to do what on your computer. The computer’s owner gets the Administrator account. And the administrator usually gives everybody else a Standard account. What does that mean? Well, only the administrator can do the following things on the computer:- Install programs.
- Create or change accounts for other people.
- Start an Internet connection.
- Connect some gadgetry.
- Perform actions affecting other people on the PC.
- Run previously installed programs.
- Change their account’s picture and password.
I Don’t Know What Version of Windows I Have
Windows 10 comes in several versions. Not sure exactly what version of Windows lives on your computer? Windows doesn’t really shout it out, but a little probing forces it to reveal that information. Specifically, you need to look at the System window.Follow this step to see what version of Windows is installed:
- Right-click the Start button, and choose System from the pop-up menu. The Settings app opens to the System category’s About section. Look in the right pane’s Windows Specifications section to see what version of Windows lives on your PC. Chances are good that it’s Windows 10 Home or Pro version.
- From the Desktop, click the Start button.
- Right-click the menu item named either Computer or My Computer, and choose Properties from the pop-up menu. When the System Properties window appears, read the information to discover your version of Windows and whether it’s 32-or 64-bit.
My Print Screen Key Doesn’t Work
Contrary to its name, the Print Screen key doesn’t shuttle a picture of your screen to your printer. Instead, the Print Screen key (usually labeled PrintScreen, PrtScr, or PrtSc) sends the screen’s picture to the Windows memory.From there, you can paste it into a graphics program, such as Paint, letting the graphics program send the picture to the printer.
If you want to capture an image of the entire screen and quickly save it as a file, press Windows+PrtScr.
That shortcut tells Windows to snap a picture of your current screen and save it as a file. Windows saves those pictures in your computer’s Pictures folder within a folder called Screenshots. Screenshot files are in the PNG format, a favorite with many graphics programs. (The screenshot doesn’t include your mouse pointer.) Subsequent screenshots include a number after the name, as in Screenshot (2) and Screenshot (3).
When saved, your screenshot can head for your printer when you right-click the file and choose Print from the pop-up menu.
Some tablets can also take and save a screenshot if you hold down the volume down toggle and press the tablet’s built-in Windows key. Other tablets require different key combinations, so check your tablet’s manual to see how it takes screenshots.
When something on your computer screen looks confusing or broken, take a screenshot. Sending the screenshot file to a tech support person lets them see exactly what you’re seeing, which increases his chance of fixing it.


